POS SRO is the counter intake flow for service repair orders. Use it when a customer arrives with one or more devices to drop off: capture the equipment, look up warranty and history, take a deposit, and print equipment tags before the repair moves to your bench.
When to Use POS SRO
POS SRO is for counter-initiated intake — a customer is in front of you handing over a device. For larger inbound batches (a bulk shipment, mail-in repairs, or scanning a stack of devices into receiving) use Pending SROs V2, which is optimised for barcode-driven receiving. Once an SRO exists, ongoing work happens in Service Repair Orders.
The SRO List
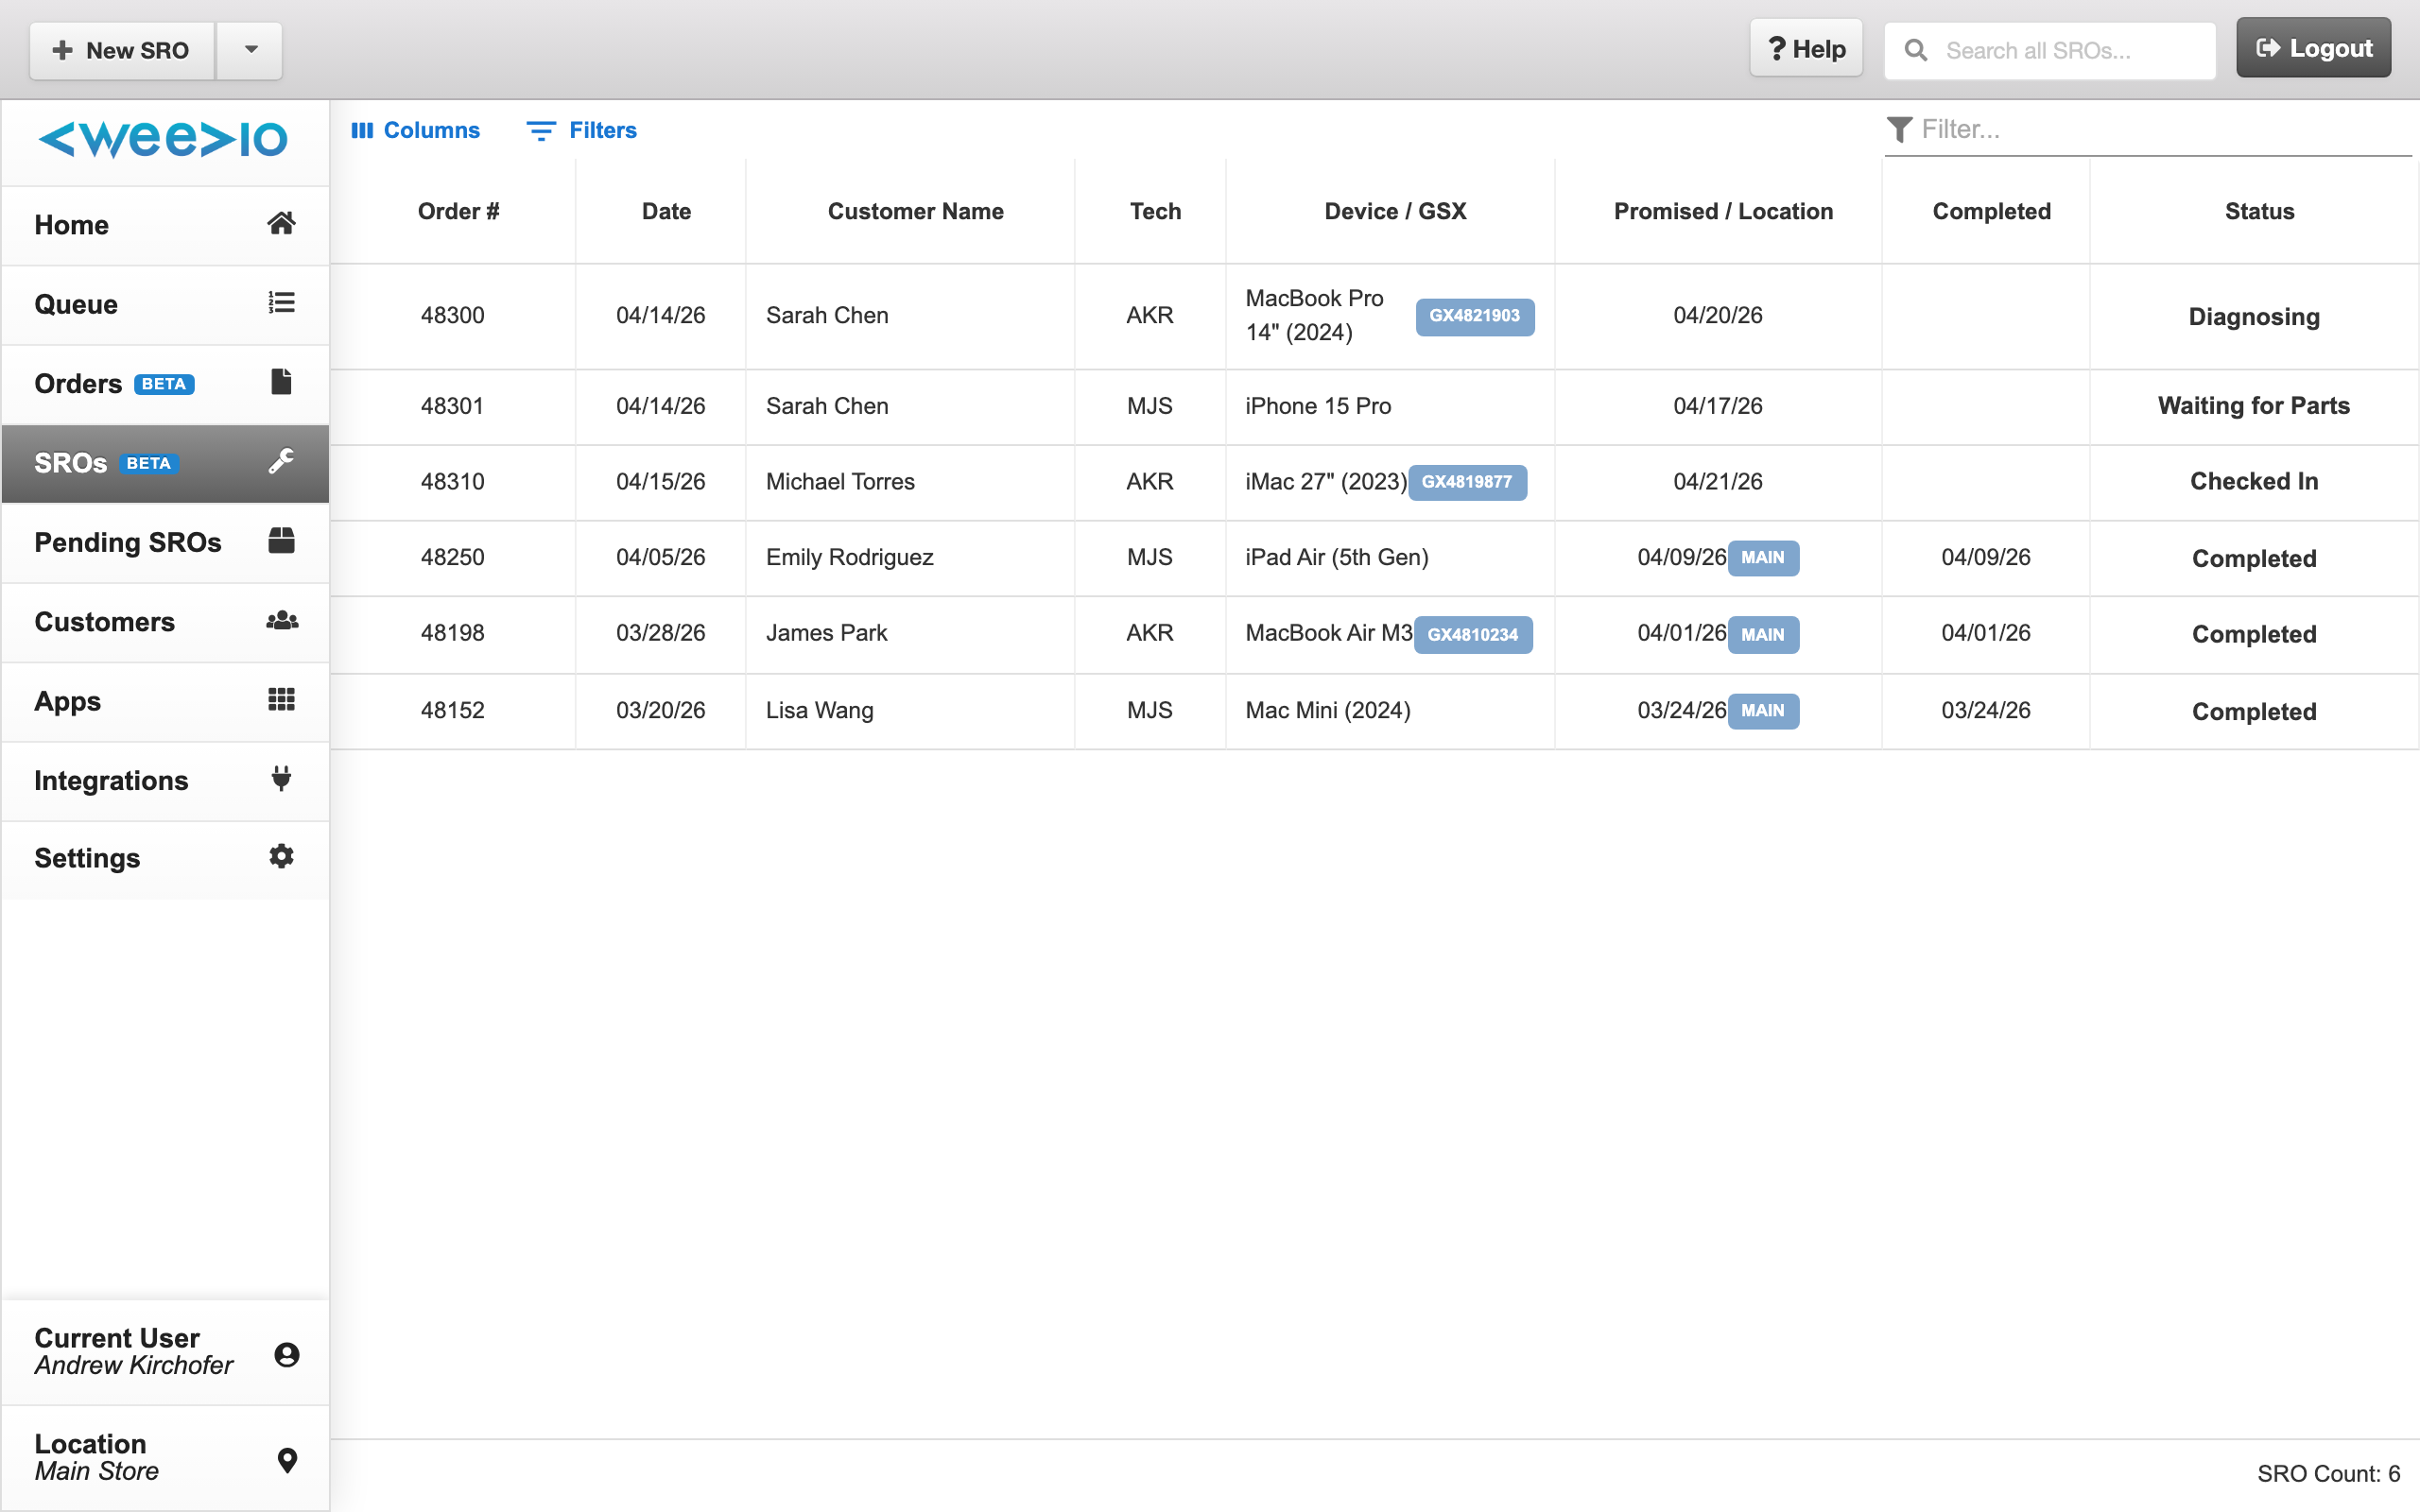
Opening Point of Sale → SRO shows the SRO list — every SRO created at your location, filterable by status and date.
Columns include:
| Column | What it shows |
|---|---|
| SRO # | The unique repair number |
| Date | When the SRO was opened |
| Customer Name | Customer attached to the SRO |
| Repaired By | The tech assigned (blank until assigned) |
| Device / GSX | Device description and the GSX confirmation code if Apple-linked |
| Promised / Location | Promised date and the location finishing the repair |
| Completed | Completion date once closed |
| Status | Current status tag (see Status Tags below) |
Click any row to open the SRO in detail view.
Creating a Counter SRO
Start a new SRO
From the SRO list, click New SRO. The detail view opens with the customer field empty.
Attach the customer
The equipment table is locked until you select a customer. Search by name, phone, email, or account number from the customer chooser at the top of the screen. The customer's saved contact info and address load automatically.
Add equipment
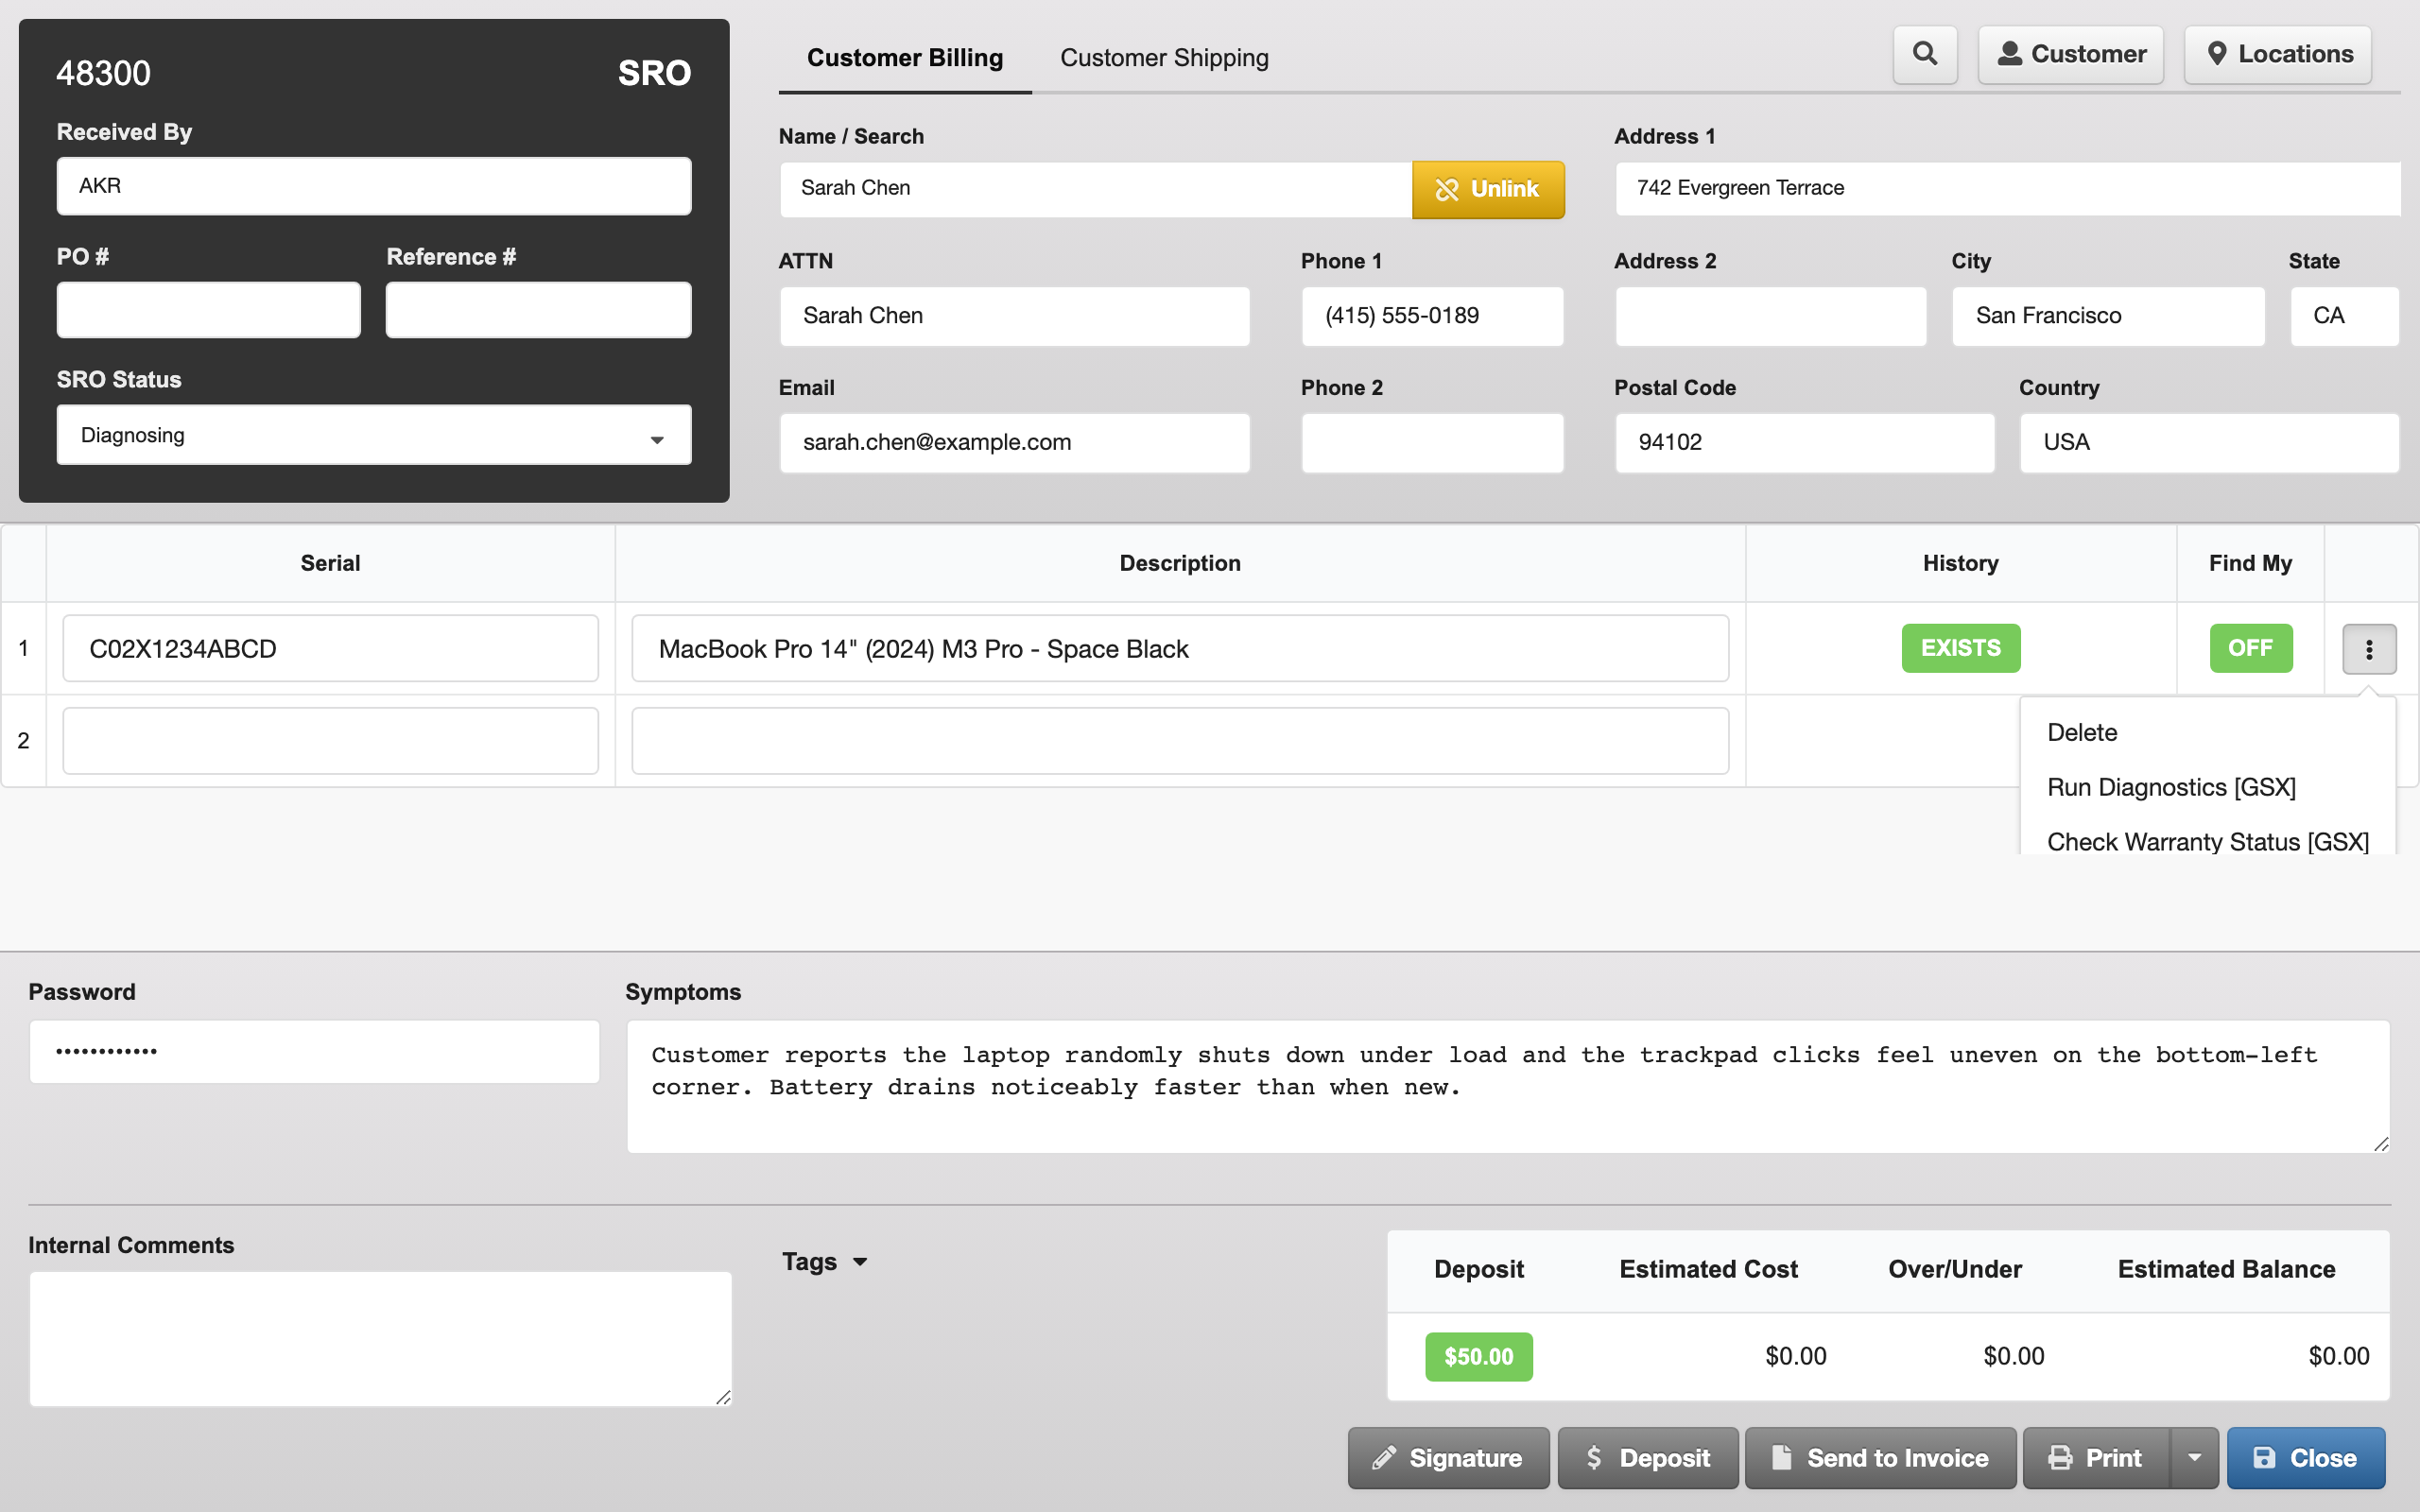
Use the equipment table to enter each device the customer is dropping off. For each row, fill in the Serial number and a Description. As soon as you enter a serial, Weevio Cloud looks up the device's prior repair history and Find My status (for Apple devices).
Run GSX checks (Apple devices)
If your store is configured for GSX, use the row's action menu to Check Warranty Status or Run Diagnostics. Results post back to the row label and a detailed report opens in a modal. See the GSX Integration docs for setup.
Capture symptoms and password
In the repair details section, type the customer's reported symptoms. The equipment Password field is masked once you click out of it — type the password as the customer dictates it, then click out to lock it.
Take a deposit
Click Deposit to record what the customer pays at intake. The estimated balance updates as you adjust the deposit and the estimated cost.
Get a signature
Click Signature to capture the customer's signature on screen — typically agreeing to your repair terms and deposit policy.
Print equipment tags and close
Use the print menu to print Equipment Tags (one tag per device with the serial, SRO number, and any priority/hot-bench marking) plus the customer's SRO and deposit receipt.
Equipment Table
Each row in the equipment table captures one device. Beyond the basics, two automatic labels appear after you enter a serial:
- History — shows whether this device has been serviced before (
EXISTS) or is new to your records (EMPTY).EXISTSis a useful flag if the same device is coming back for follow-up. - Find My — for Apple devices, shows whether Find My is still active on the device (red, with the activation code) or has been turned off (green). Apple won't approve service on a device with Find My still on, so this label tells you whether to ask the customer to disable it before you check the device in.
Per-row actions
The action menu (three dots at the end of the row) offers:
- Run Diagnostics [GSX] — runs Apple GSX diagnostics on the serial. Results appear in a popup and on the row label.
- Check Warranty Status [GSX] — pulls the current Apple warranty status for the serial.
- View Results — opens the most recent GSX diagnostic report for the row.
- Delete — remove the row.
GSX actions only appear if your location is configured with valid GSX credentials. See GSX Setup & Authentication for the per-location setup.
Repair Details
The section below the equipment table holds repair-level fields:
- Symptoms Reported — free-text description of what the customer says is wrong. Customers often see this on receipts and approval forms, so be specific.
- Password — the device unlock code or password the customer provides. The field masks the value once you click out, so it isn't visible to anyone walking past the screen.
- Internal Comments — staff-only notes about the repair. Customers never see these.
Status Tags
The Tags accordion at the bottom of the SRO turns on or off the status flags that drive the rest of the workflow:
| Tag | Meaning |
|---|---|
| Service In-House | The device is on-site and being worked on |
| Billed | The customer has been invoiced |
| Canceled | The repair was cancelled |
| Under Dispute | Customer or warranty dispute — needs attention |
| Hot Bench | Priority repair, expedited |
| Ready for Pickup | Repair is done; awaiting customer collection |
| Commission Paid | Tech commission has been settled |
Tags drive the list filters in Service Repair Orders and appear on equipment tags when relevant — for example, a Hot Bench tag prints >> PRIORITY / HOT BENCH << on the device tag so it's visible from across the bench.
Totals and Deposit
The totals row above the buttons shows four numbers:
- Deposit — amount the customer has paid in at intake
- Estimated Cost — your estimate of the final repair cost (set this once you've diagnosed)
- Over / Under — difference between deposit and estimated cost; positive means the customer has paid more than the estimate
- Estimated Balance — what the customer owes (or is owed) when the repair completes
Send to Invoice:
When the repair is finished, click Send to Invoice to roll the SRO into a POS invoice. The deposit you took at intake carries over as a payment on the invoice. If the SRO already has an invoice, the button jumps to the existing invoice instead.
Printing
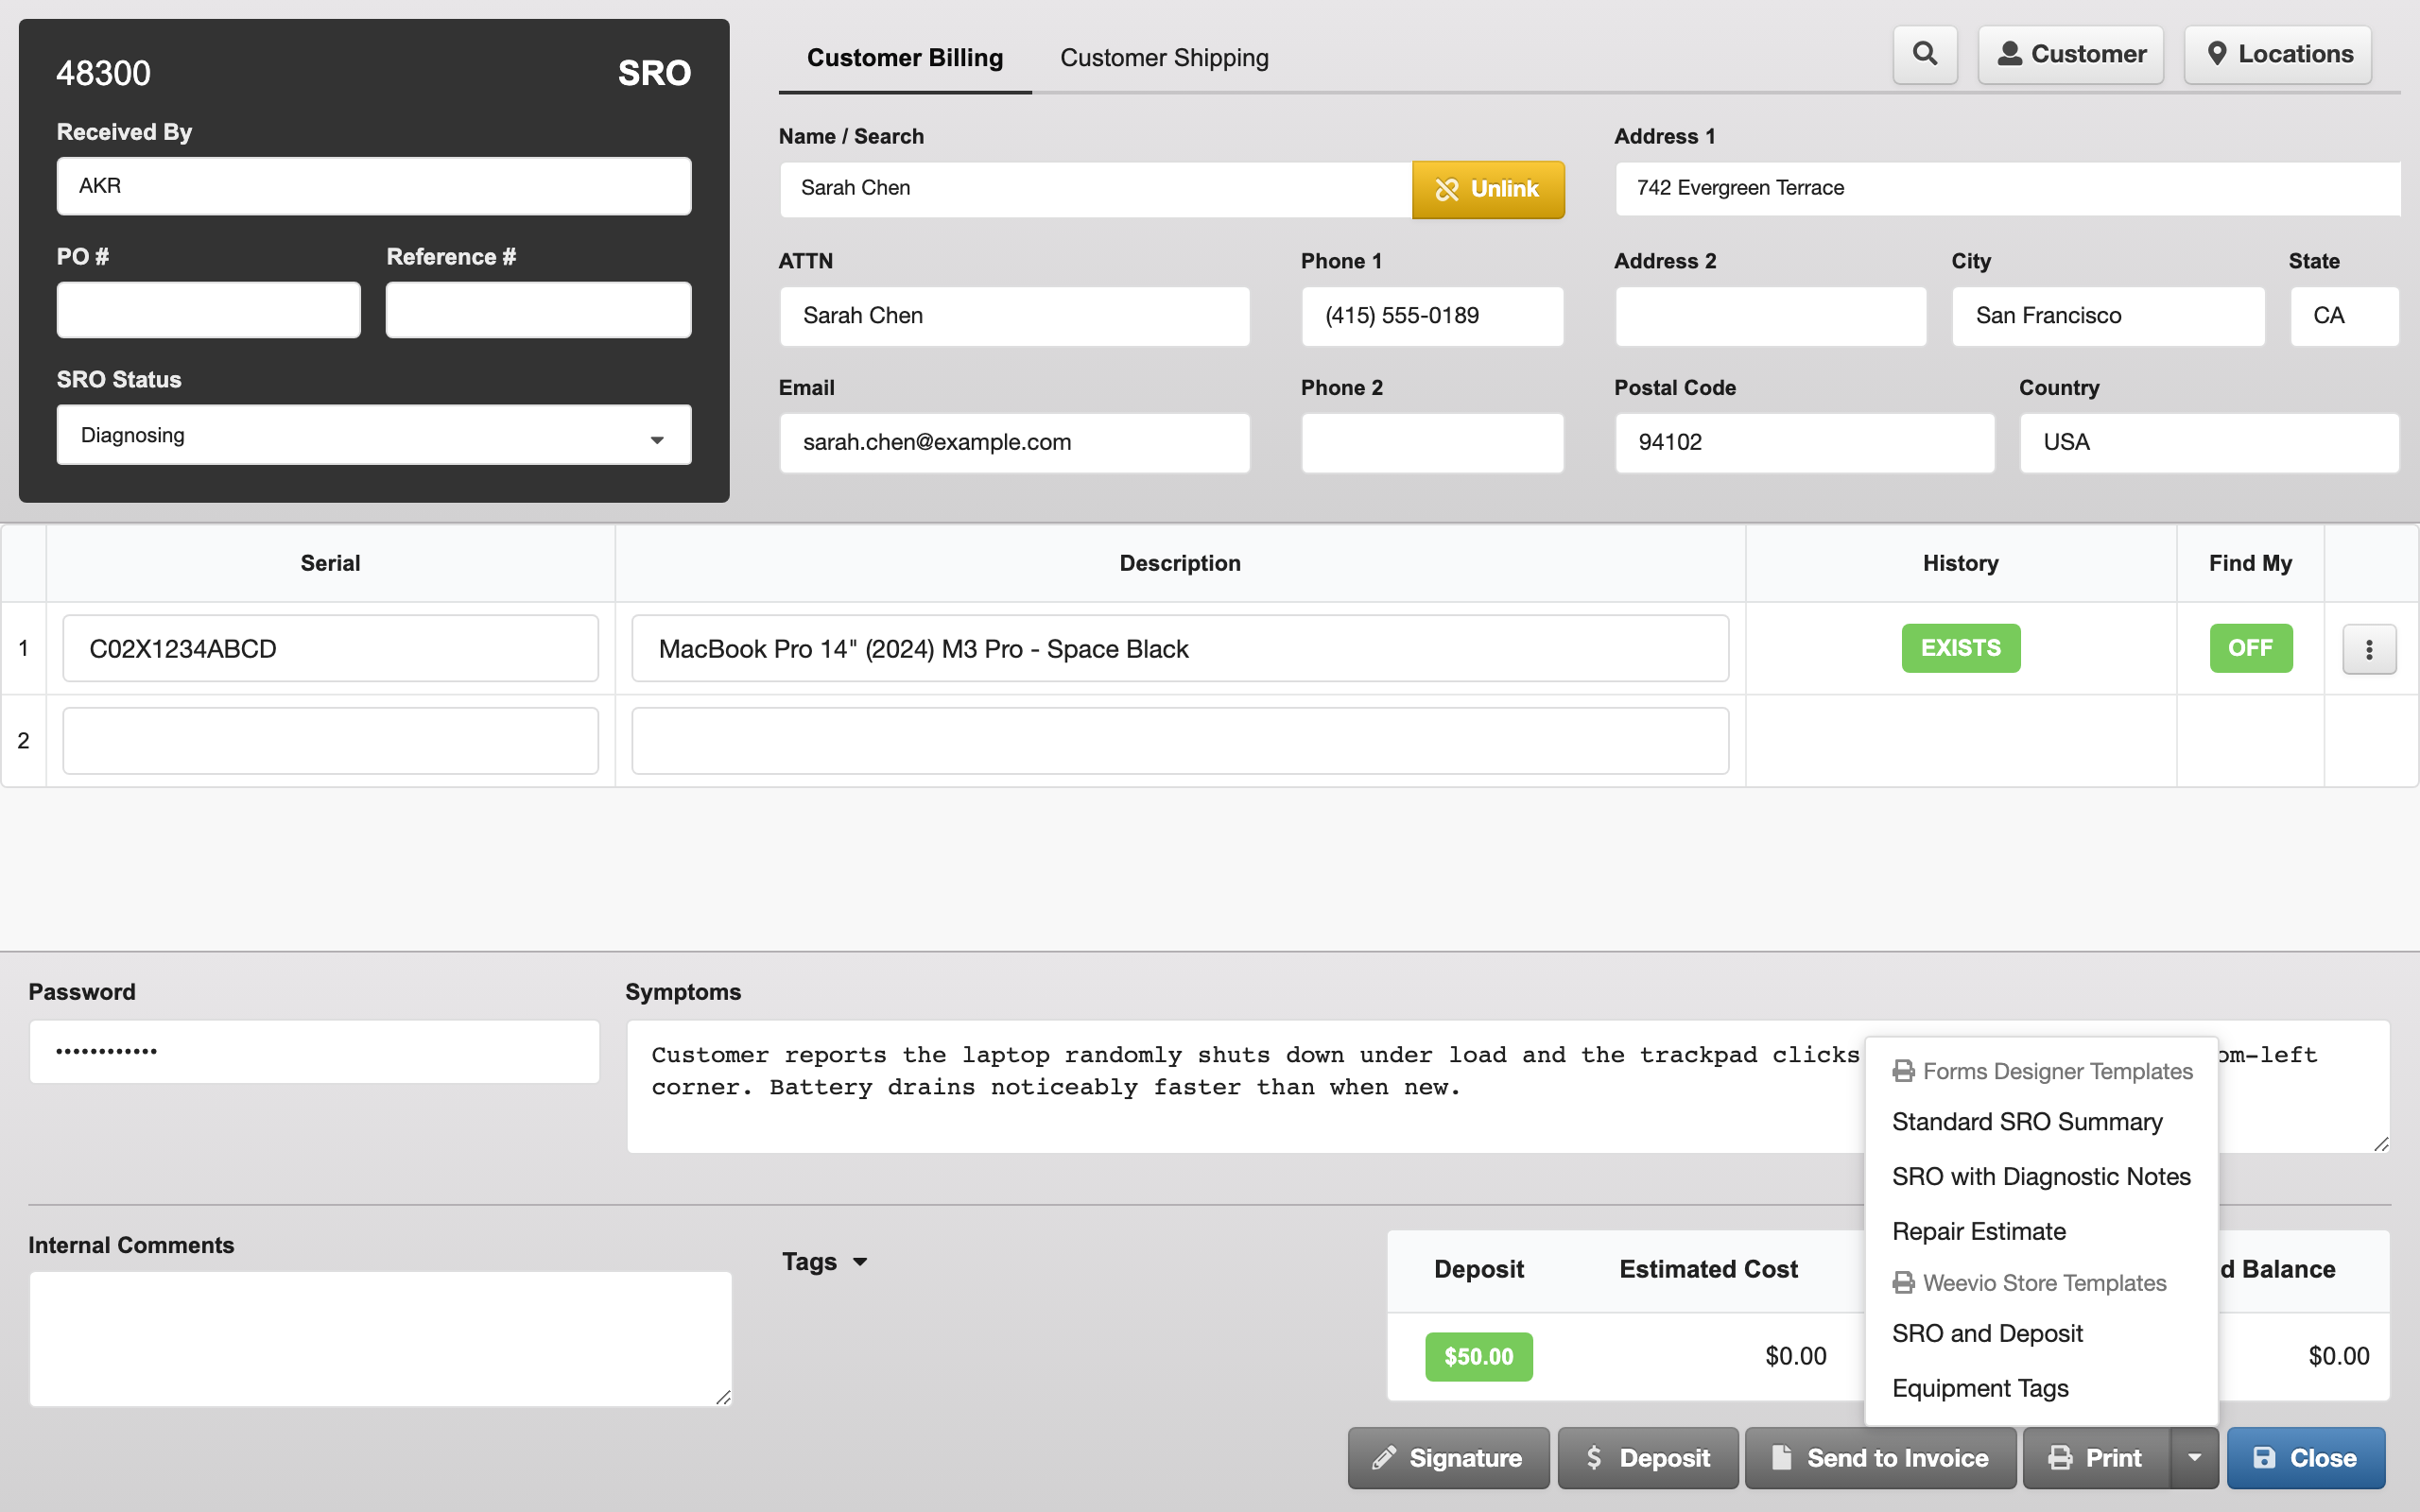
The print menu on the bottom toolbar offers:
- Default template — your tenant's standard SRO summary
- Forms Designer templates — custom templates built by your admin in PIMS Forms Designer
- SRO and Deposit — combined SRO receipt with the deposit transaction
- Equipment Tags — one tag per device. Tags are sized for thermal label printers and show the serial, SRO number, customer, and any Hot Bench / Priority flag.
See Equipment Tag Printing for thermal printer setup and layout notes.
Tips
- Search before you scan. If the device has been in before, the
History EXISTSlabel gives you its prior repair record — use it for context before quoting. - Resolve Find My before the device leaves the counter. A red Find My label means Apple will reject the device at GSX. Ask the customer to remove the device from their Apple ID while they're still at the counter.
- Take the deposit before printing tags. Deposit-first keeps payment tied to the customer at intake and avoids walk-aways.
Related
- POS Order — counter sales (often combined with a deposit)
- Service Repair Orders — full SRO lifecycle after intake
- Pending SROs V2 — barcode receiving for bulk intake
- GSX Integration — Apple warranty and diagnostic setup
- Equipment Tag Printing — equipment tag layout and printer setup
Need Help?
For assistance, please send a message to our Support page.