The User Management page lets tenant administrators manage the staff accounts that can sign in to Weevio Cloud. From here, Admins can add new users, change names and phone numbers, set permission levels, manage per-user PIMS credentials, reset passwords, and remove users who no longer need access.
Note:
User Management covers your internal Weevio Cloud users — the people at your business who log in to PIMS Client, Weevio Store, and related staff tools. To manage which of your customers can access your Customer Portal, see Users & Account Management.
Who Can Access User Management
Only users with the Admin permission level can view the full user list and add, edit, or delete other users. When a user with the Regular permission level navigates to User Management, they are automatically redirected to their own profile — they can still update their personal information, password, and PIMS credentials, but cannot see or manage other users.
You can find User Management in the PIMS Client at Settings → User Management in the left sidebar.
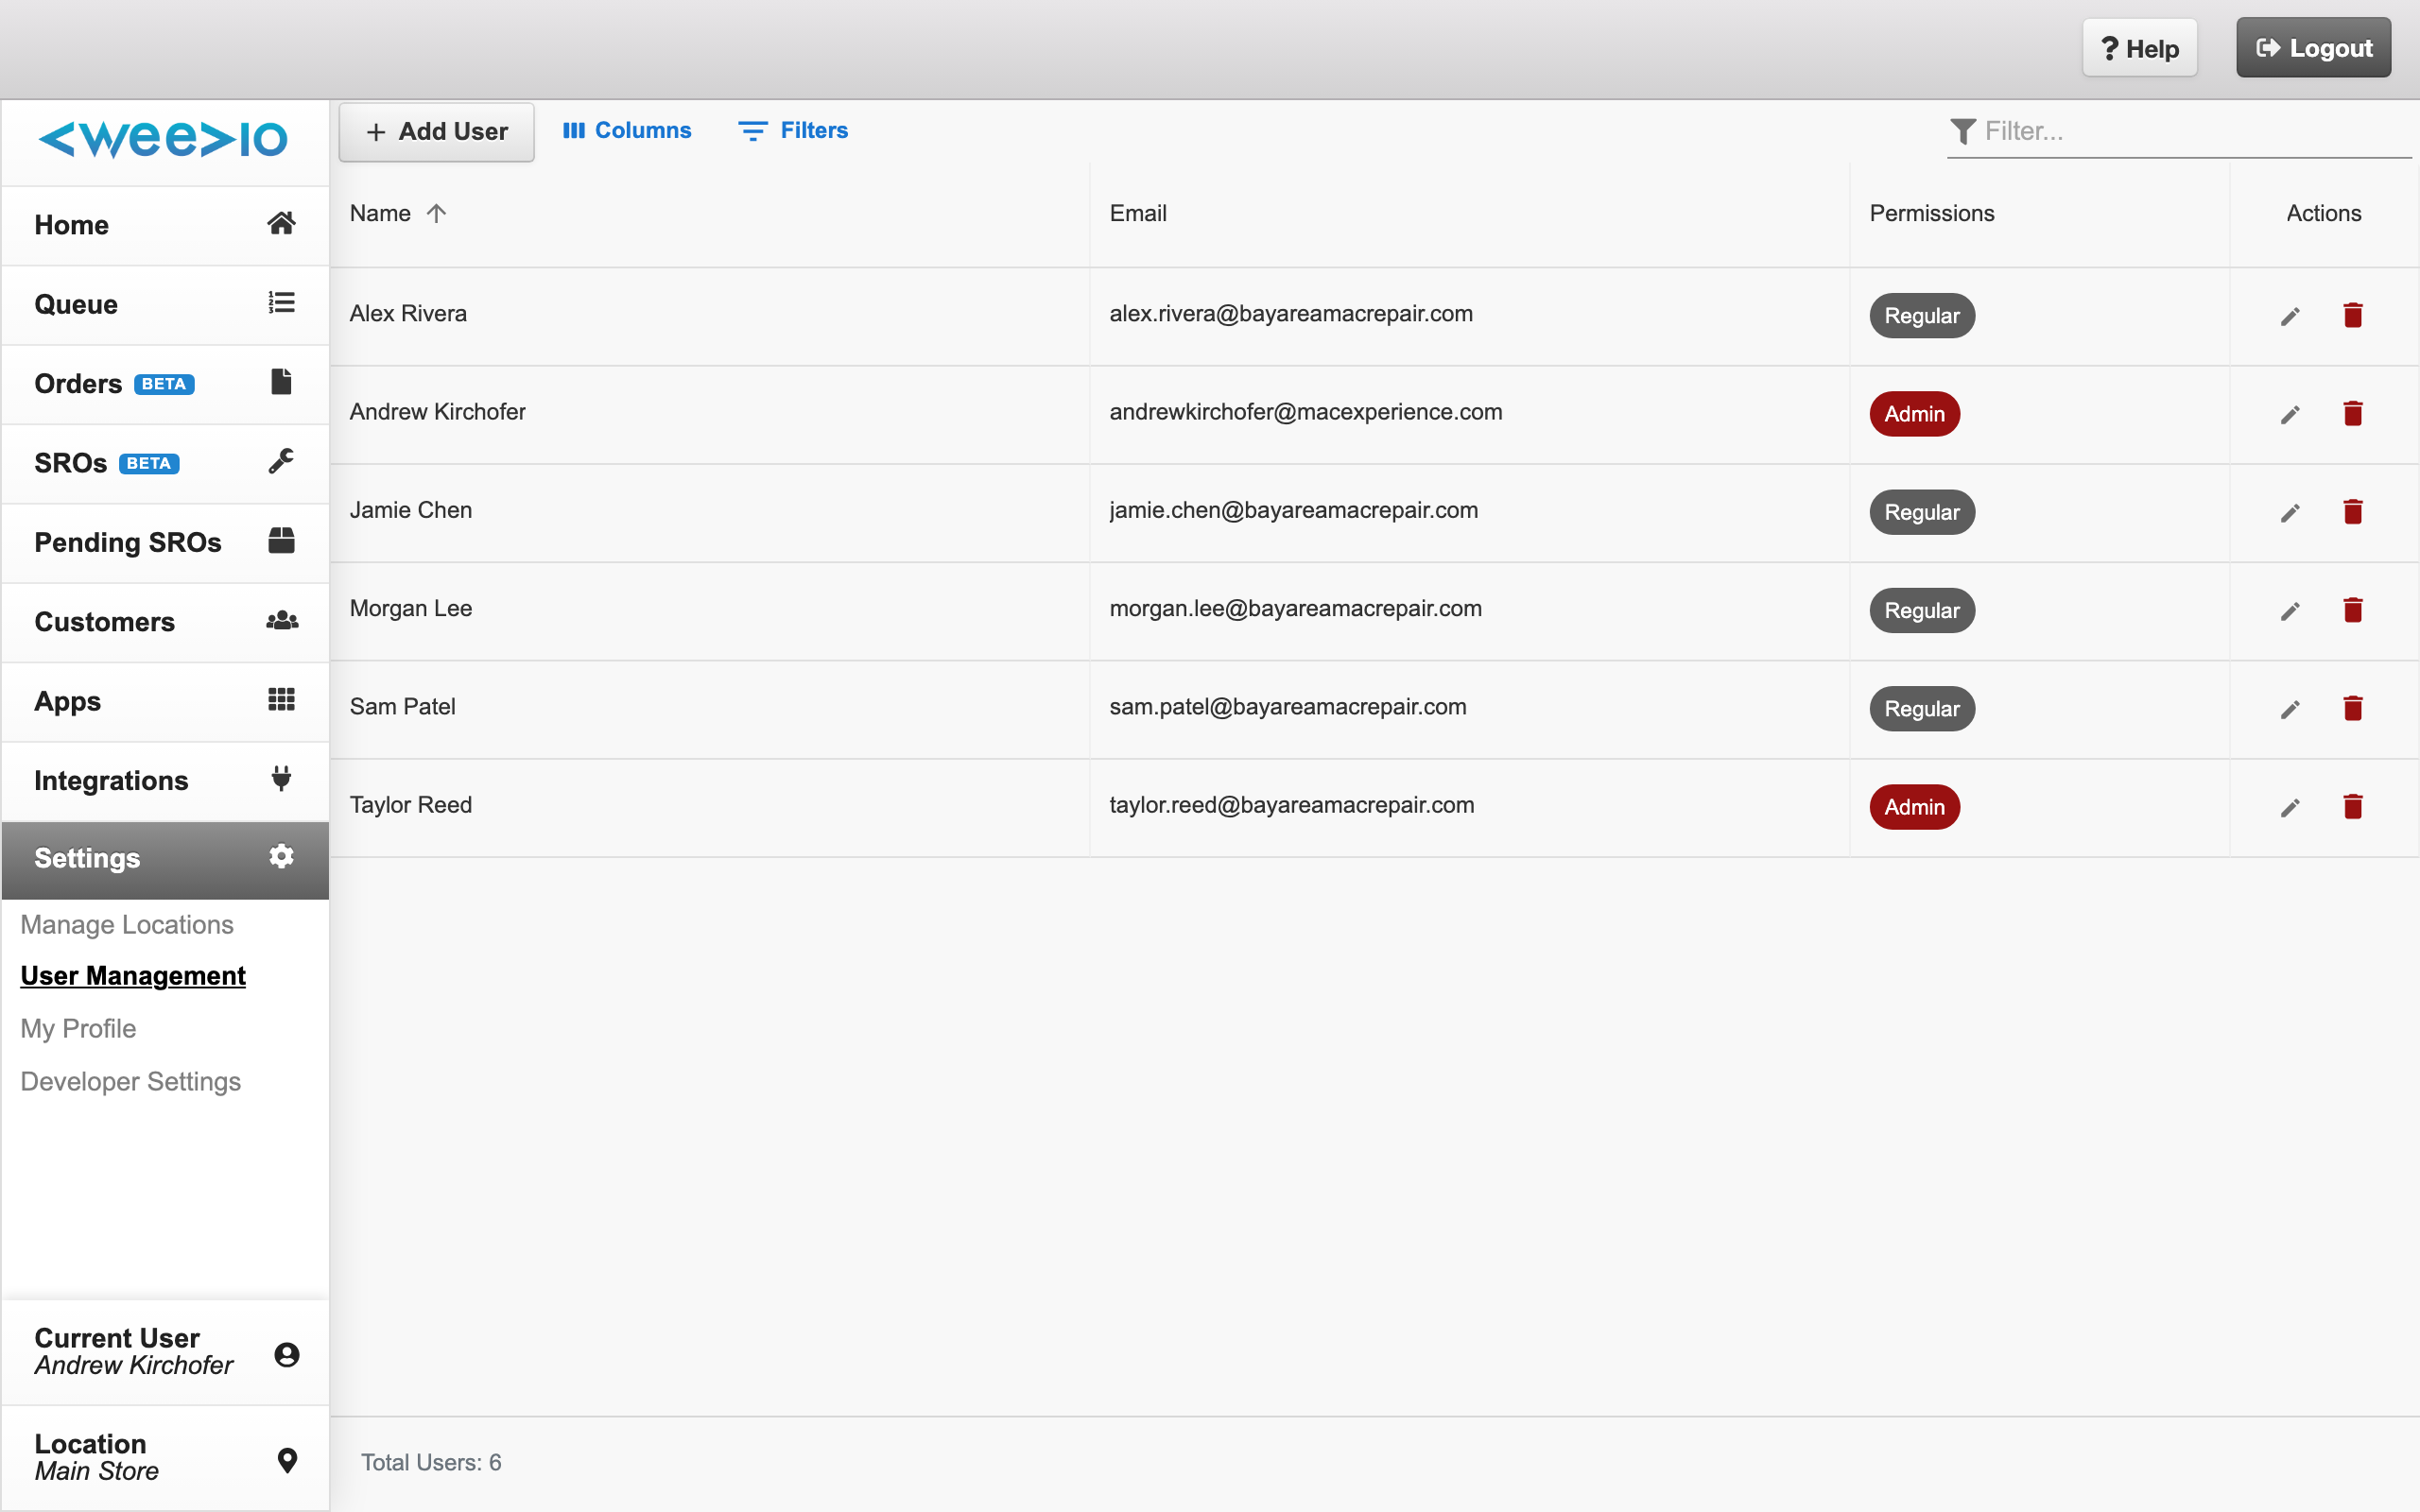
The Users Table
The User Management page shows every user in your tenant in a data grid. Admins can sort, filter, and search the table, and the footer displays the Total Users count that reflects any active filter.
The table includes the following columns:
| Column | Description |
|---|---|
| Name | The user's first and last name. Sorted alphabetically by default. |
| The email address the user signs in with. Email cannot be changed after the account is created. | |
| Permissions | The user's permission level, shown as a colored chip — Admin (red) or Regular (gray). |
| Actions | Edit (pencil) and Delete (trash) icons for each row. |
Clicking any row — or the pencil icon — opens that user's profile. The Add User button appears in the toolbar above the grid and is visible to Admins only.

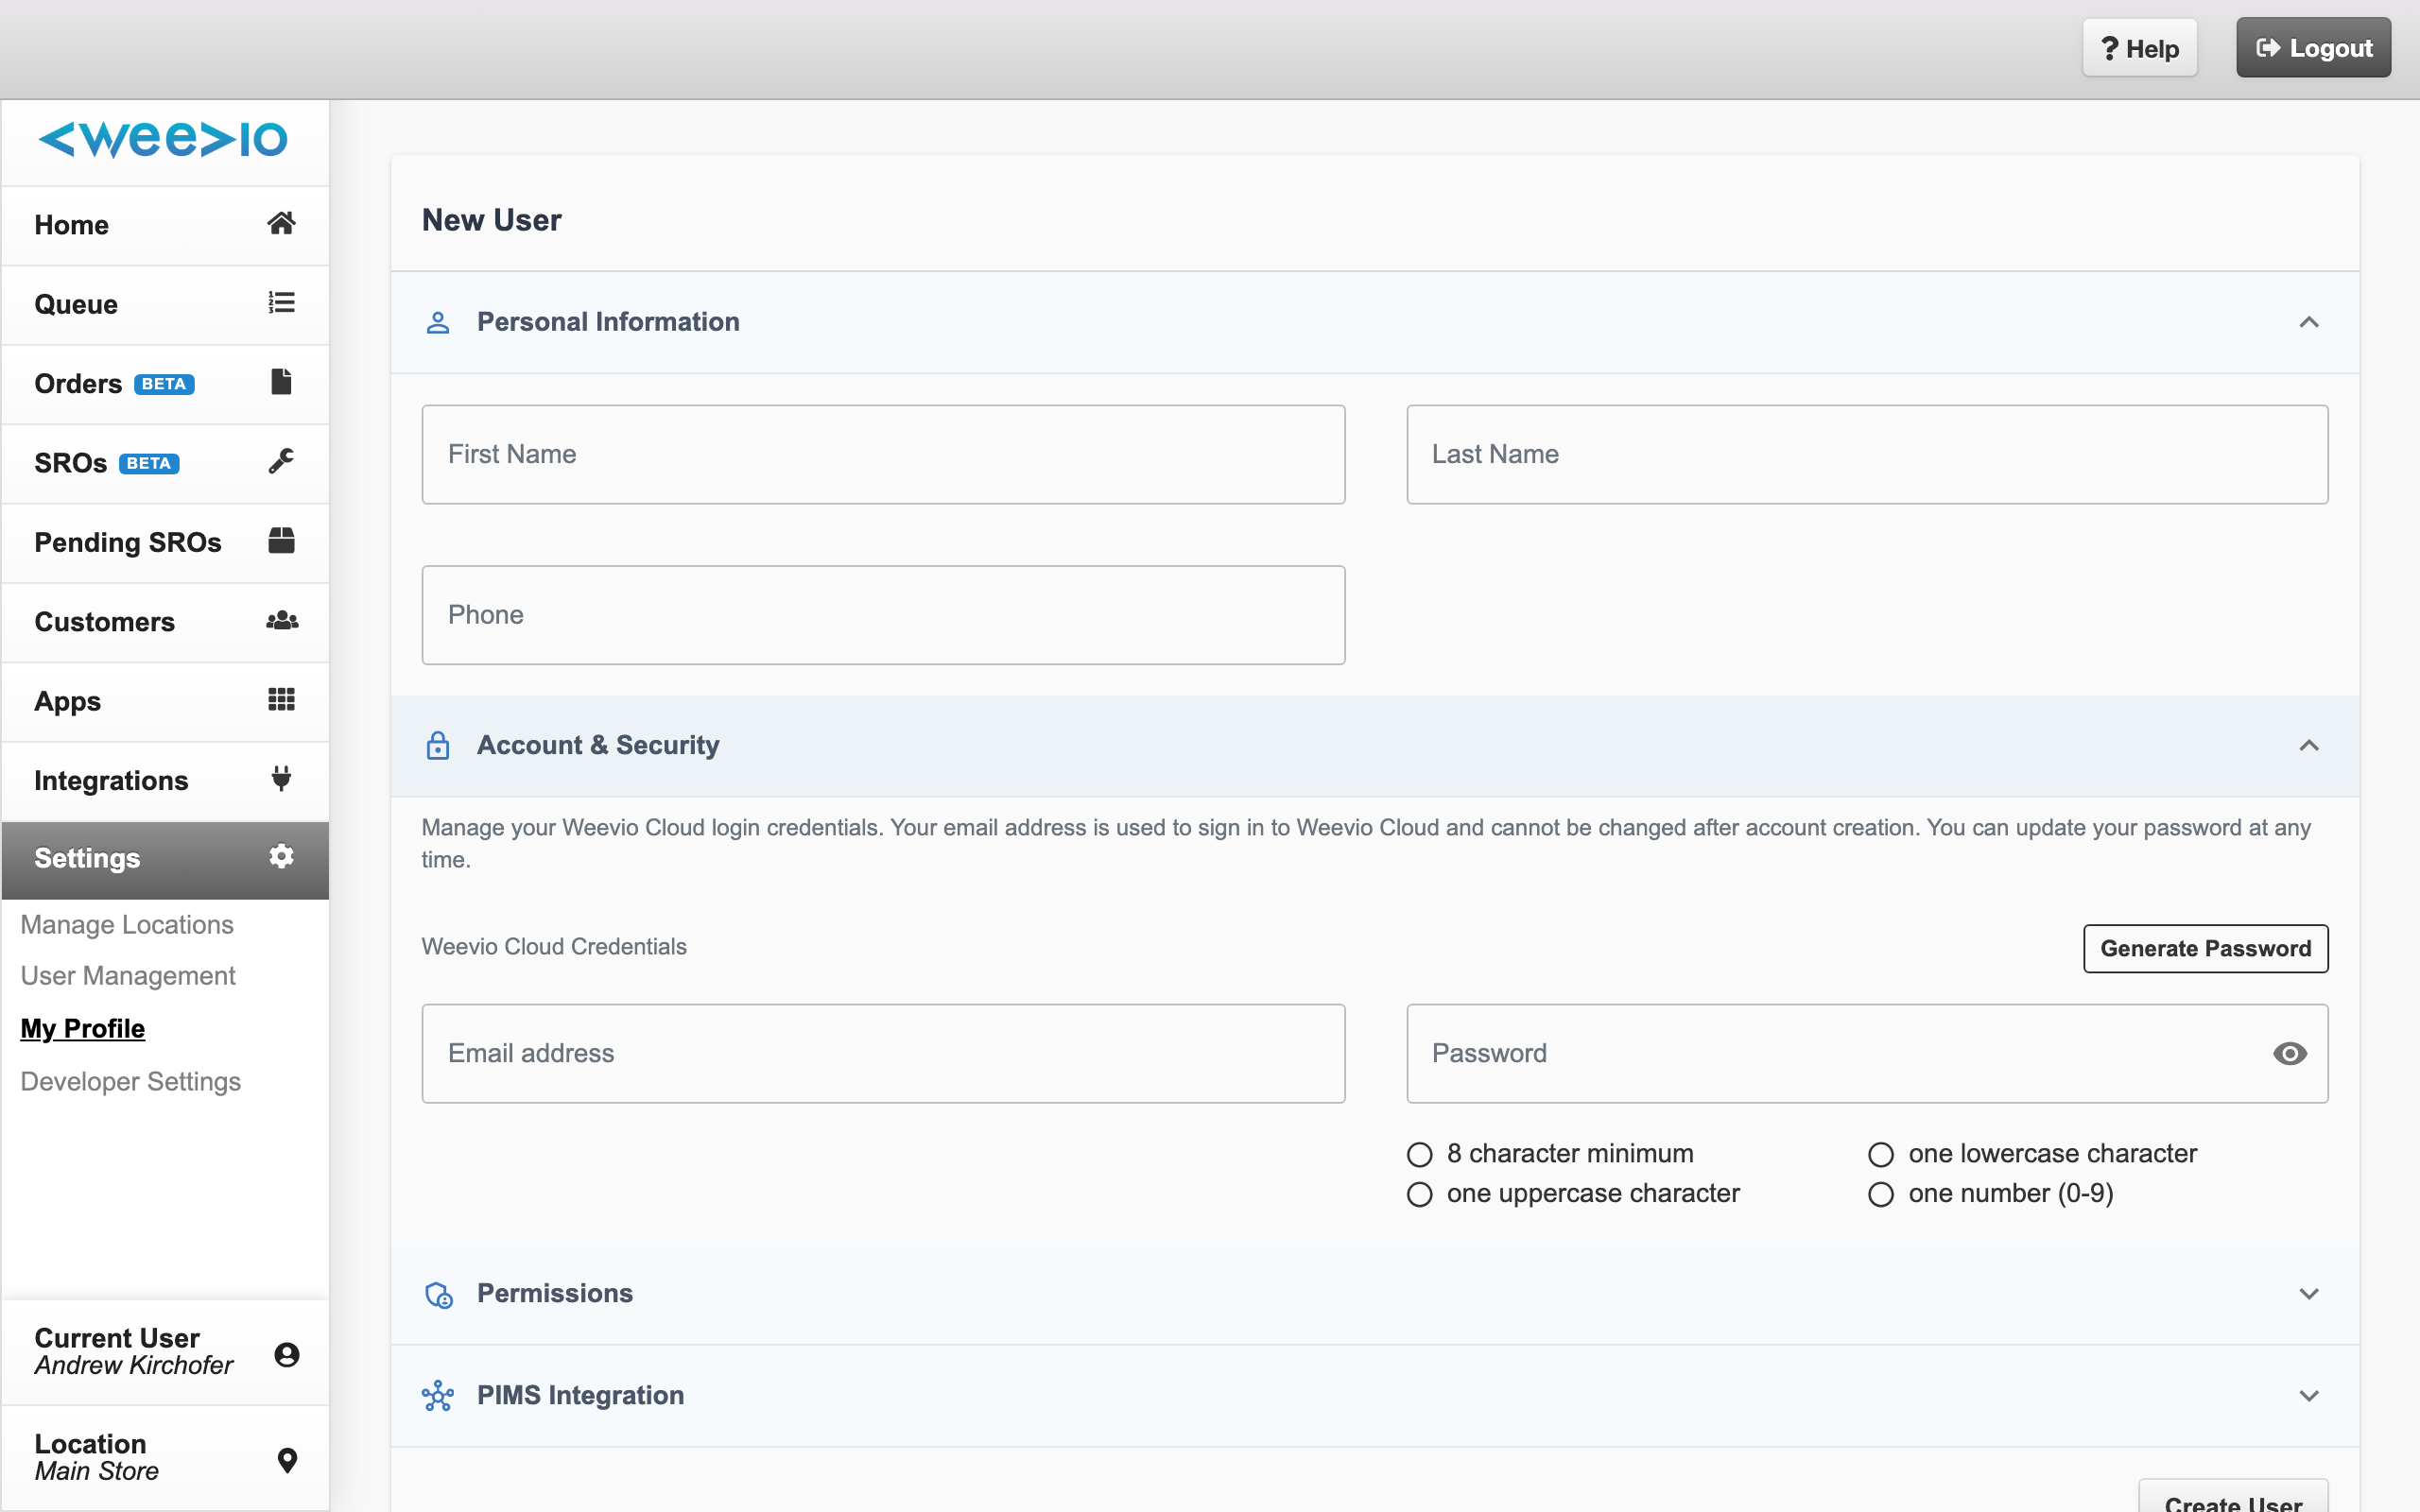
Adding a New User
Open the user profile in create mode
Click the Add User button (with the + icon) in the toolbar above the users grid. A blank User Profile page opens with a "New User" header.
Fill in Personal Information
In the Personal Information section, enter the user's:
- First Name
- Last Name
- Phone (optional)
Set the email and password
Expand the Account & Security section and enter:
- Email address — used to sign in to Weevio Cloud. Choose carefully: email cannot be changed after the user is created.
- Password — either type a password that meets the password rules shown on screen, or click Generate Password to auto-create one. Use the eye icon to reveal or hide the password.
Choose a permission level
In the Permissions section, select either Regular or Admin from the dropdown. See Permission Levels below for what each role can do.
Create the user
Click Create User at the bottom of the page. A success notification confirms the account was created, and you are redirected to the new user's profile so you can share their credentials or configure additional settings.
Note:
Required fields (First Name, Last Name, Email, and Password) are highlighted in red if you click Create User before filling them in. The button also stays disabled until the password meets all of the password rules.
Permission Levels
Every Weevio Cloud user is assigned one of two permission levels.
| Level | Access |
|---|---|
| Admin | Full access to web apps, PIMS Settings, Developer Settings, and User Management. Admins can create, edit, and delete any user in the tenant. |
| Regular | Access only to the web apps (Weevio Store, orders, repairs, inventory, etc.). Regular users cannot open any settings pages and can only edit their own profile. |
To change a user's permission level, open their profile, expand the Permissions accordion, and choose a new value from the dropdown. The Permissions section is only visible to Admins — Regular users never see it, even on their own profile.
Note:
There are only two permission levels in Weevio Cloud today — Admin and Regular. Fine-grained per-module permissions are not currently available.
Editing a User
Open a user's profile from the users grid (click the row or the pencil icon). The profile is organized into collapsible sections:
- Personal Information — First Name, Last Name, Phone. Editable by the user themselves and by any Admin.
- Account & Security — Email address (read-only after creation) and password management (see Changing a Password).
- Permissions — Admin/Regular dropdown (Admins only).
- PIMS Integration — Per-user PIMS credentials, visible only if your tenant has the orders/SROs module enabled (see PIMS Integration).
After making changes, click Save Profile at the bottom of the page. A success notification confirms the update.
Self-Service Profile Editing
Regular users can always edit their own profile. When a Regular user opens User Management, they are redirected straight to their own profile page. They can change their name, phone, password, and PIMS credentials, but cannot see or modify other users, their own email, or their own permission level.
Note:
Email addresses are locked after account creation. If a user needs a different email, an Admin must delete the old account and create a new one — the user's history is tied to the original email.
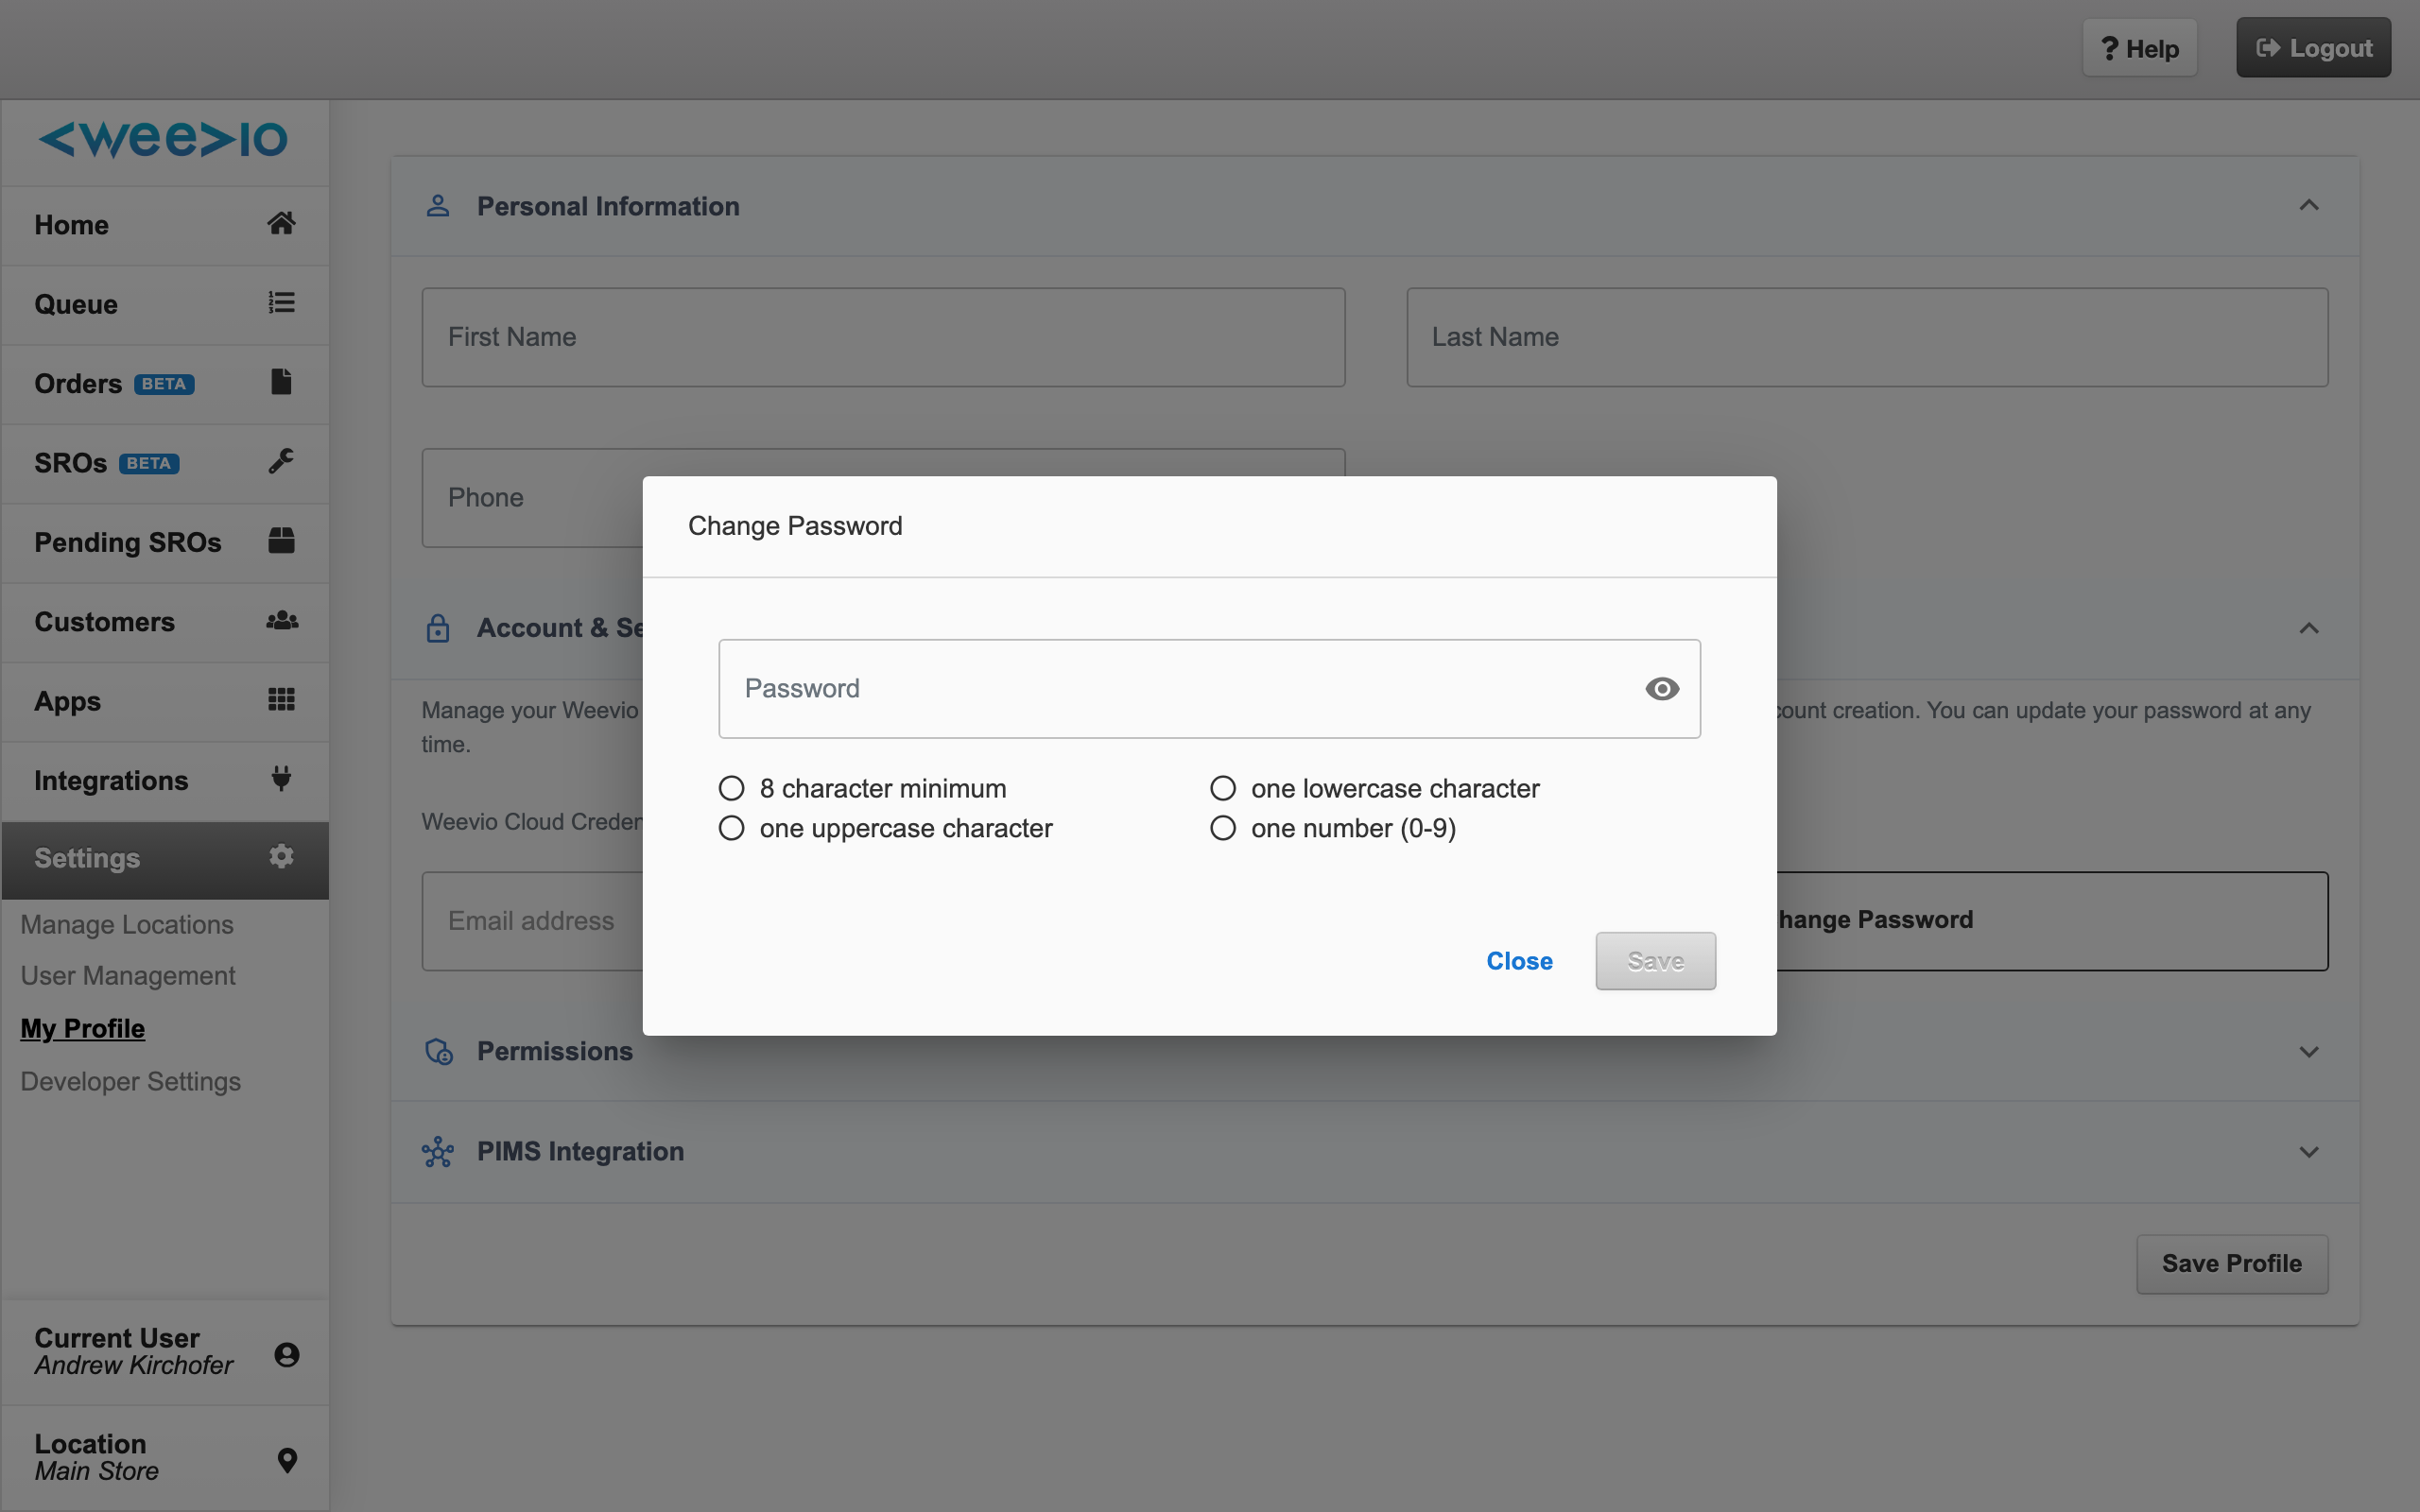
Password Management
Password Rules
Weevio Cloud enforces the following password requirements. When typing a new password, live check-marks indicate which rules have been satisfied:
- At least 8 characters
- At least one lowercase letter
- At least one uppercase letter
- At least one number (0-9)
The Save button remains disabled until all four rules are met.
Generating a Password
When creating a new user, click Generate Password in the Account & Security section to produce a random 8-character password that already meets every rule. The generated password is placed into the password field, where you can reveal it with the eye icon, copy it, and share it with the user.
Changing a Password
An Admin can reset another user's password, and any user can change their own password. The flow is the same:
Open the Change Password modal
In the Account & Security section of the user's profile, click Change Password.
Enter and confirm a new password
Type a new password that meets all four password rules. The live check-marks show when each rule is satisfied.
Save
Click Save. A success notification confirms the change. The user will use the new password the next time they sign in.
First-Login Password Change
When a newly created user signs in for the first time, Weevio Cloud opens the Change Password modal automatically with a welcome message:
Welcome to Weevio Cloud! To ensure your account is secure, please set a new password.
The user must either save a new password or click Logout — the modal cannot be dismissed any other way. This guarantees that the temporary password the Admin shared is replaced before the account is used.
PIMS Integration
If your tenant subscribes to the orders and service repair order modules, every user profile includes a PIMS Integration section. Each user links their personal PIMS account to Weevio Cloud here, which enables the PIMS-backed pages — Home Dashboard, All Orders, SROs, and Pending SROs.
The section shows:
- A status chip — Connected (green, with a shield icon) when the credentials have been validated, or Credentials Saved to Profile when they have been saved but not yet verified.
- A PIMS Username field.
- A PIMS Password field with a show/hide toggle.
Note:
PIMS credentials can only be changed by the user they belong to. An Admin can see that another user has PIMS credentials saved, but cannot edit them — the user must sign in and update their own profile.
Connecting a PIMS Account
Open your own profile
Open User Management and (if you are a Regular user) you will be taken directly to your profile. Admins can open their own profile from the users grid.
Expand PIMS Integration
Expand the PIMS Integration accordion and enter your PIMS Username and PIMS Password. These are your PIMS login credentials — not your Weevio Cloud password.
Save and validate
Click Save & Validate PIMS Connection. Weevio Cloud attempts to sign in to PIMS with the credentials. If successful, a toast reads "User profile and PIMS credentials saved successfully" and the status chip turns to Connected. If validation fails, a toast explains the failure so you can correct the credentials and try again.
Default PIMS Credentials
Some tenants use a shared default PIMS account for all Weevio Cloud users. If that applies to you, the PIMS Integration section displays a blue informational alert:
You are logged in using the default PIMS credentials for this tenant. You are not able to change your PIMS credentials.
In this mode the PIMS Username and Password fields are disabled. Contact your administrator if you need to use your own PIMS login instead of the shared default.
When Weevio Cloud Prompts for PIMS Sign-In
If you open a PIMS-backed page and your PIMS credentials are missing or have expired, Weevio Cloud redirects you to your profile with the PIMS Integration section automatically expanded and a red alert at the top explaining why:
- "To access Orders and SROs, sign in to PIMS."
- "To access the home dashboard, sign in to PIMS."
Enter fresh credentials and click Save & Validate PIMS Connection to continue.

Deleting a User
Only Admins can delete users. Deleting a user permanently removes their account from Weevio Cloud.
Click the trash icon
In the users grid, click the red Delete (trash) icon in the Actions column of the user you want to remove.
Confirm the deletion
A Delete User dialog appears asking "Are you sure you want to delete {user's full name}?" — click Delete (red button) to confirm or Cancel to back out.
Verify the user is removed
On success, the user disappears from the grid and the Total Users count updates. If the deletion fails, a toast reads "Failed to delete user {name}. Please try again later."
Note:
Deletion is permanent — deleted users cannot be restored. If you only need to temporarily block someone's access, change their password instead and update their permission level, then delete the account later if they do not return.
Signing Yourself Out After a Profile Change
When you update your own email address or password, Weevio Cloud signs you out automatically and returns you to the login page. This keeps your session aligned with the new credentials. Simply sign in again using the updated values.
Related Features
- Users & Account Management — Manage Customer Portal users (your customers, not your staff)
- Quick Start Guide — Initial tenant setup and first sign-in
- Home Dashboard — The staff landing page most users see after signing in
Need Help?
For assistance, please send a message to our Support page.