The Users and Permissions page lets Customer Portal administrators manage who has access to their organization's portal account. You can add new users, set permission levels, enable or disable access, and — if your Shopify integration is active — control online store access for each user.
Note:
Only Admin permission level users can access the Users and Permissions page. Limited users and individual (non-business) customer accounts do not have access to this feature.
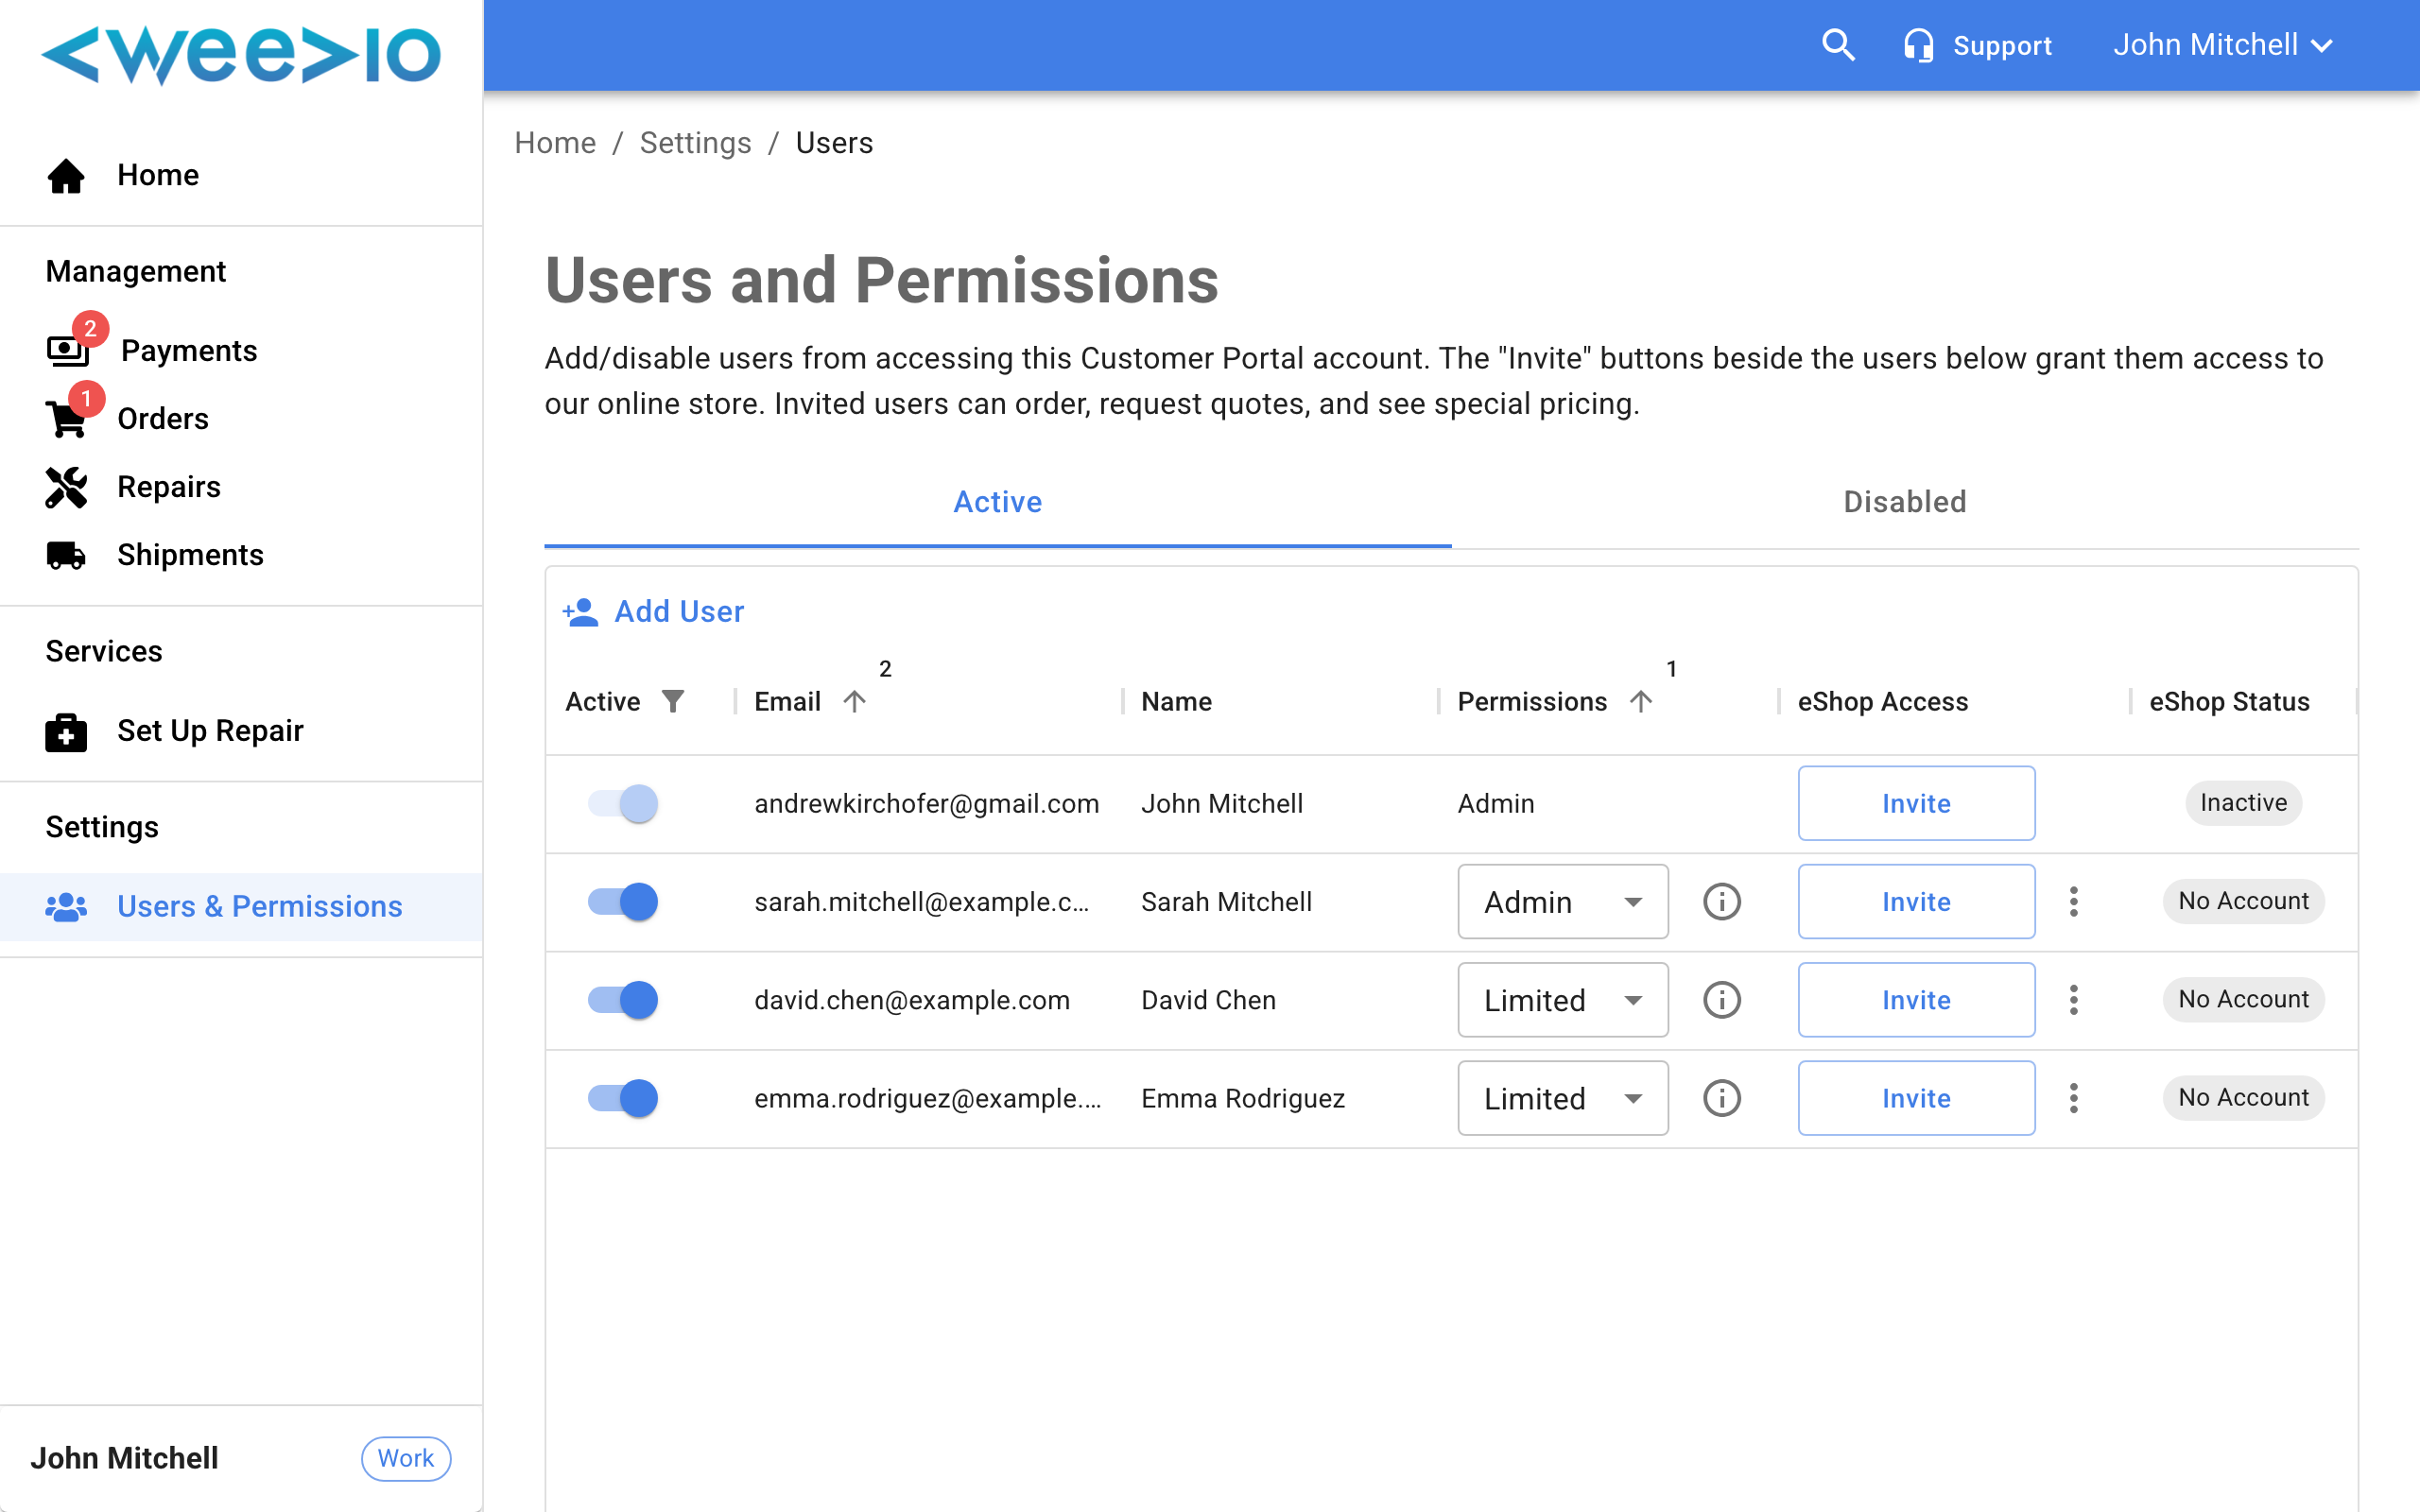
The Users Table
The Users and Permissions page displays all users associated with your customer account in a data table. Two tabs let you filter the view:
| Tab | Description |
|---|---|
| Active | Shows all currently enabled users who can log in to the portal |
| Disabled | Shows users whose access has been turned off |
The table includes the following columns:
| Column | Description |
|---|---|
| Active | A toggle switch to enable or disable a user's portal access |
| The user's email address (used for login) | |
| Name | The user's display name |
| Permissions | The user's permission level — Admin or Limited |
| eShop Access | Invite, resend, or revoke the user's online store access (only visible if Shopify integration is configured) |
| eShop Status | The user's current online store account status (only visible if Shopify integration is configured) |
The footer of the table shows the Total Users count for your account.
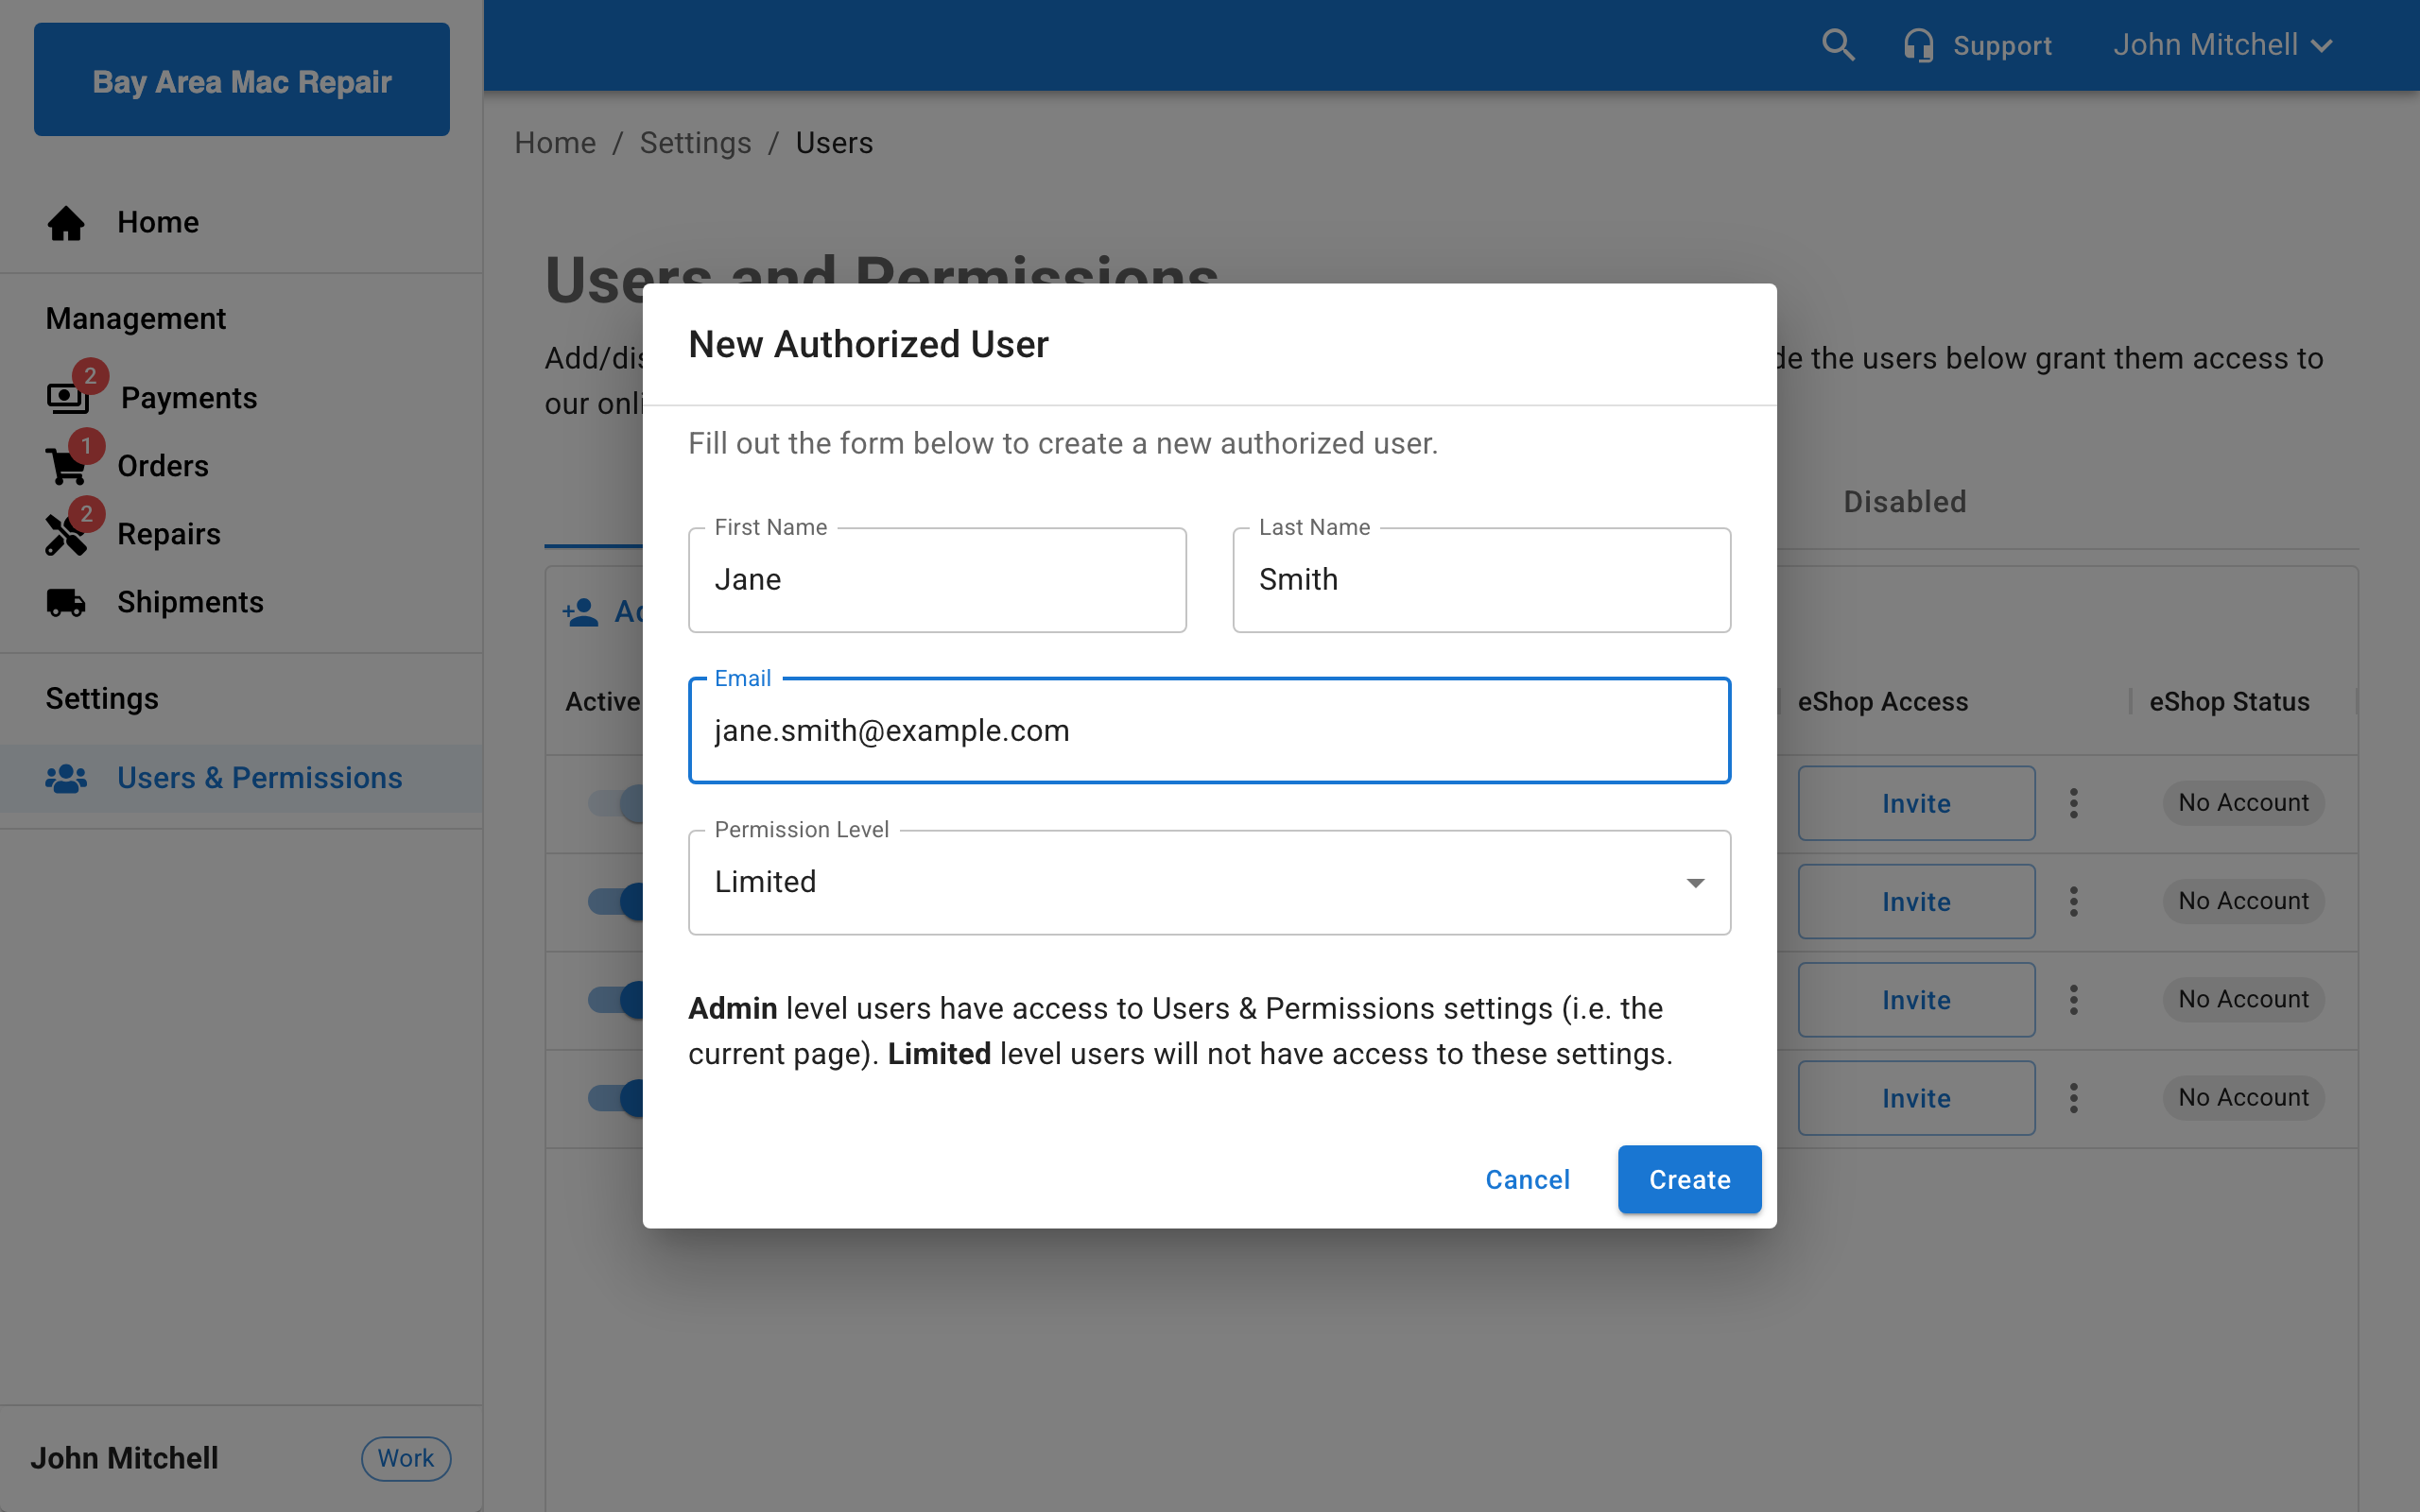
Adding a New User
Open the Add User Dialog
Click the Add User button in the toolbar above the users table.
Fill in User Details
Enter the following information in the form:
- First Name — The user's first name
- Last Name — The user's last name
- Email — The email address the user will use to log in
- Permission Level — Choose Admin or Limited (see Permission Levels below)
Create the User
Click Create to add the user. A success notification confirms the user has been created and they will appear in the Active users list.
Note:
Each email address can only be associated with one user per customer account. If you try to add an email that already exists, the form will display an error.
Permission Levels
Every portal user is assigned one of two permission levels:
| Level | Description |
|---|---|
| Admin | Full access to the Customer Portal, including the Users and Permissions settings page. Admins can add, disable, and manage other users. |
| Limited | Access to all standard Customer Portal features (orders, repairs, payments, etc.) but no access to the Users and Permissions page. |
To change a user's permission level, use the Permissions dropdown in their row in the users table. You cannot change your own permission level.
Note:
The permission level only controls access to user management settings. Both Admin and Limited users can view orders, repairs, payments, and all other portal features.
Enabling and Disabling Users
Use the Active toggle switch in the users table to enable or disable a user's portal access:
- Enabled (on) — The user can log in and use the Customer Portal
- Disabled (off) — The user is blocked from logging in
Disabled users move to the Disabled tab. You can re-enable them at any time by switching the toggle back on.
Note:
You cannot disable your own account. The toggle is disabled for the currently logged-in user.
Online Store Access
If your organization has the Shopify integration configured, the users table includes additional columns for managing each user's access to your online store (eShop). This allows you to grant portal users the ability to place orders and access special pricing on your Shopify storefront.
How Online Store Access Works
When you invite a user to the online store, Weevio Cloud links their Shopify customer record to your organization by adding customer tags to their Shopify account. These tags are how Weevio Cloud tracks which organization a Shopify customer belongs to and what pricing they should receive.
The following tags are applied to the user's Shopify customer record:
| Tag | Purpose |
|---|---|
| PIMS Customer Code | Links the Shopify customer to your organization's PIMS customer record. This is the primary tag that determines online store access. |
| PIMS Customer Name | Associates the Shopify customer with your organization's name for identification. |
| Price Code | If your organization has a negotiated price code, this tag is added so the user sees your special B2B pricing on the online store. |
These tags control:
- Store access — A user is considered active on your online store only if their Shopify customer record contains your organization's PIMS Customer Code tag
- Special pricing — If a Price Code tag is present, the user sees your organization's negotiated wholesale pricing instead of standard retail prices
- Organization linking — The tags tie the Shopify account to your specific customer record, even if the user has accounts with other organizations
Note:
Tags are managed automatically when you use the Invite and Revoke buttons. You do not need to edit Shopify customer tags manually.
How Customer Tags Work with BSS B2B Apps
The PIMS customer tags applied by the invite system are designed to work with two BSS Commerce Shopify apps that extend the online store experience for B2B customers. These apps read the Shopify customer tags to control access and pricing.
BSS: B2B Login/Lock & Hide
The BSS: B2B Login/Lock & Hide app uses Shopify customer tags to control which customers can access specific pages, collections, and products on your online store.
When a user is invited through the Users and Permissions page and receives the PIMS Customer Code tag, the BSS Login app can use that tag to:
- Grant access to B2B-only pages, collections, or products that are hidden from the general public
- Restrict access to customers who do not have the correct PIMS tags — for example, locking wholesale catalog pages so only tagged B2B customers can view them
- Redirect unauthenticated visitors to a login page or contact form when they attempt to access restricted content
This means that revoking a user's online store access from the Users and Permissions page (which removes their PIMS tags) also removes their ability to view any tag-restricted content controlled by the BSS Login app.
BSS: B2B Custom Pricing
The BSS: B2B Custom Pricing app works alongside Weevio Cloud's Product Page Widget to display customer-specific wholesale pricing on your Shopify store.
The Price Code tag on the customer's Shopify record is the key to this integration:
- When a tagged customer visits your store, Weevio Cloud reads the Price Code from their Shopify customer tags
- Weevio Cloud fetches the customer's specific pricing from the BSS B2B wholesale API
- The Product Page Widget displays a "Your Price" badge showing the customer's negotiated rate and savings compared to the retail price
- On the cart page, Weevio Cloud automatically applies BSS B2B pricing so the cart reflects the customer's wholesale prices
Because the Price Code tag is applied automatically when you invite a user through the Users and Permissions page, customers with negotiated pricing see their wholesale rates as soon as they log in — no additional configuration is needed per user.
Note:
If you revoke a user's online store access, their Price Code tag is also removed. They will no longer see custom B2B pricing and will instead see standard retail prices until they are re-invited.
For more details on B2B pricing configuration, see B2B Wholesale Pricing. For PunchOut commerce integration with procurement systems like SAP Ariba and Coupa, see PunchOut Commerce.
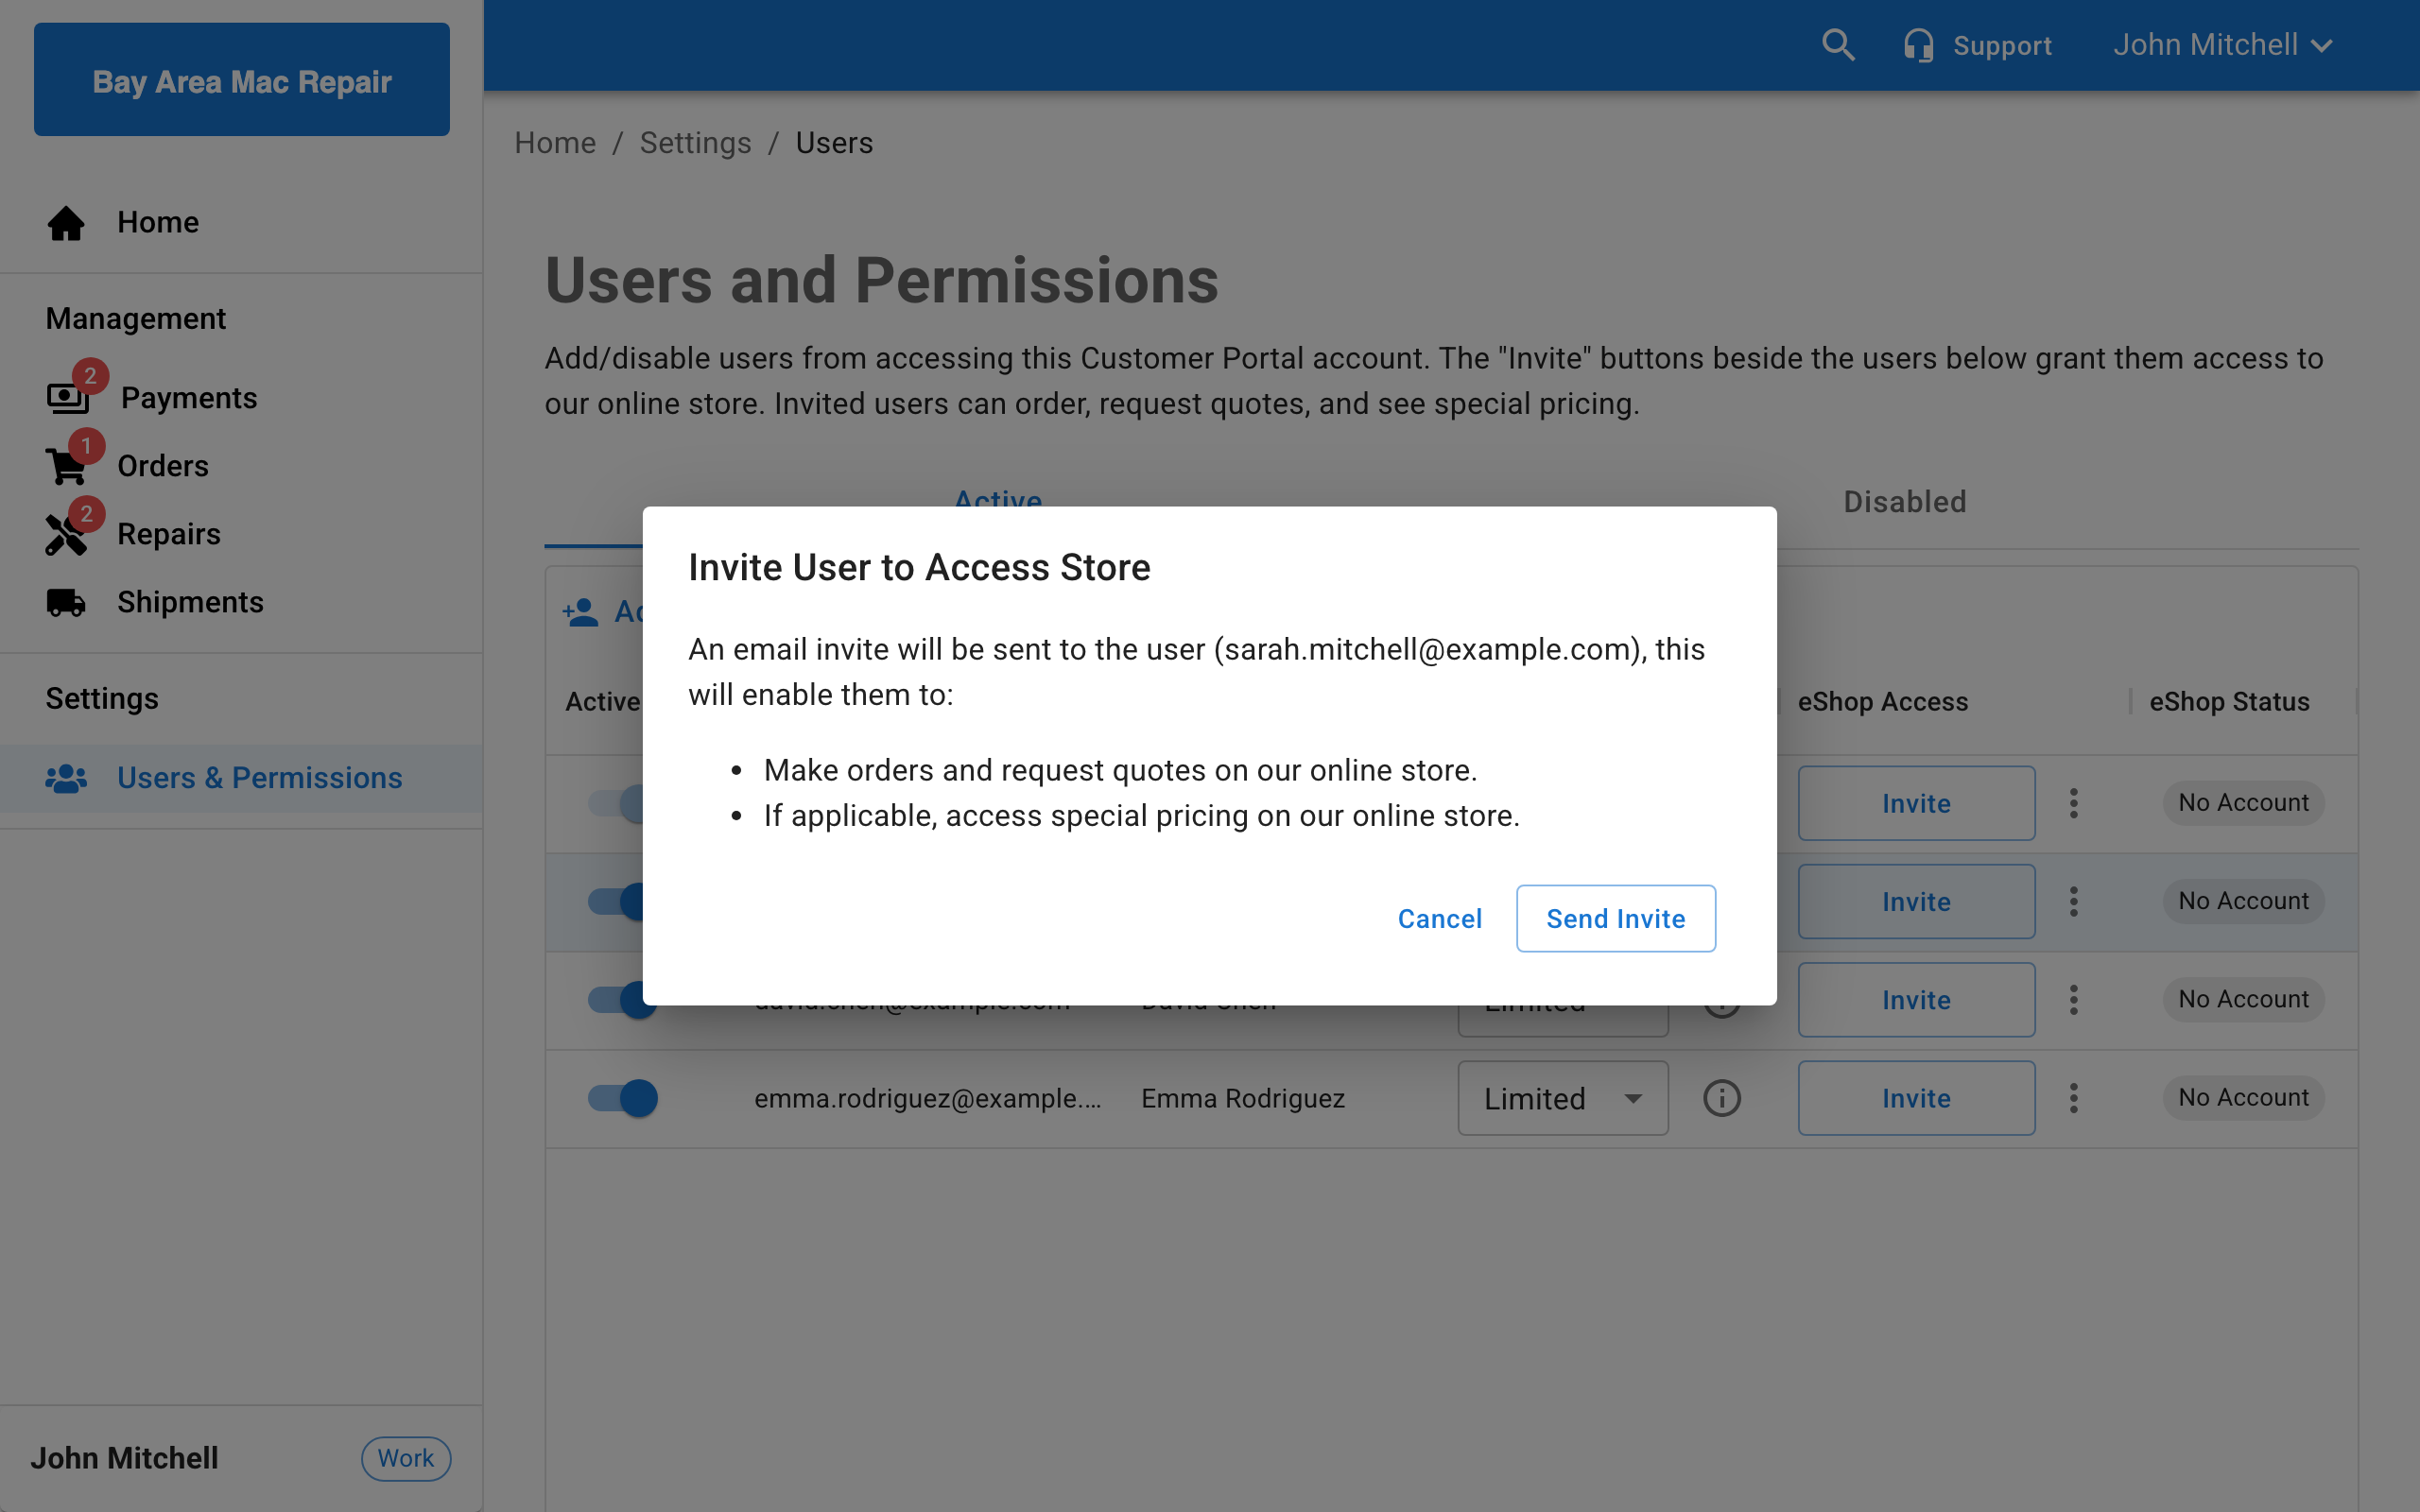
Inviting a User to the Online Store
Click Invite
In the eShop Access column, click the Invite button next to the user you want to grant access to.
Confirm the Invitation
A dialog appears explaining that an email invite will be sent to the user, enabling them to:
- Make orders and request quotes on your online store
- Access special pricing (if applicable)
Click Send Invite to confirm.
Share the Invite
The invite email is sent to the user and an account activation URL is copied to your clipboard. You can share this URL directly with the user as an alternative to the email.
eShop Status
The eShop Status column shows the current state of each user's online store account:
| Status | Description |
|---|---|
| No Account | The user has not been invited to the online store and has no Shopify customer record |
| Invited | An invitation has been sent and your organization's tags have been added, but the user has not yet activated their Shopify account |
| Active | The user has activated their online store account, your organization's tags are present, and they can place orders |
| Inactive | The user has a Shopify account but it does not have your organization's PIMS Customer Code tag — they need to be re-invited |
Managing Online Store Access
- Resend — If a user's status is "Invited" and they haven't activated their account, click Resend to send a new invitation email
- Revoke — To remove a user's online store access, click Revoke. This removes your organization's PIMS tags from their Shopify customer record, which revokes their access to your special pricing, any BSS B2B tag-restricted content, and organization-linked store features
- Copy Account Invite URL — Click the options menu (three-dot icon) next to the Invite or Resend button to copy the activation URL without sending an email. This is useful if you want to share the link through a different channel (e.g., messaging or in person)
Tag Conflicts
When you invite a user, Weevio Cloud checks whether their Shopify customer record already has PIMS tags from a different organization. If existing tags are found, you will see an E-commerce Warning dialog:
"This email address is tied to a different customer."
This means the user's email is already linked to another organization's Shopify account. A single Shopify customer record can only be tagged to one PIMS customer at a time. This also means the customer can only receive B2B pricing and tag-restricted access from one organization at a time.
Note:
If you encounter this warning, contact your service provider to resolve the tag conflict. They can review the user's Shopify customer record and update or remove the conflicting tags so the user can be properly linked to your organization.
Related Features
- B2B Wholesale Pricing — Display negotiated wholesale pricing for logged-in business customers
- PunchOut Commerce — Integrate with SAP Ariba, Coupa, and other procurement systems
- Payments — Customers can pay invoices, quotes, and repair deposits through the portal
- Orders — View and manage customer orders
- Repairs — Track service repair orders and approve estimates
Need Help?
For assistance, please send a message to our Support page.