Overview
Queue Management is a real-time service desk in Weevio Store that helps staff manage walk-in customers and scheduled appointments from a single screen. It provides a centralized view of everyone waiting for service, tracks their status, and guides staff through the intake process — from initial check-in to creating a Service Repair Order (SRO).
Note:
Queue Management requires the Queue module to be enabled for your account. Contact your administrator if you don't see the Queue option in your navigation.
The Queue Dashboard
When you open Queue Management, you see a real-time dashboard showing all customers currently waiting for service at your location.
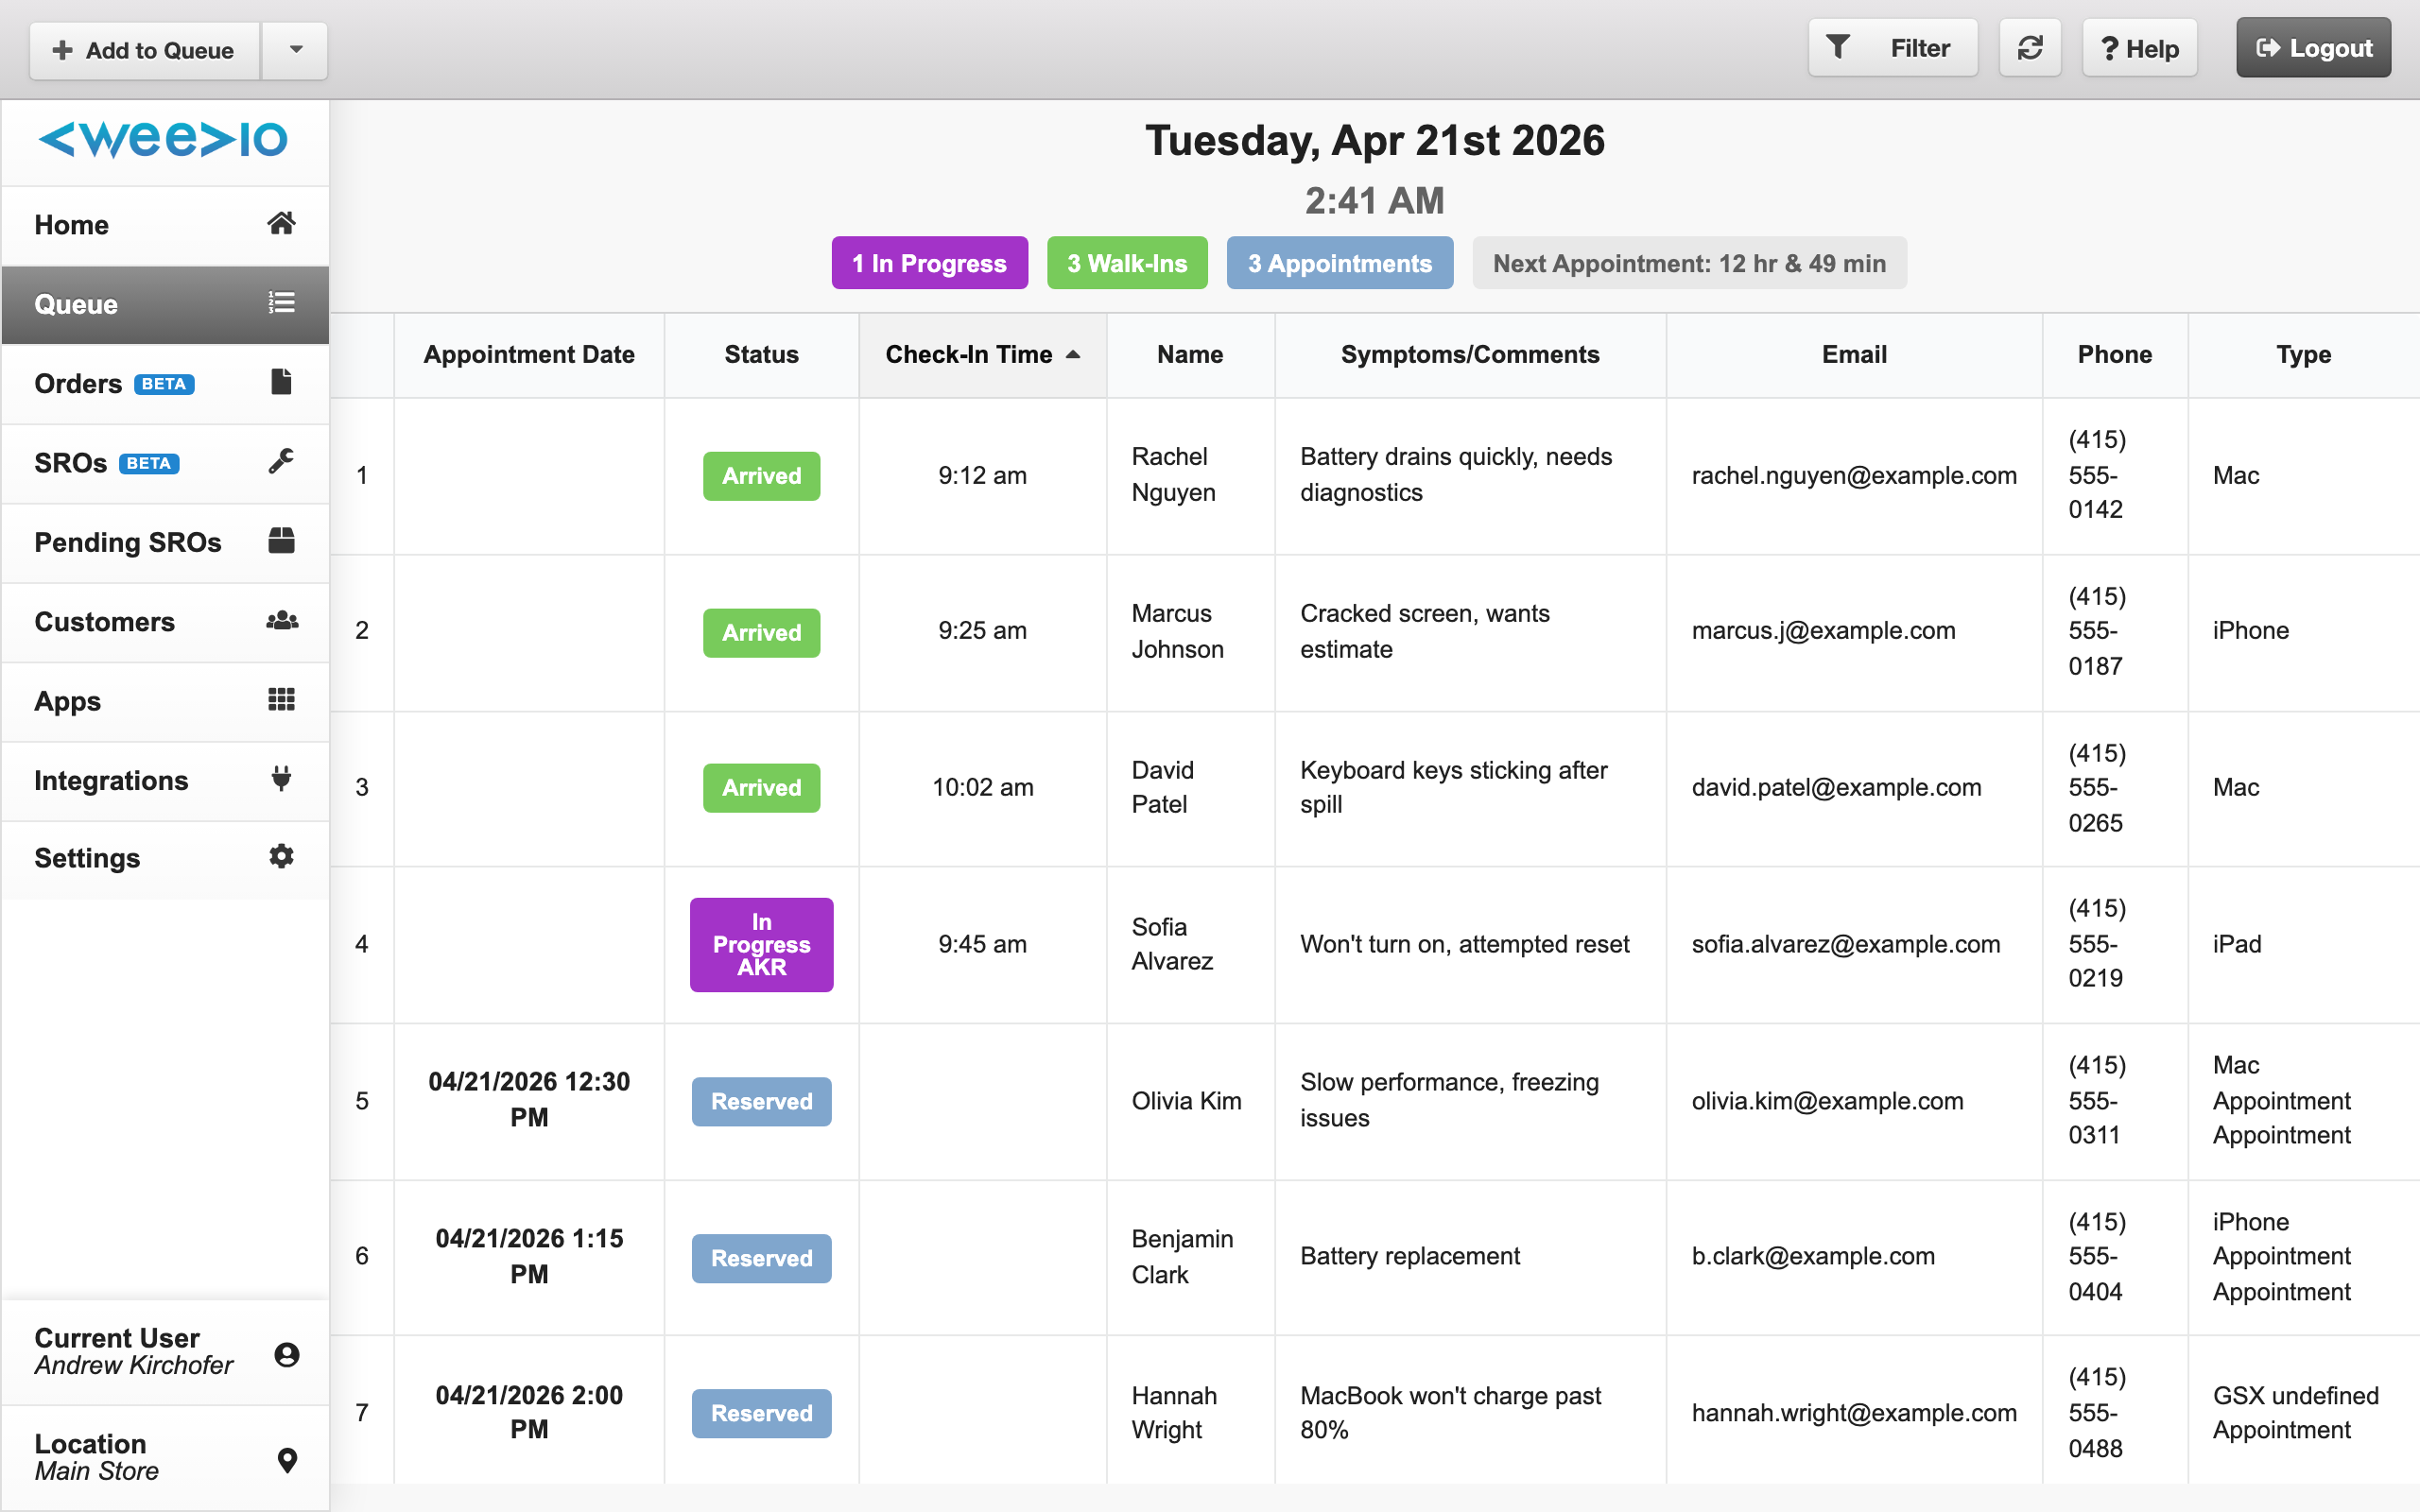
Status Summary
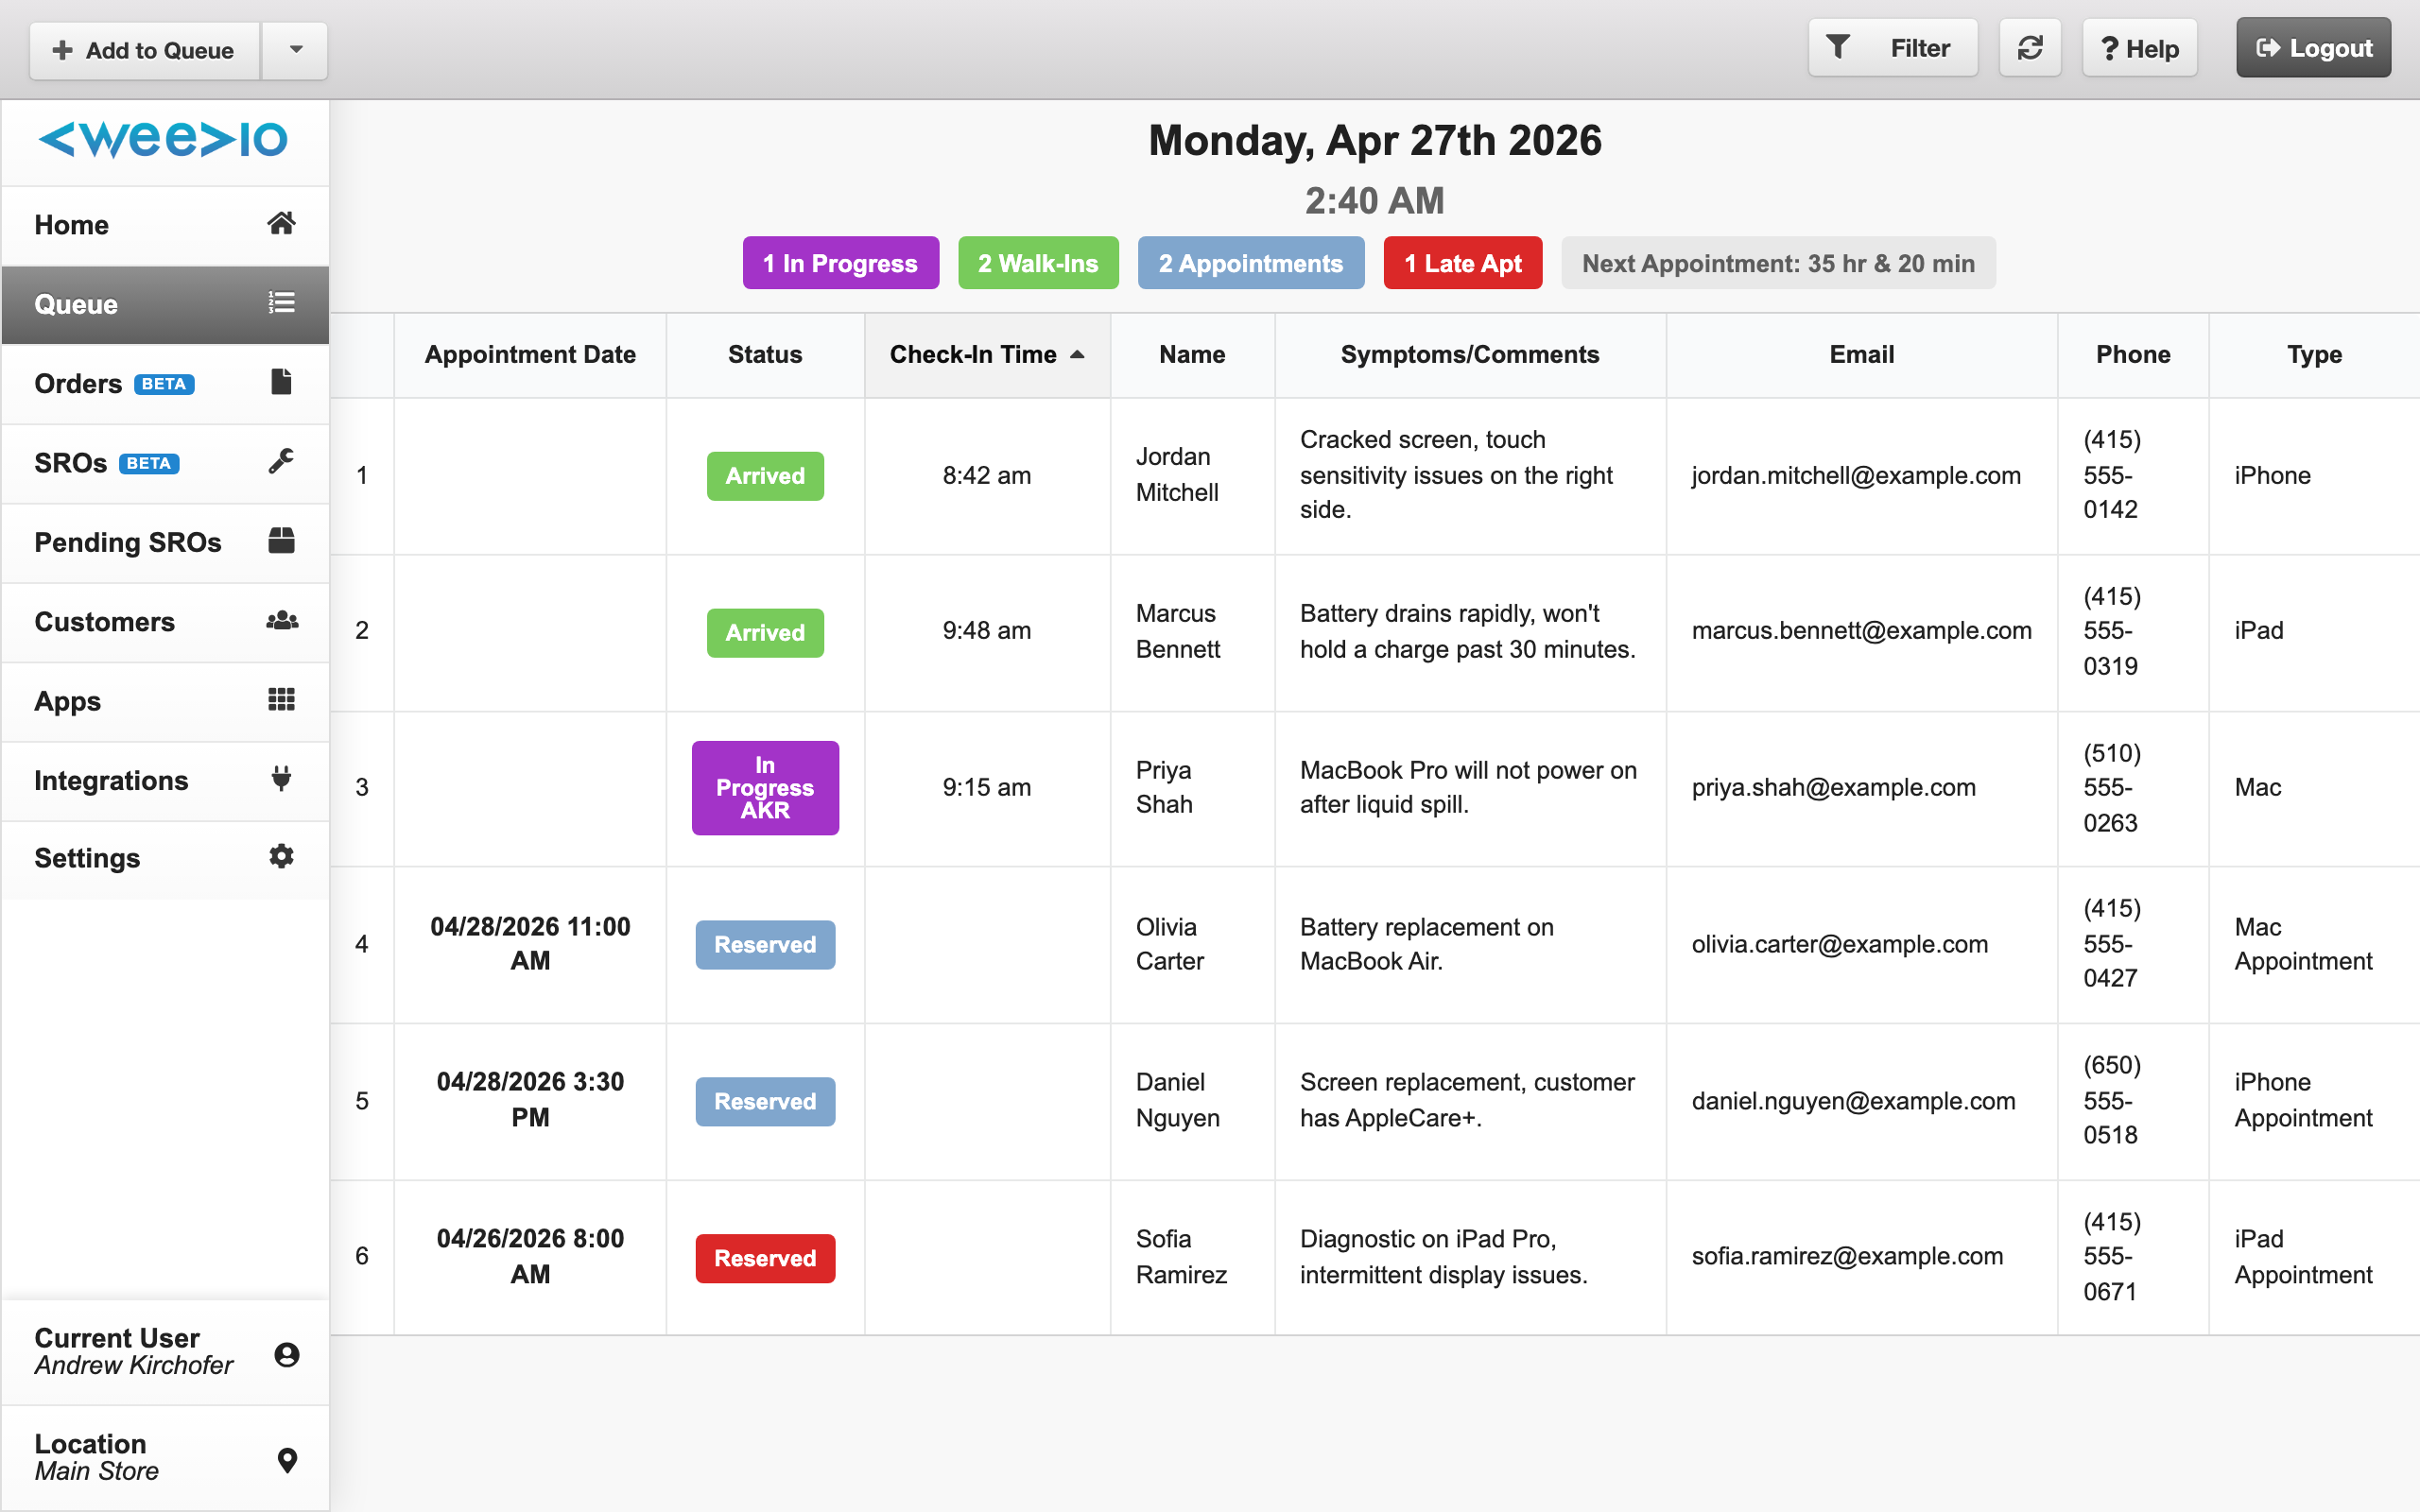
At the top of the queue, color-coded counters give you an at-a-glance view of your current workload:
- Walk-Ins (green) — Customers who have checked in and are waiting
- In Progress (purple) — Customers currently being helped by a staff member
- Appointments (blue) — Upcoming scheduled appointments that are on time
- Late Appointments (red) — Appointments that are past their scheduled time
A countdown timer also displays the time remaining until your next scheduled appointment, helping you plan ahead.
Queue Table
The queue table displays the following information for each customer or appointment:
| Column | Description |
|---|---|
| # | Row number |
| Appointment Date | Scheduled appointment time, if applicable |
| Status | Current status with a color-coded label |
| Check-In Time | When the customer was checked in |
| Name | Customer's first and last name |
| Symptoms / Comments | Description of the issue or staff notes |
| Customer's email address | |
| Phone | Customer's phone number |
| Type | Device type or appointment type (e.g., "Mac Appointment", "iPhone") |
The queue refreshes automatically every 30 seconds and when you switch back to the browser tab, so your view stays up to date without manual reloading.
Adding Walk-In Customers
When a customer walks into your store without an appointment, add them to the queue so they can be helped in order:
Open the check-in form
Click the Add to Queue button in the navigation bar.
Enter customer details
Fill in the customer's name, email, phone number, device type, and a description of their issue or symptoms. If your location has custom intake questions configured, those will appear here as well.
Choose an action
You have two options:
- Add to Queue — Saves the customer to the waiting queue. They will appear with an "Arrived" status.
- Continue to SRO Wizard — Adds the customer to the queue and immediately begins the Service Repair Order workflow.
Managing Appointments
Scheduled appointments — both Weevio internal appointments and Apple GSX appointments — appear in the queue automatically with a Reserved status. When a customer arrives for their appointment, you manage them directly from the queue.
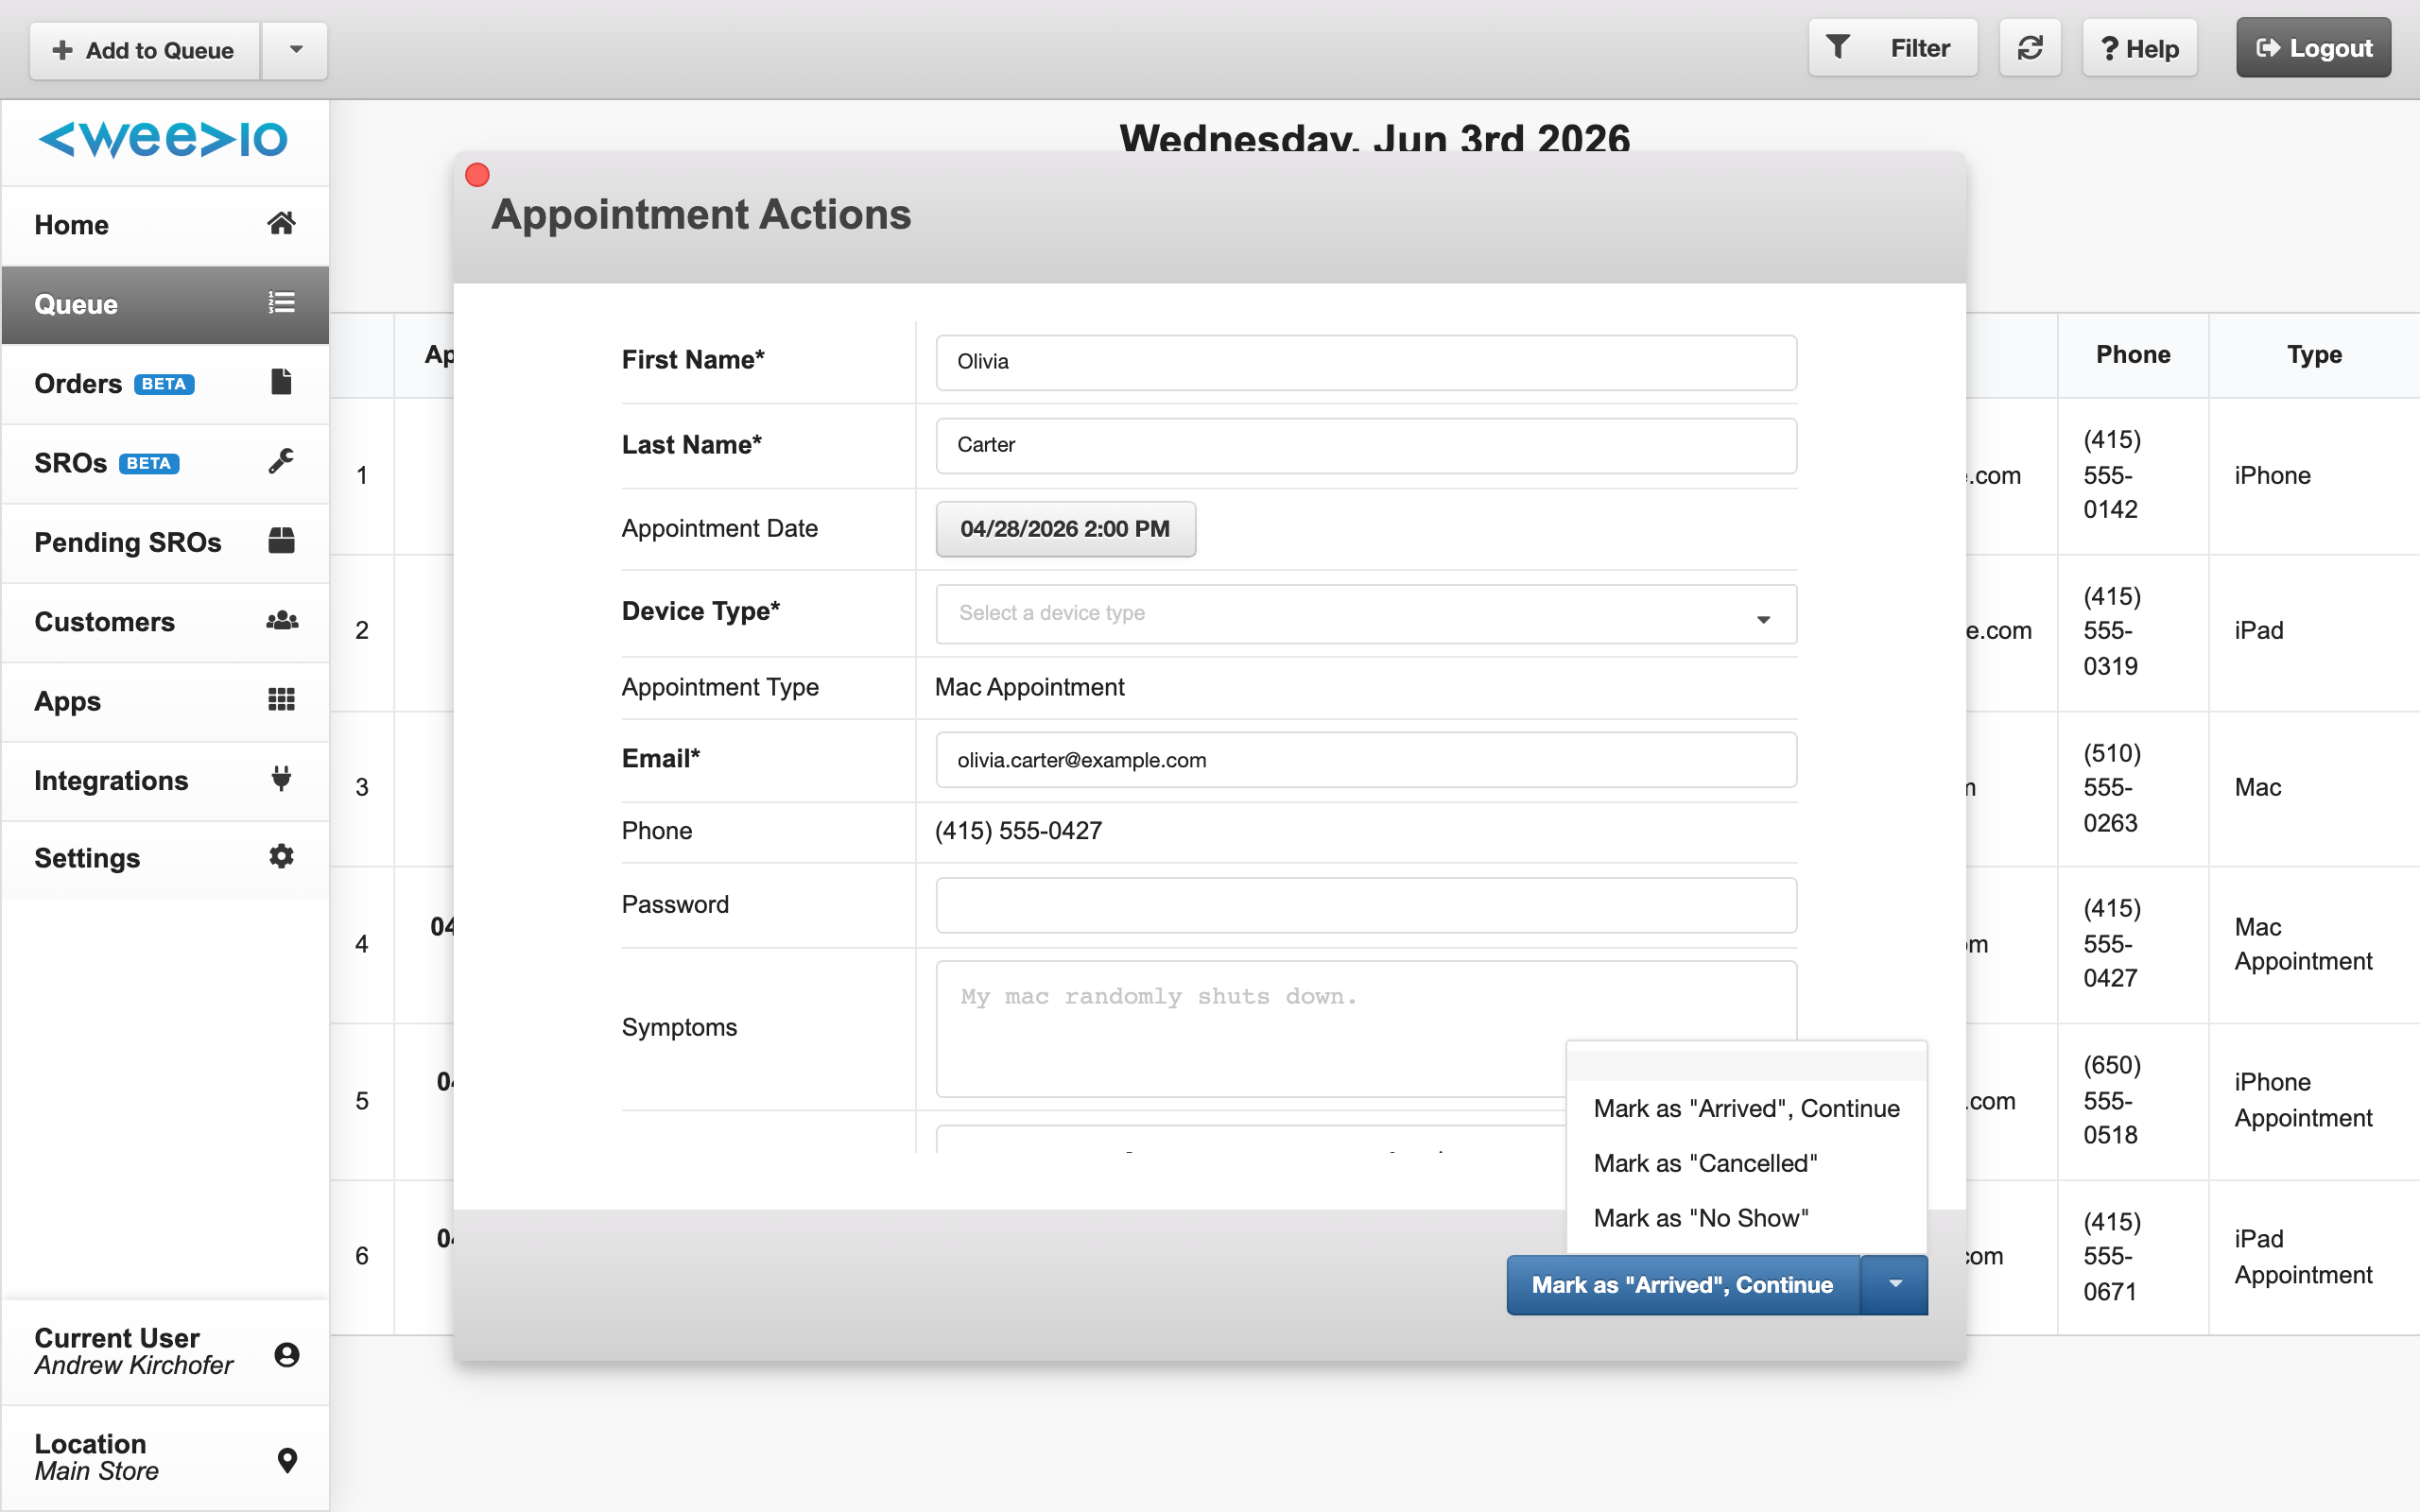
Checking In an Appointment
Click on an appointment row and select Mark as Arrived to check the customer in. This moves them from the appointments section into the active queue and opens the service workflow so you can begin helping them right away.
Handling No-Shows and Cancellations
If a customer does not show up or needs to cancel:
- No Show — Click the appointment row and select Mark as No Show. You will be asked to confirm before the status is updated.
- Cancel — Click the appointment row and select Mark as Cancelled. For GSX appointments, you must select a cancellation reason:
- Customer Cancelled
- Customer Rescheduled
- Store Closure
- Staff Unavailability
- Improper Reservation
- Duplicate Reservation
Note:
If a GSX appointment cannot be reached due to a connection issue, a yellow warning label appears on the row. You can use the Convert to Check-In option to manually check the customer in without GSX.
Helping a Customer
When you are ready to help someone in the queue:
Click on a queue item
Click the customer's row in the queue table. Their status changes to In Progress and your employee code is displayed on the row, so other staff members know you are helping this customer.
Review details
A workflow modal opens showing the customer's information, symptoms, and any notes. You can review and update these details.
Choose how to proceed
From the workflow modal, you can:
- Save — Update the customer's information and return to the queue.
- Continue to SRO Wizard — Proceed through the full intake process to create a Service Repair Order.
- Remove — Remove the customer from the queue entirely (with a confirmation prompt).
Note:
If another staff member is already helping a customer, you will see a notification: "This customer is currently being assisted." You can choose to take over if needed.
If you close the workflow modal without completing the process, the customer's status automatically resets from In Progress back to Arrived, making them available for another staff member to pick up.
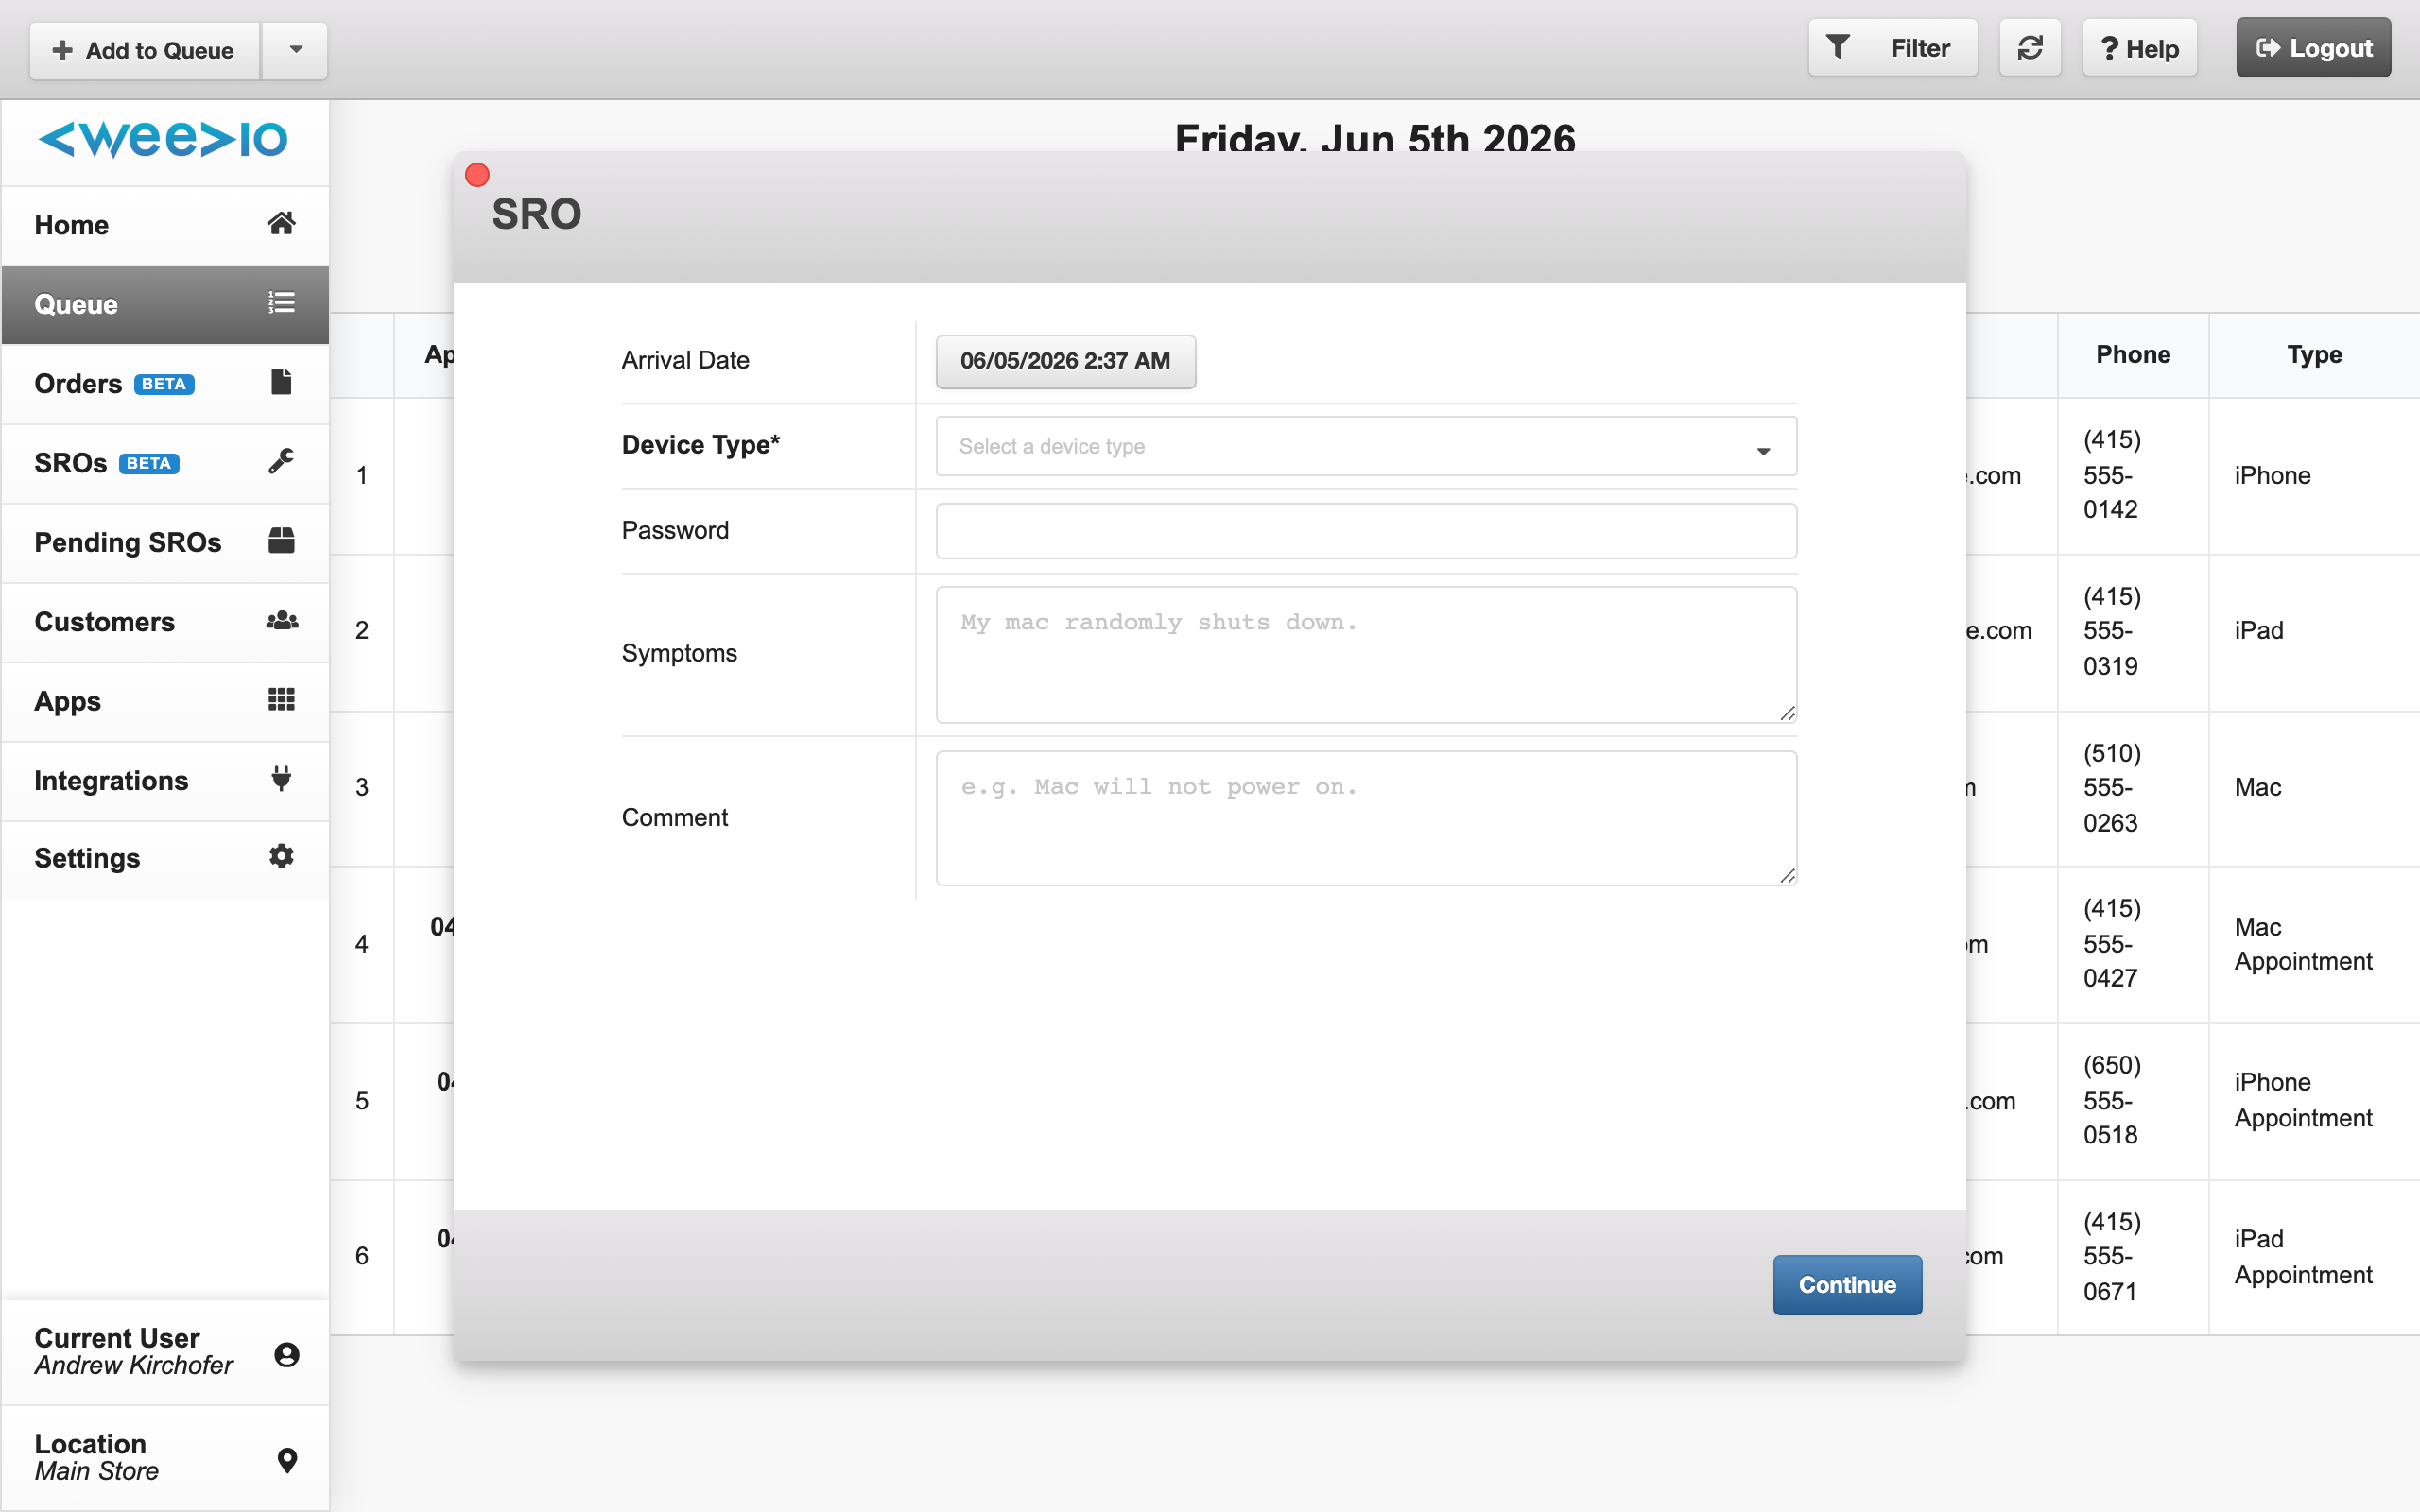
The SRO Intake Workflow
When you choose Continue to SRO Wizard, a guided multi-step process walks you through everything needed to create a Service Repair Order:
Details
Review and update the customer's name, device type, symptoms, and any comments.
Instructions & Password
Enter repair instructions and the device password, if needed for service.
Serial Number
Capture the device's serial number.
Find My Device
Verify the Find My Device status. This should be disabled before service begins.
Serial Number Validation
Validate the serial number against the device database to confirm device details.
GSX Diagnostics
Run Apple GSX diagnostic tests on the device, if applicable.
Customer Selection
Select an existing customer profile from your records or create a new one.
Customer Details
Confirm or update the customer's address and contact information.
Results & SRO Creation
Review diagnostic or warranty results and finalize the Service Repair Order.
Note:
Some steps — such as GSX Diagnostics and Find My Device — only appear when your location has PIMS and GSX integration configured. Your workflow may have fewer steps depending on your setup.
Filtering and Searching
Quick Filters
Click any of the color-coded status counters at the top of the queue to filter the table to just that category:
- Walk-Ins — Show only checked-in customers waiting for service
- In Progress — Show only customers currently being helped
- Appointments — Show only on-time upcoming appointments
- Late — Show only overdue appointments
Click the active filter again to clear it and show all queue items.
Date Navigation
By default, the queue shows today's customers and appointments. To view a different date:
- Click the date display at the top of the queue to open a date picker
- Select any date to view that day's queue history
- Click Today to return to the current date
Advanced Search
Use Advanced Search to find a specific appointment by customer name. This searches across both Weevio internal appointments and GSX appointments, which is useful when you need to locate a booking quickly.
Queue Item Statuses
Understanding the status labels helps you quickly assess your queue at a glance:
| Status | Color | Meaning |
|---|---|---|
| Arrived | Green | Customer has checked in and is waiting for service |
| In Progress | Purple | A staff member is actively helping this customer (employee code shown) |
| Reserved | Blue | An upcoming appointment — the customer has not yet arrived |
| Late | Red | An appointment that is past its scheduled time |
| GSX Error | Yellow | A GSX connection issue occurred with this appointment |
Typical Queue Flow
The queue follows a straightforward flow from arrival to service:
Walk-in customers:
- Staff adds the customer to the queue → status becomes Arrived
- A staff member clicks the row to start helping → status becomes In Progress
- Staff completes the SRO workflow or saves → the queue item is resolved
Appointments:
- The appointment appears in the queue as Reserved
- When the customer arrives, staff marks them as Arrived
- A staff member clicks the row to start helping → status becomes In Progress
- Staff completes the SRO workflow → the queue item is resolved
If a staff member closes the workflow without finishing, the status resets to Arrived so another team member can pick it up.
Need Help?
For assistance, please send a message to our Support page.