All Customer Portal settings are managed in Weevio Cloud under Settings > Apps > Customer Portal. This page walks through each configuration section available to administrators.
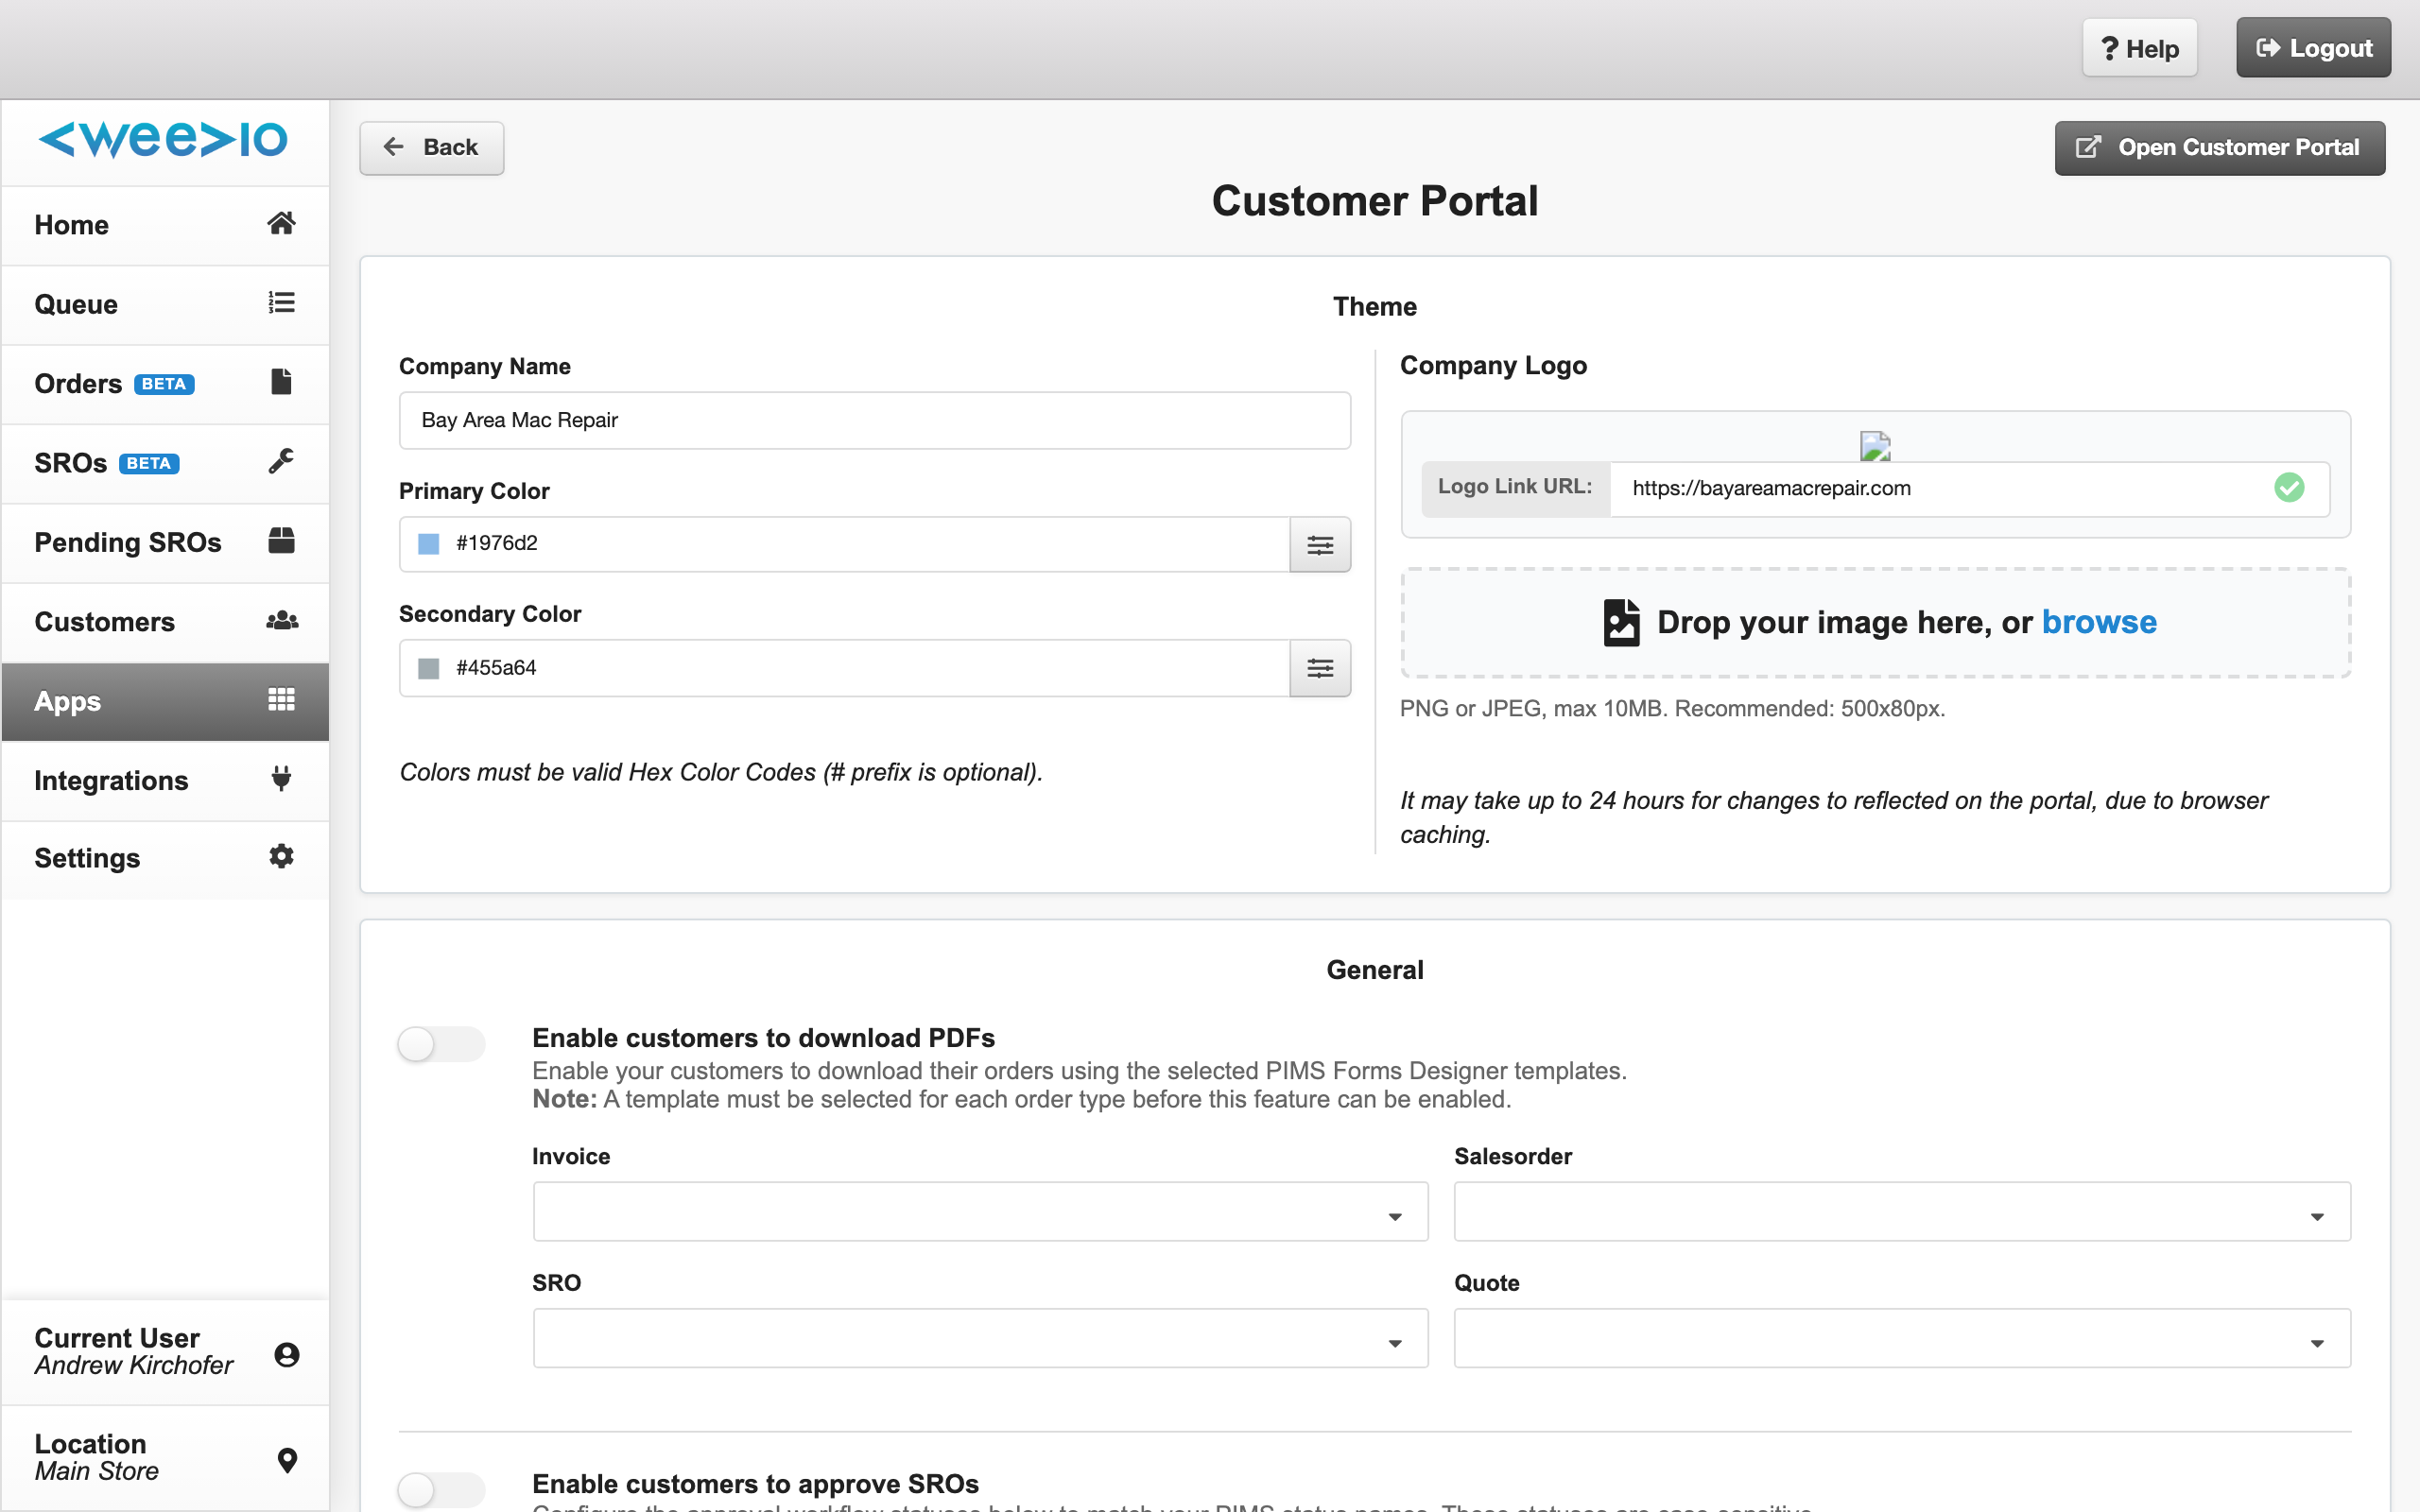
Theme & Branding
Customize the look and feel of your Customer Portal to match your company branding.
| Setting | Description |
|---|---|
| Company Name | Your organization name, displayed throughout the portal |
| Primary Color | Main brand color used for buttons, links, and accents (hex value, e.g. #1976d2) |
| Secondary Color | Supporting brand color (hex value) |
| Company Logo | Your logo displayed in the portal header. PNG or JPEG, max 10 MB, recommended 500x80 px. Drag and drop or click to upload. |
| Logo Link URL | URL customers navigate to when clicking your logo (e.g., your company website) |
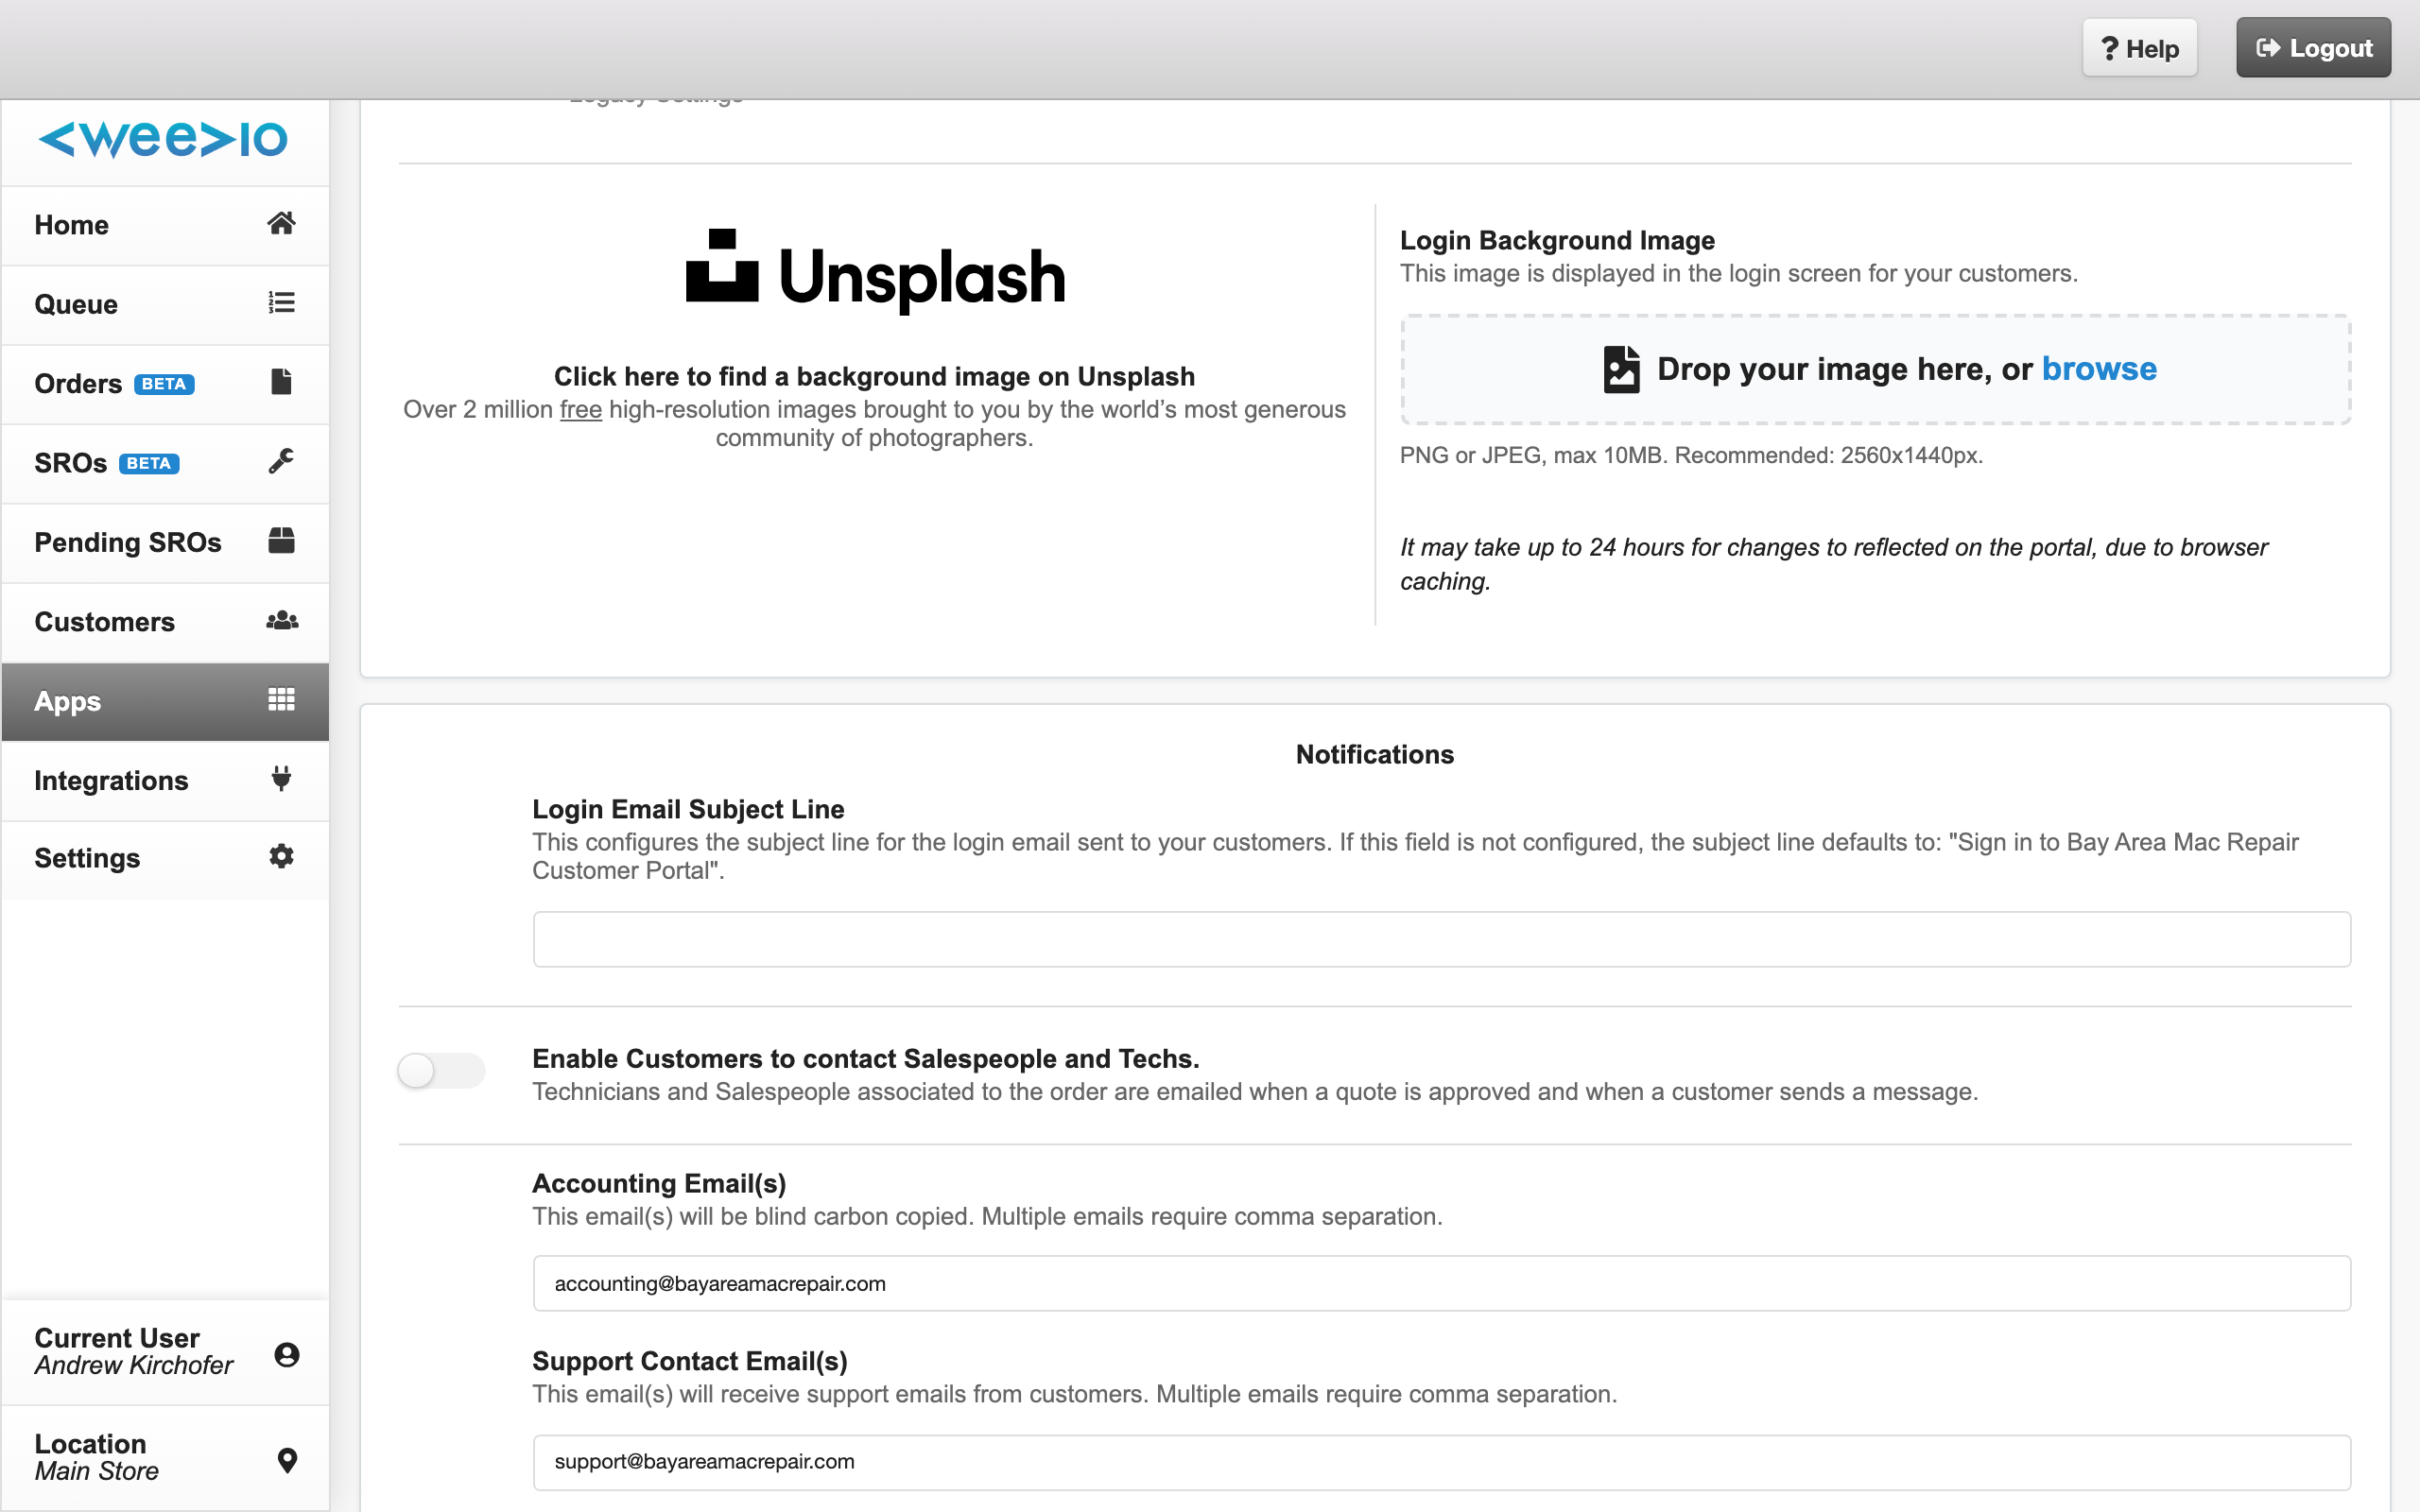
| Login Background Image | Background image shown on the portal login page. PNG or JPEG, max 10 MB, recommended 2560x1440 px. |
For detailed instructions on uploading images, see Branding & Images.
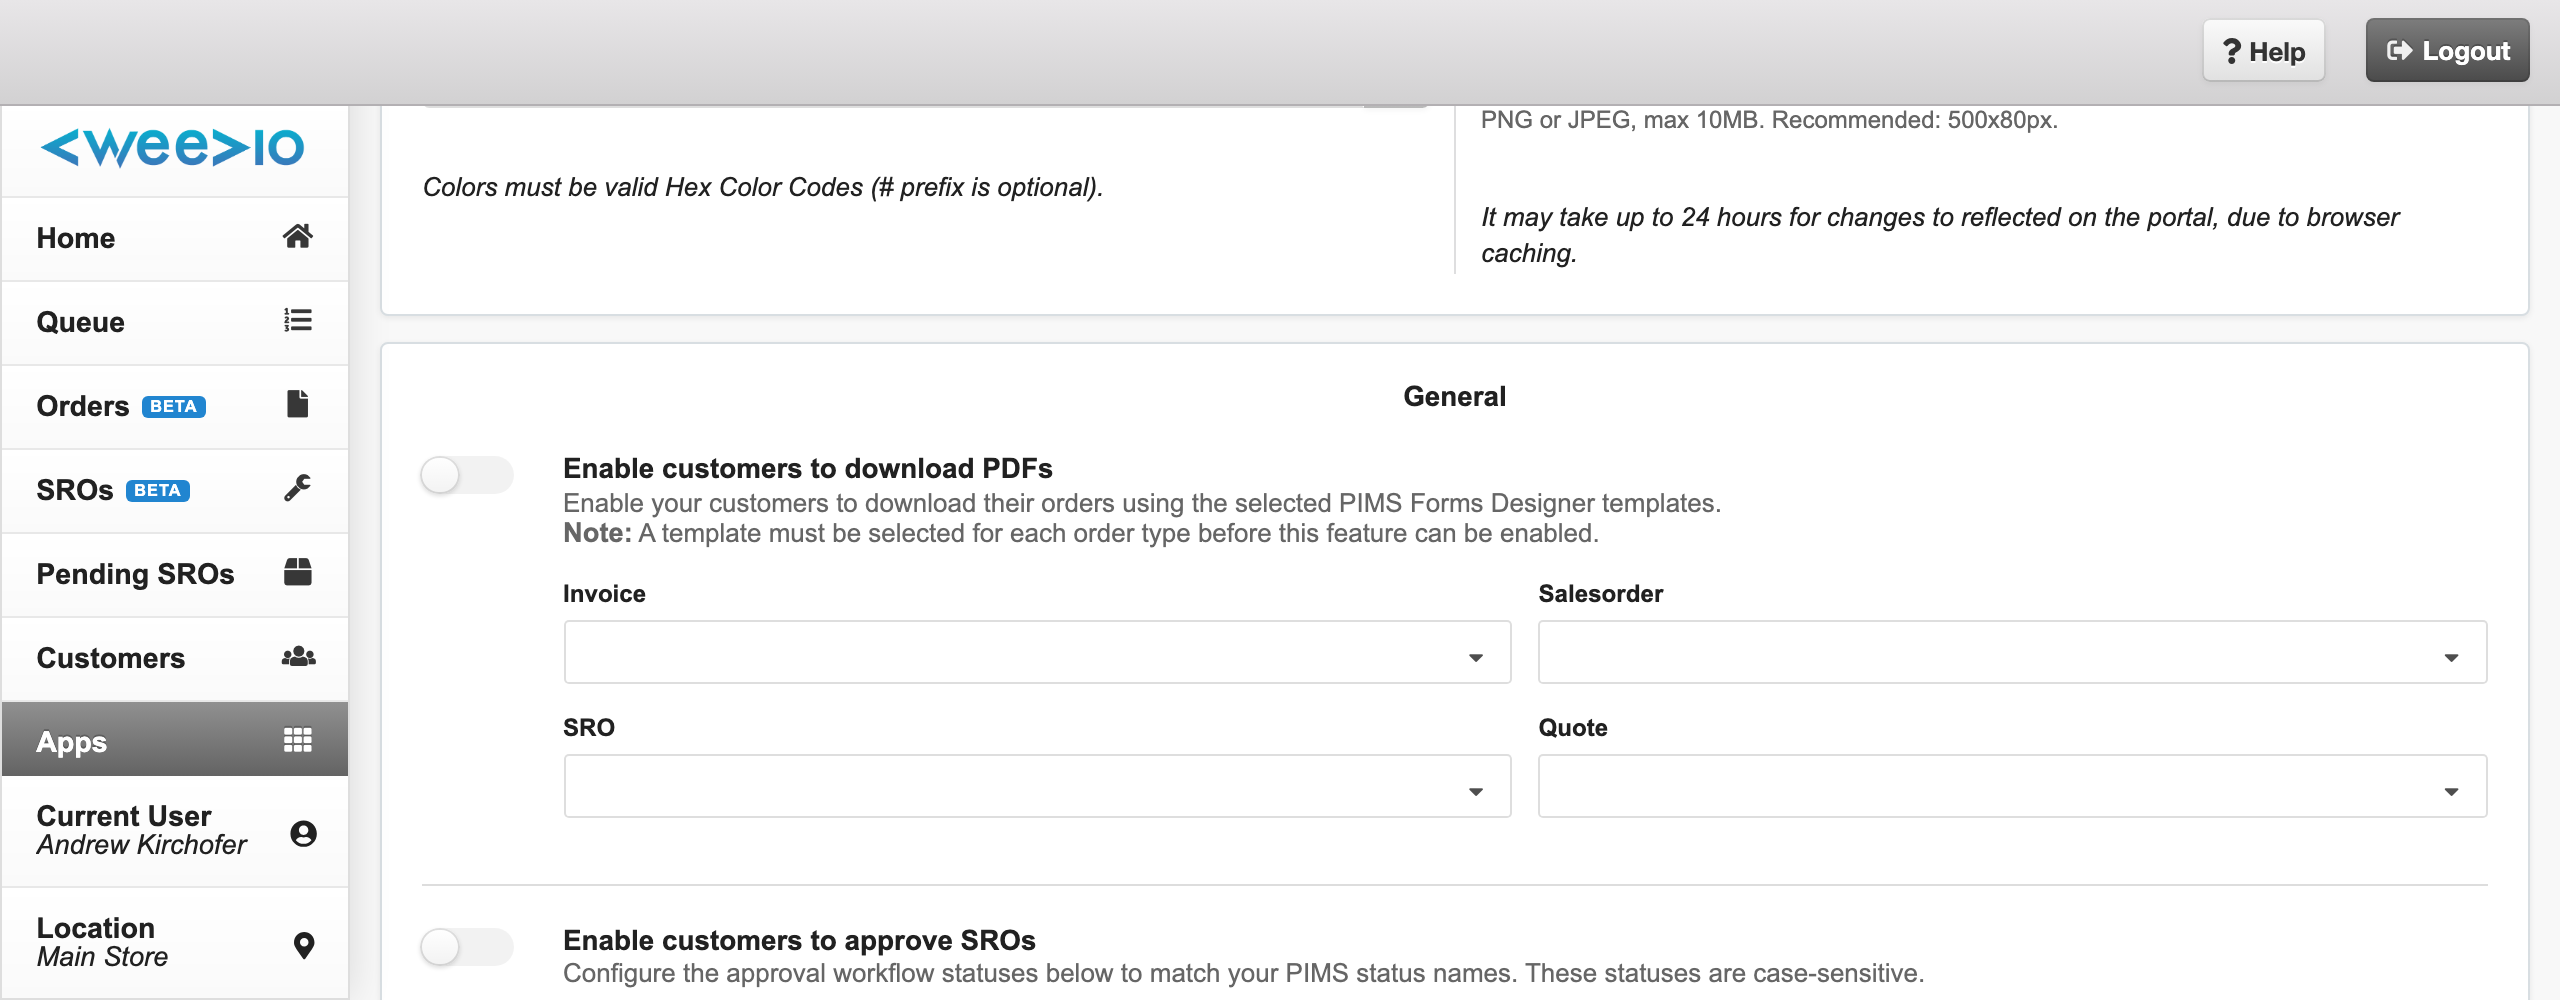
PDF Downloads
Allow customers to download order documents as PDFs using your PIMS Forms Designer templates.
| Setting | Description |
|---|---|
| Enable customers to download PDFs | Master toggle to show or hide PDF download buttons in the portal |
| Invoice Template | PIMS Forms Designer template used for invoice PDFs |
| Sales Order Template | Template used for sales order PDFs |
| SRO Template | Template used for SRO/repair PDFs |
| Quote Template | Template used for quote PDFs |
Note:
Templates are populated from your PIMS Forms Designer. If no templates appear in the dropdown, verify that templates exist in your PIMS configuration.
Notifications
Configure email notifications and contact options for the Customer Portal.
| Setting | Description |
|---|---|
| Login Email Subject Line | Custom subject line for customer login emails. Defaults to Sign in to [Company Name] Customer Portal. |
| Enable Customers to contact Salespeople and Techs | When enabled, customers can send messages to their assigned salesperson or technician. Contacts are emailed when a customer approves a quote or sends a message. |
| BCC Customer Actions | Email address(es) that receive a copy of all customer action notifications. Separate multiple addresses with commas. |
| Accounting Email(s) | Email address(es) for accounting-related notifications. Separate multiple with commas. |
| Pending SROs Email(s) | When enabled, sends an email notification to the specified address(es) when a customer submits the Set Up Repair form. Only available if the Pending SROs module is active. |
| Support Contact Email(s) | Email address(es) that receive customer support messages. Separate multiple with commas. |
SRO Approval Workflow
Configure how customers approve or decline repair orders. This includes setting PIMS status mappings for each stage of the workflow, enabling payment requirements, and configuring the visual timeline.
For the complete setup guide, see Approval Workflow — Admin Configuration.
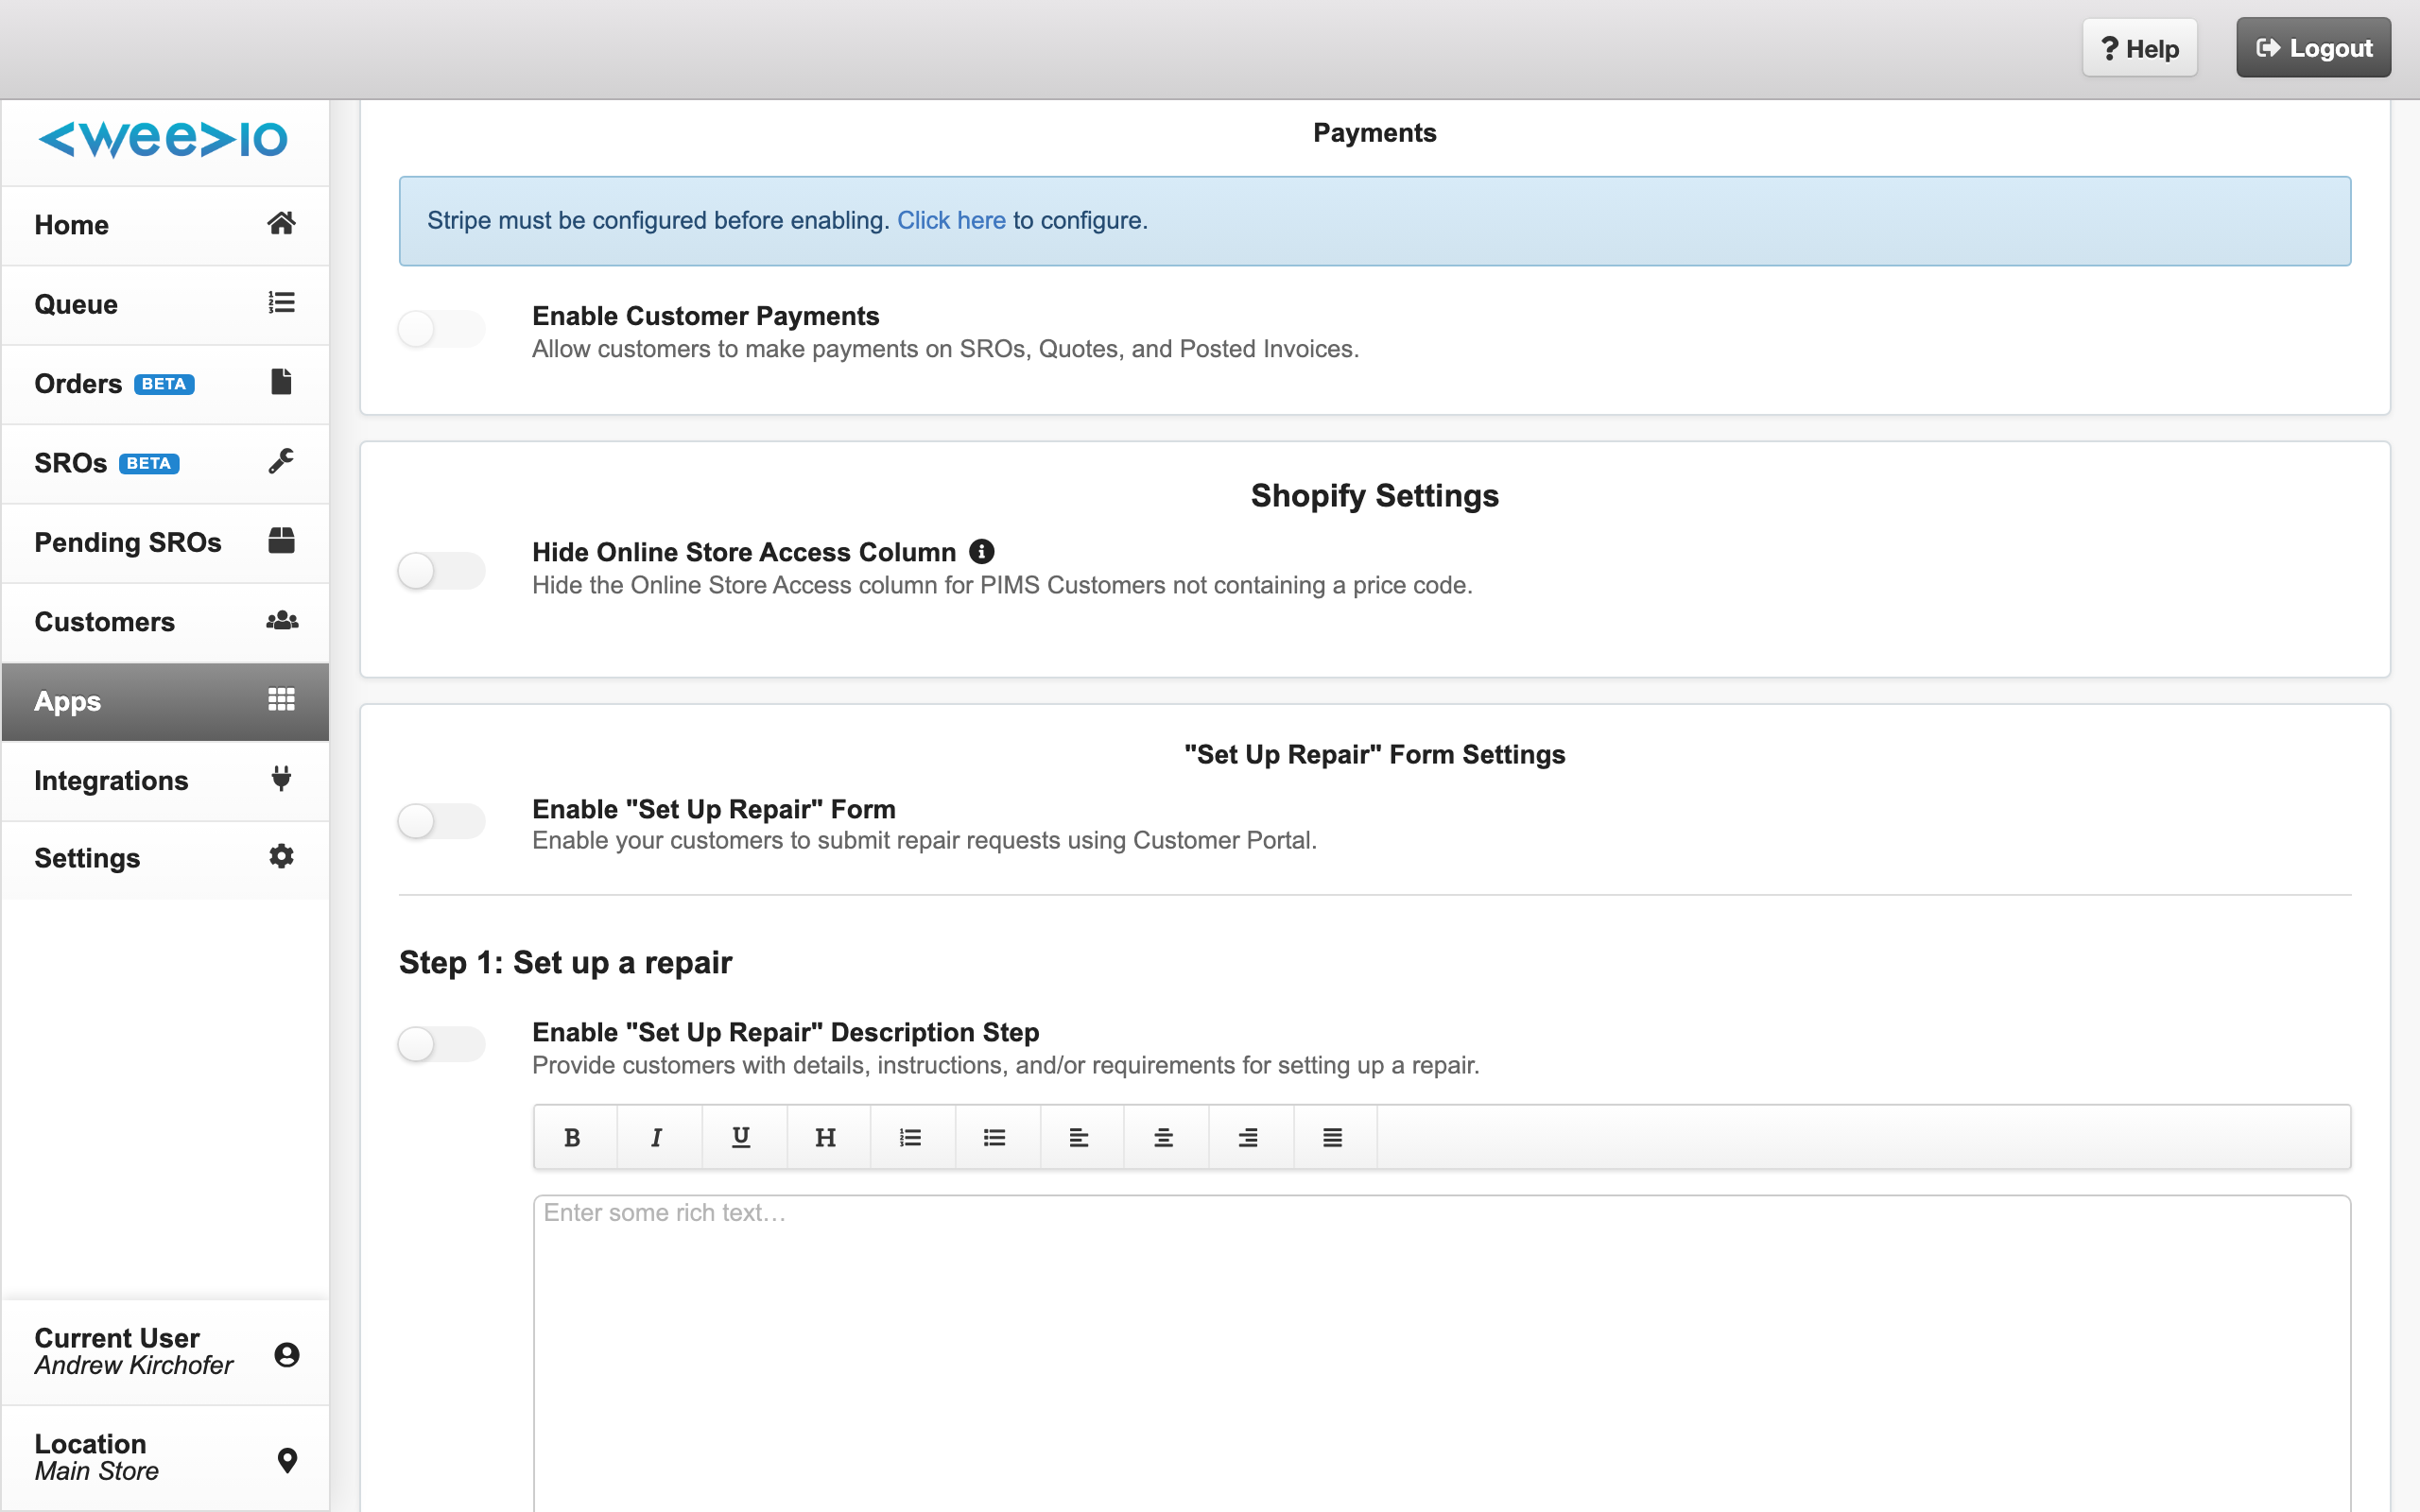
Payments
Configure which payment methods are available to customers for invoices, quotes, and repair deposits. Options include ACH bank transfers, credit/debit cards, fee pass-through, and payment type restrictions.
For the complete settings reference, see Payments — Admin Configuration.
Set Up Repair Form
Configure the multi-step repair intake form that customers use to submit repair requests.
Note:
The Set Up Repair form is only available if the Pending SROs module is active for your account.
| Setting | Description |
|---|---|
| Enable "Set Up Repair" Form | Master toggle to enable or disable the repair intake form in the portal |
Form Steps
The repair form consists of six steps. Steps 2, 3, and 6 are always included; the others can be enabled or disabled individually.
Step 1: Description and Instructions (Optional)
When enabled, displays a custom introductory page before the form begins. Use the rich text editor to provide repair instructions, requirements, or other information customers should read before submitting.
Step 2: Your Details (Always Included)
Collects customer contact information: company name, contact name, email, phone, and address. This step cannot be disabled.
Step 3: Device Entry (Always Included)
Customers enter details for each device being repaired: device type, serial number, backup status, data erasure consent, repair approver, and symptoms. This step cannot be disabled.
Step 4: Delivery Details (Optional)
When enabled, collects information about how devices will be delivered to your shop and returned to the customer. You can configure:
- Receiving Options — Radio button choices for how the customer will send devices (e.g., "Drop off in person", "Ship via FedEx"). Enter each option on a new line.
- Receiving Text Fields — Additional custom text input fields for receiving details (e.g., "Tracking Number"). Add or remove fields as needed.
- Returning Options — Radio button choices for how repaired devices should be returned.
- Returning Text Fields — Additional custom text input fields for return details.
Step 5: Terms of Service (Optional)
When enabled, displays your terms of service and requires a digital signature before submission. Use the rich text editor to enter your terms. See E-Signature and Terms of Service for the customer experience.
Step 6: Submission Confirmation (Always Included)
Displays a confirmation message after the form is submitted. Customize the message using the rich text editor.
For the customer-facing form experience, see Setup Repair.
Shopify Settings
Note:
This section only appears if the Shopify Integration module is active for your account.
| Setting | Description |
|---|---|
| Hide Online Store Access Column | Hides the eShop Access column in Users and Permissions for PIMS customers who do not have a price code assigned |
Portal Links
The settings page provides ready-to-use URLs you can embed on your website or share with customers:
| Link | Description |
|---|---|
| Customer Portal Landing Page | Direct link to your portal login page |
| Repair Form Landing Page | Direct link to the Set Up Repair form |
Copy these links to add them to your website, email templates, or other customer-facing materials.
Custom SMTP Settings
By default, the Customer Portal sends emails from Weevio's mail servers. You can configure a custom SMTP server to send portal emails from your own domain.
| Setting | Description |
|---|---|
| Host | Your SMTP server hostname (e.g., smtp.example.com) |
| Port | SMTP port number |
| User | SMTP authentication username |
| Password | SMTP authentication password |
| From Email Address | The email address that appears in the "From" field of portal emails |
Use the Send Test Email button to verify your configuration before saving. Click Reset to Default to revert to Weevio's default mail server.
Note:
Custom SMTP settings do not affect Customer Portal login link emails, which always send from the default address.
Need Help?
For assistance, please send a message to our Support page.