The SRO Approval Workflow lets customers review and approve or decline Service Repair Orders (SROs) directly in the Customer Portal before repairs proceed. When enabled, repairs requiring approval appear in a dedicated Action Required tab with notification badges on your dashboard.
How It Works
When your service provider enables the approval workflow, repairs go through these stages:
- Awaiting Approval — The repair appears in your Action Required tab, ready for your decision.
- Approved or Declined — You approve or decline the repair. Your technician is notified.
- Awaiting Payment (if applicable) — For accounts that require upfront payment, approved repairs must be paid before work begins.
- Work Proceeds — Once approved (and paid, if required), the repair moves forward.
Note:
If your account uses terms-based billing (such as Net 30, On Account, or Invoice), you will not be prompted to pay upfront. Approved repairs proceed immediately.
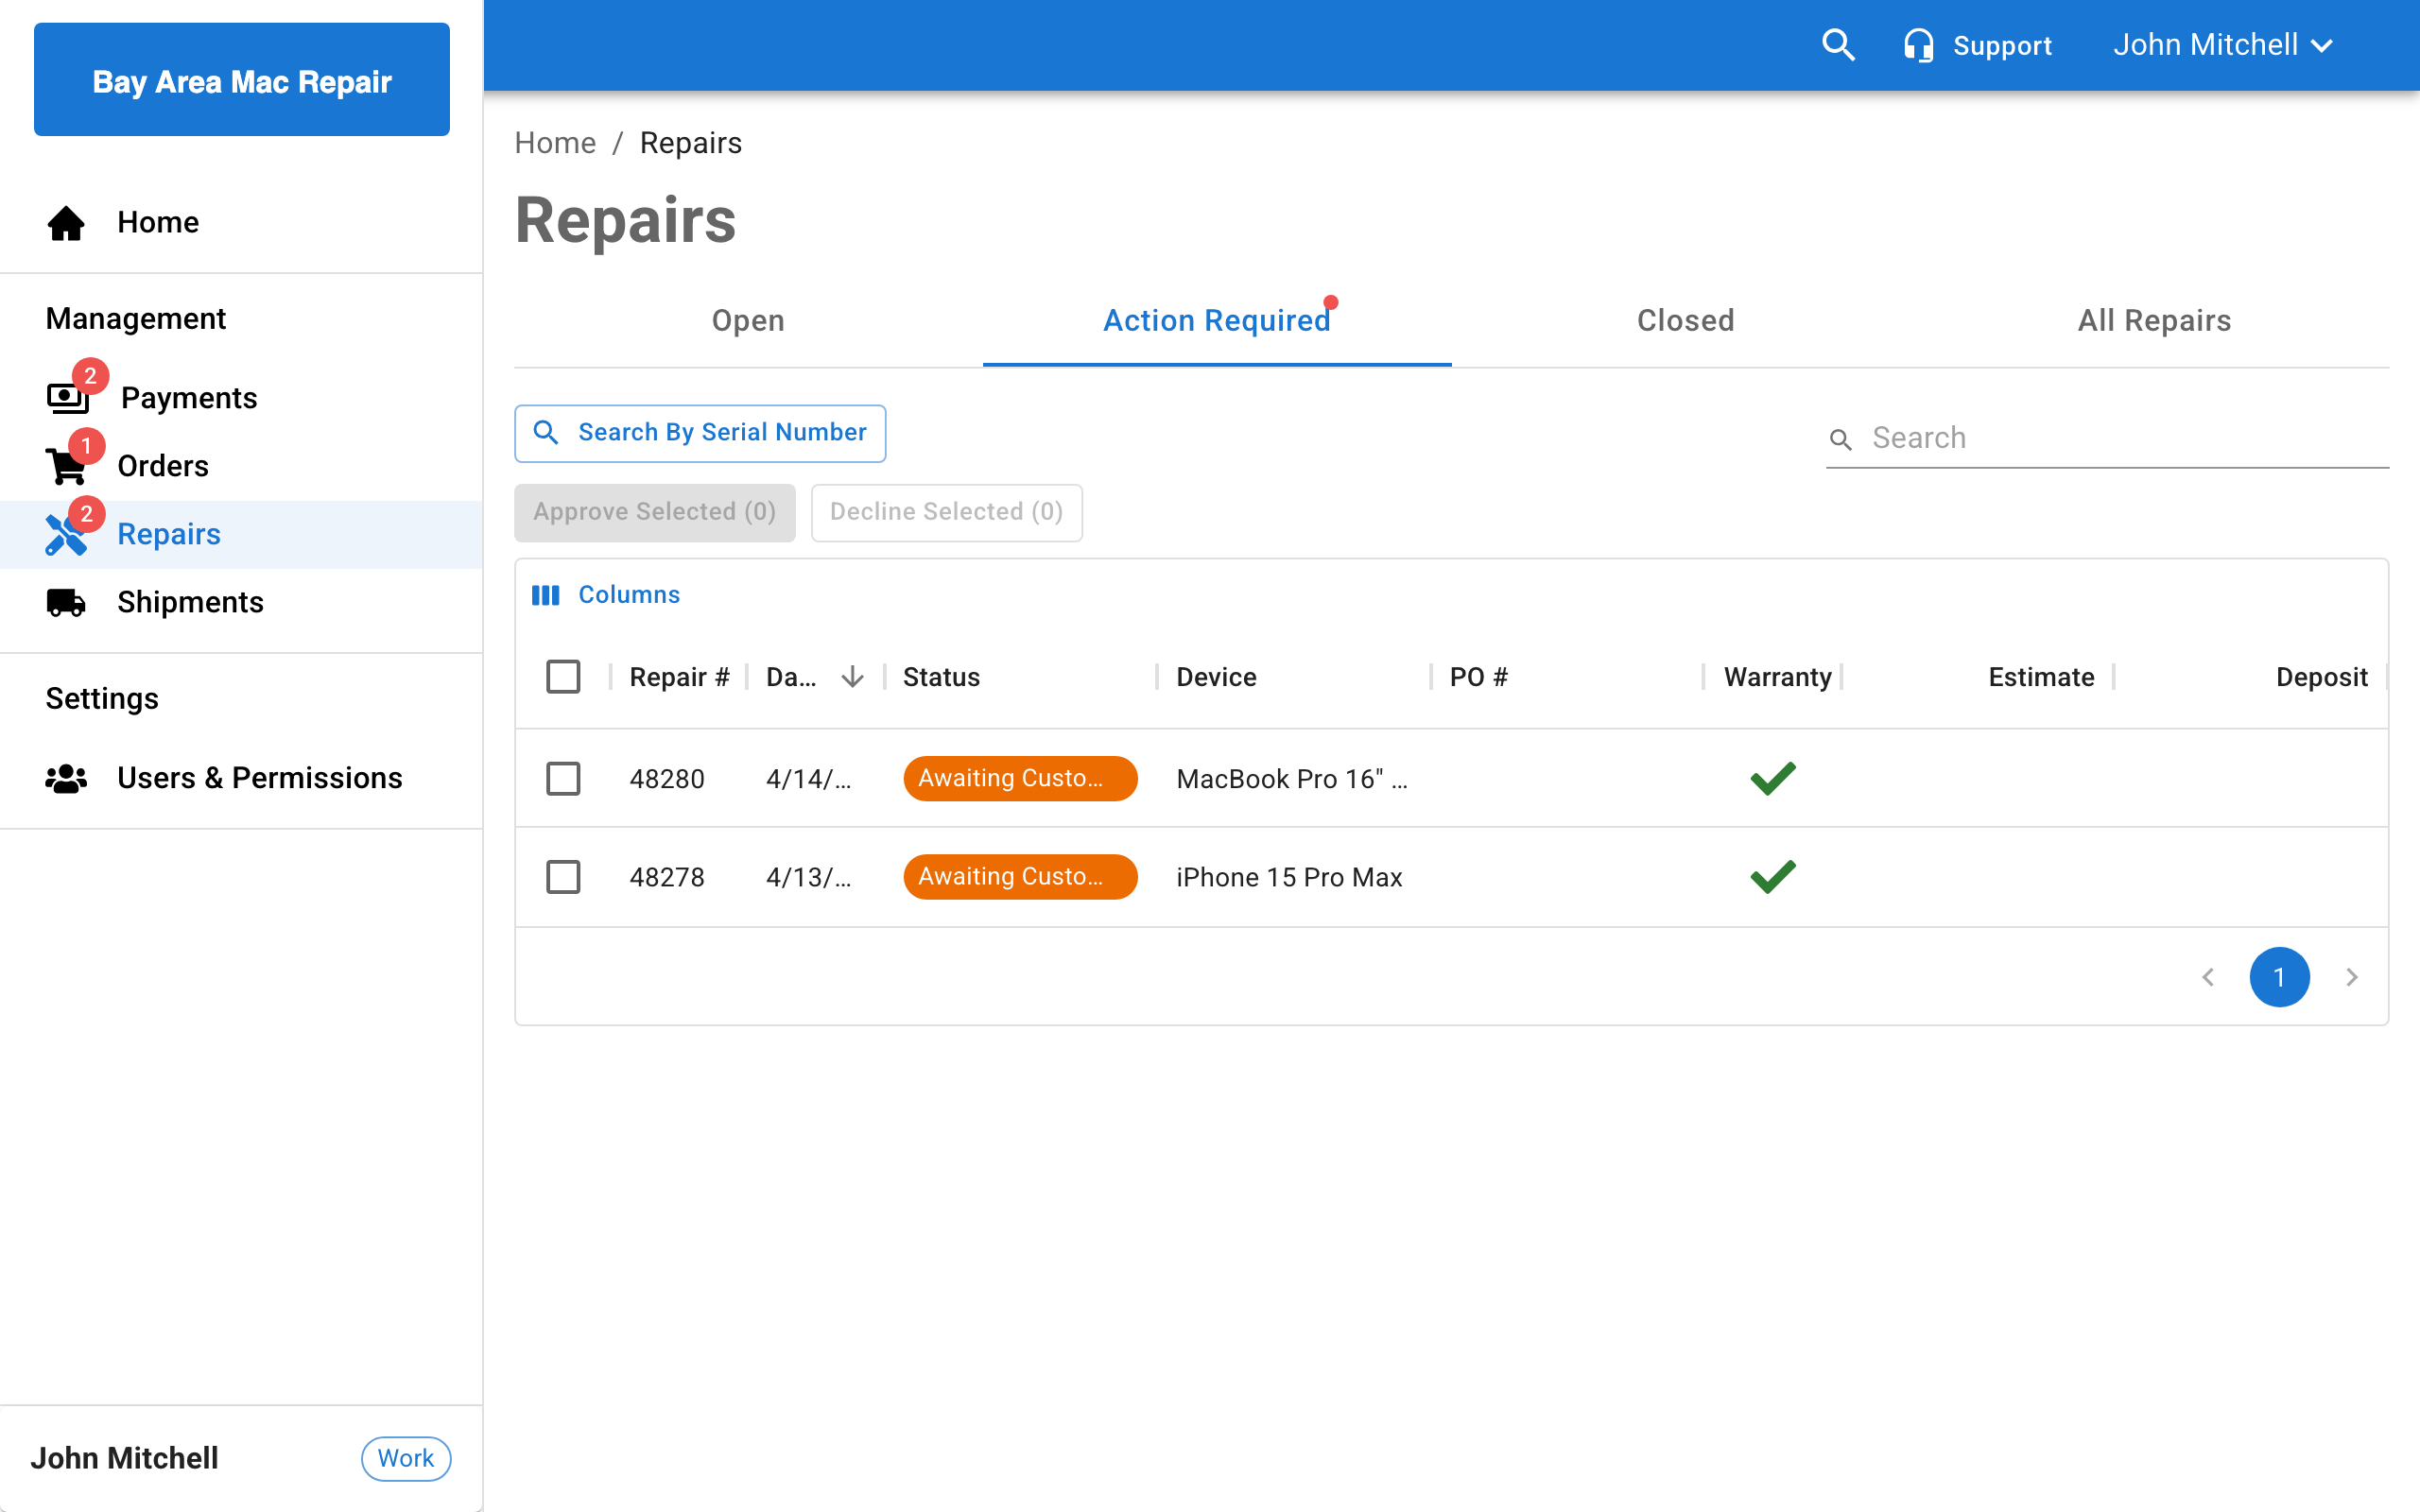
Viewing Repairs Awaiting Approval
Repairs awaiting your action appear in two places:
- Dashboard — A notification badge on the Repairs card shows the count of repairs needing attention.
- Repairs page — The Action Required tab lists all repairs awaiting your approval. A red badge dot appears on the tab when items are pending.
![]()
Status Indicators
Repair statuses display as color-coded chips so you can identify their state at a glance:
| Color | Status | Meaning |
|---|---|---|
| Amber (warning) | Awaiting Approval | The repair is waiting for your decision |
| Blue (info) | Awaiting Payment | You approved the repair but payment is still needed |
| Green (success) | Approved | The repair is approved and work can proceed |
| Red (error) | Declined | You declined the repair |
| Red (error) | Canceled | The repair was canceled |
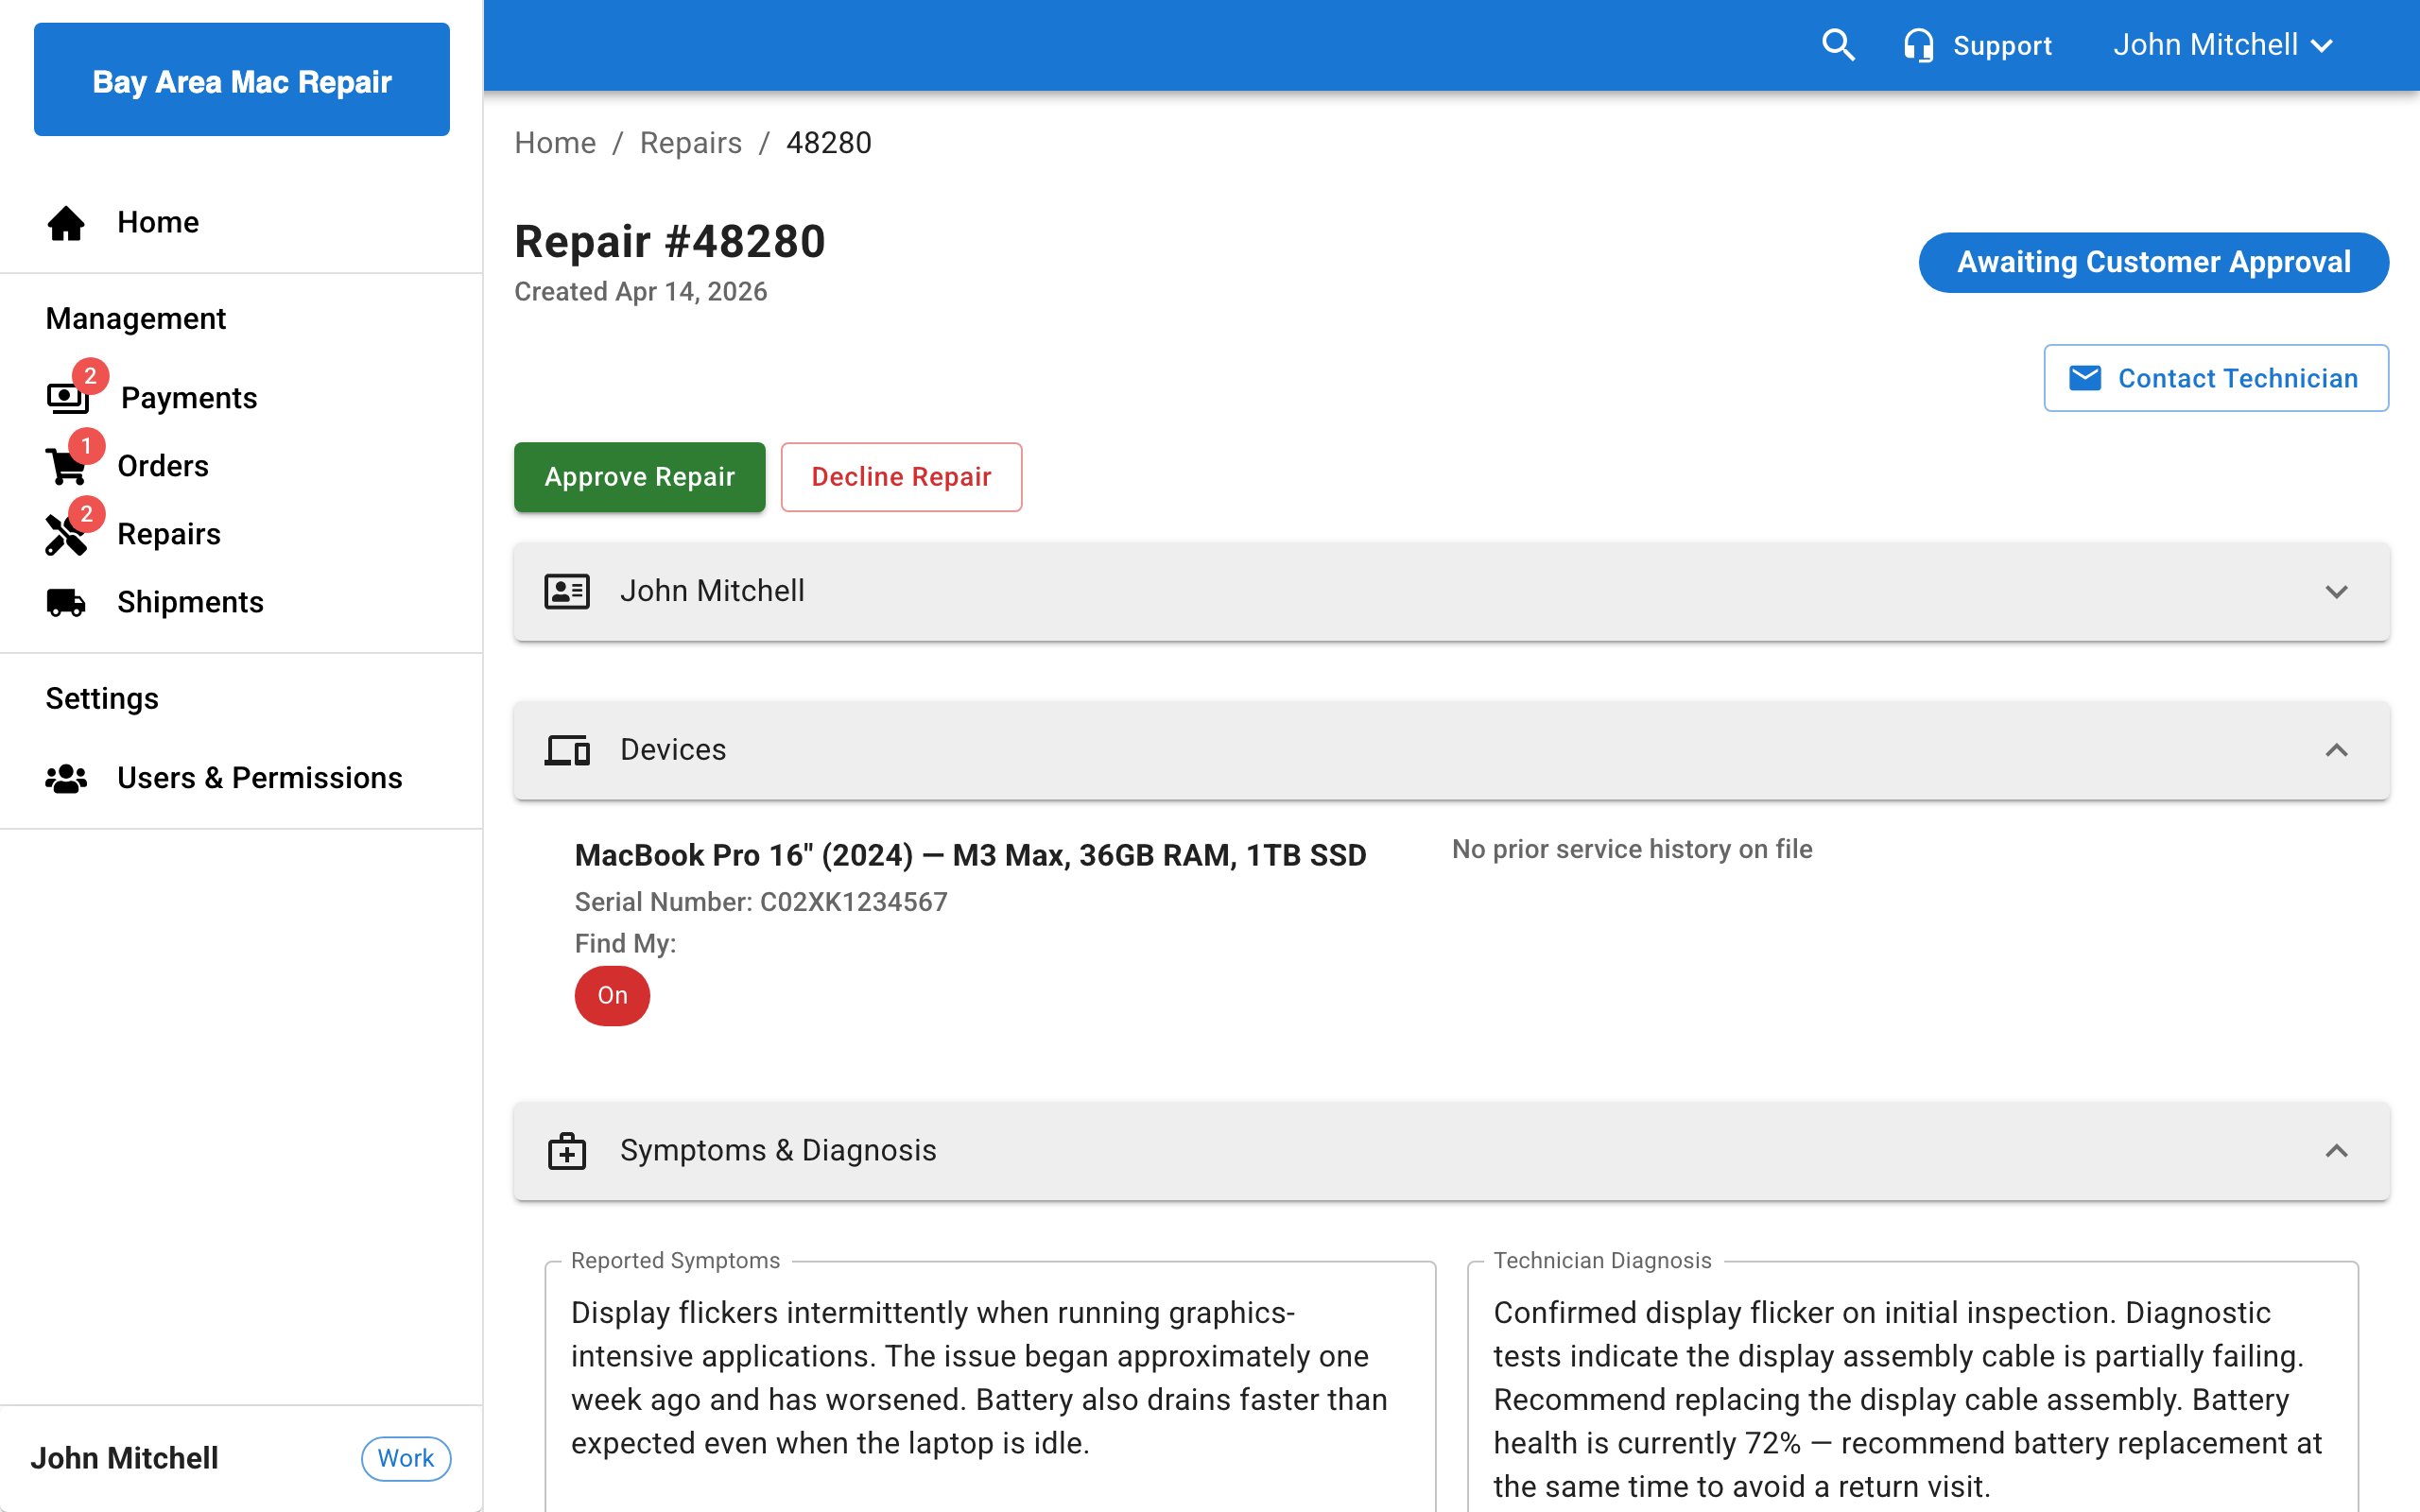
Approving a Single Repair
Open the repair
Navigate to the Repairs page and click on a repair from the Action Required tab.
Review the repair details
Review the estimate, parts, and services listed. Check the totals and balance due.
Click Approve Repair
Click the Approve Repair button. It appears both near the top and bottom of the page for convenience.
Note:
If you see an error toast such as "Failed to approve repair. Please refresh the page and try again. If the issue persists, contact us.", the repair was not approved. The repair is safely left in its previous state — refresh the page and try again. If the problem continues, contact your service provider. See Troubleshooting Approval Errors for a full list of messages.
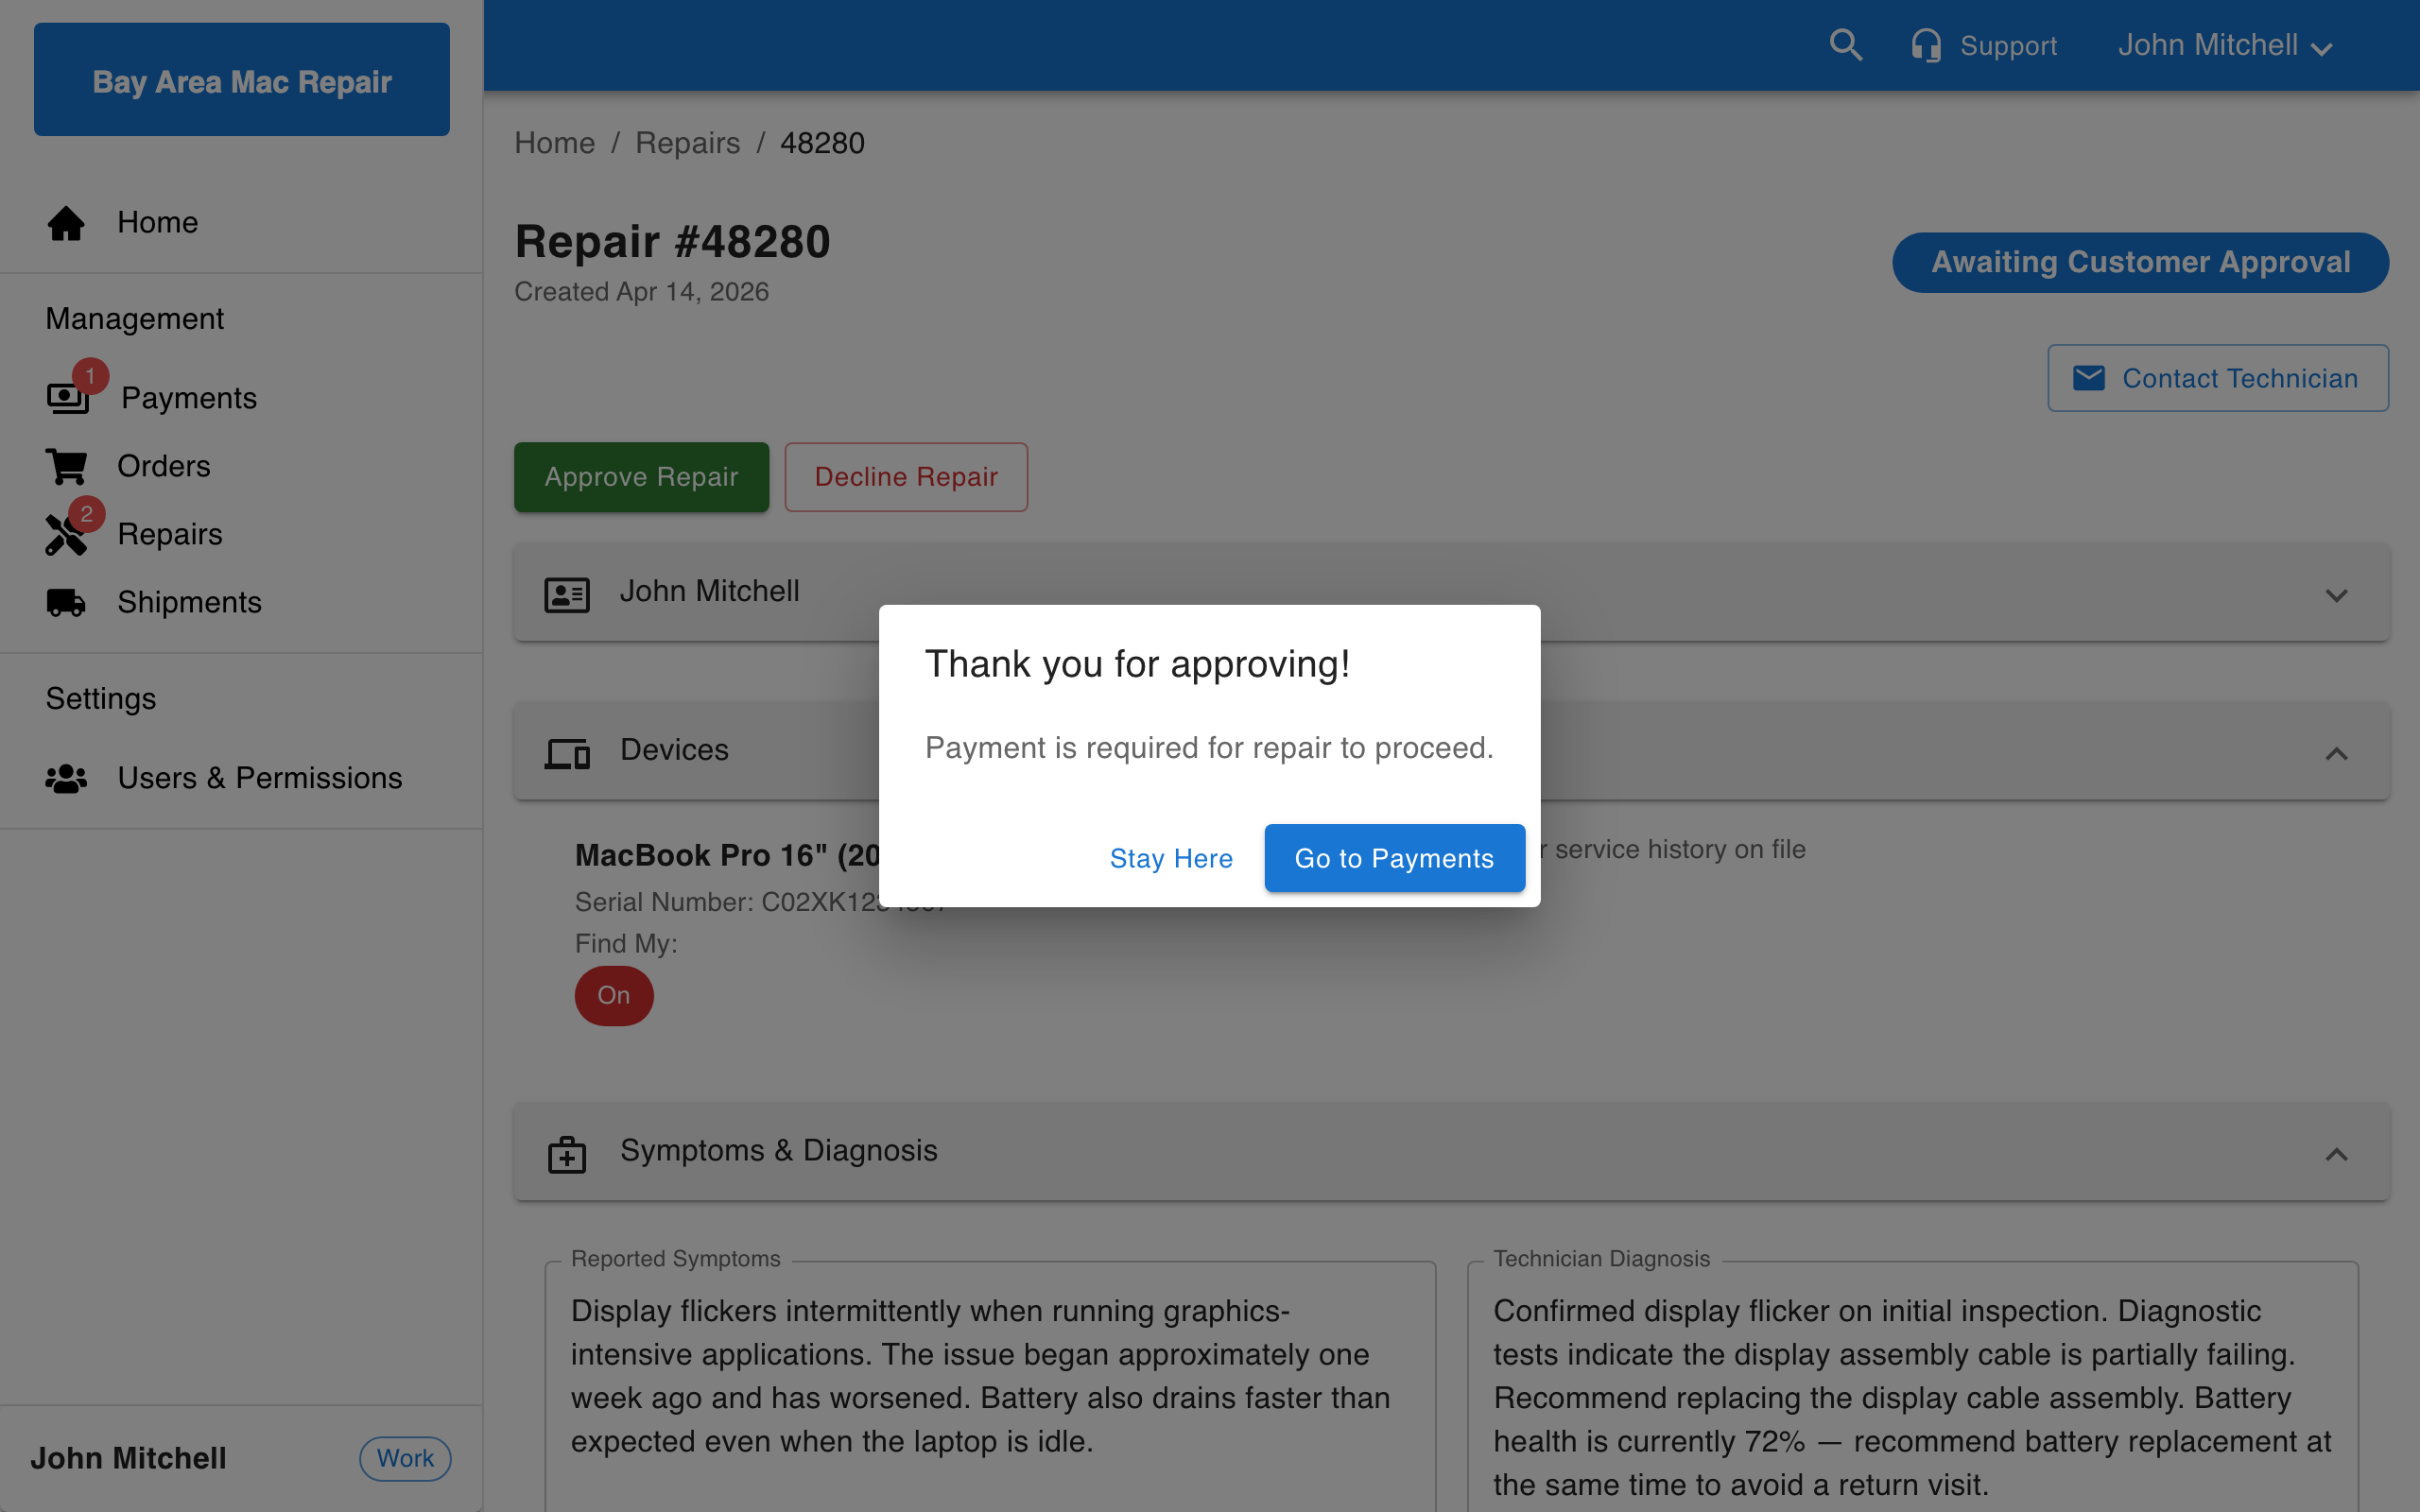
Complete payment if prompted
If your service provider requires upfront payment, a dialog appears after approval. Click Go to Payments to proceed to checkout — your approved repair will be automatically selected. Click Stay Here to complete payment later.
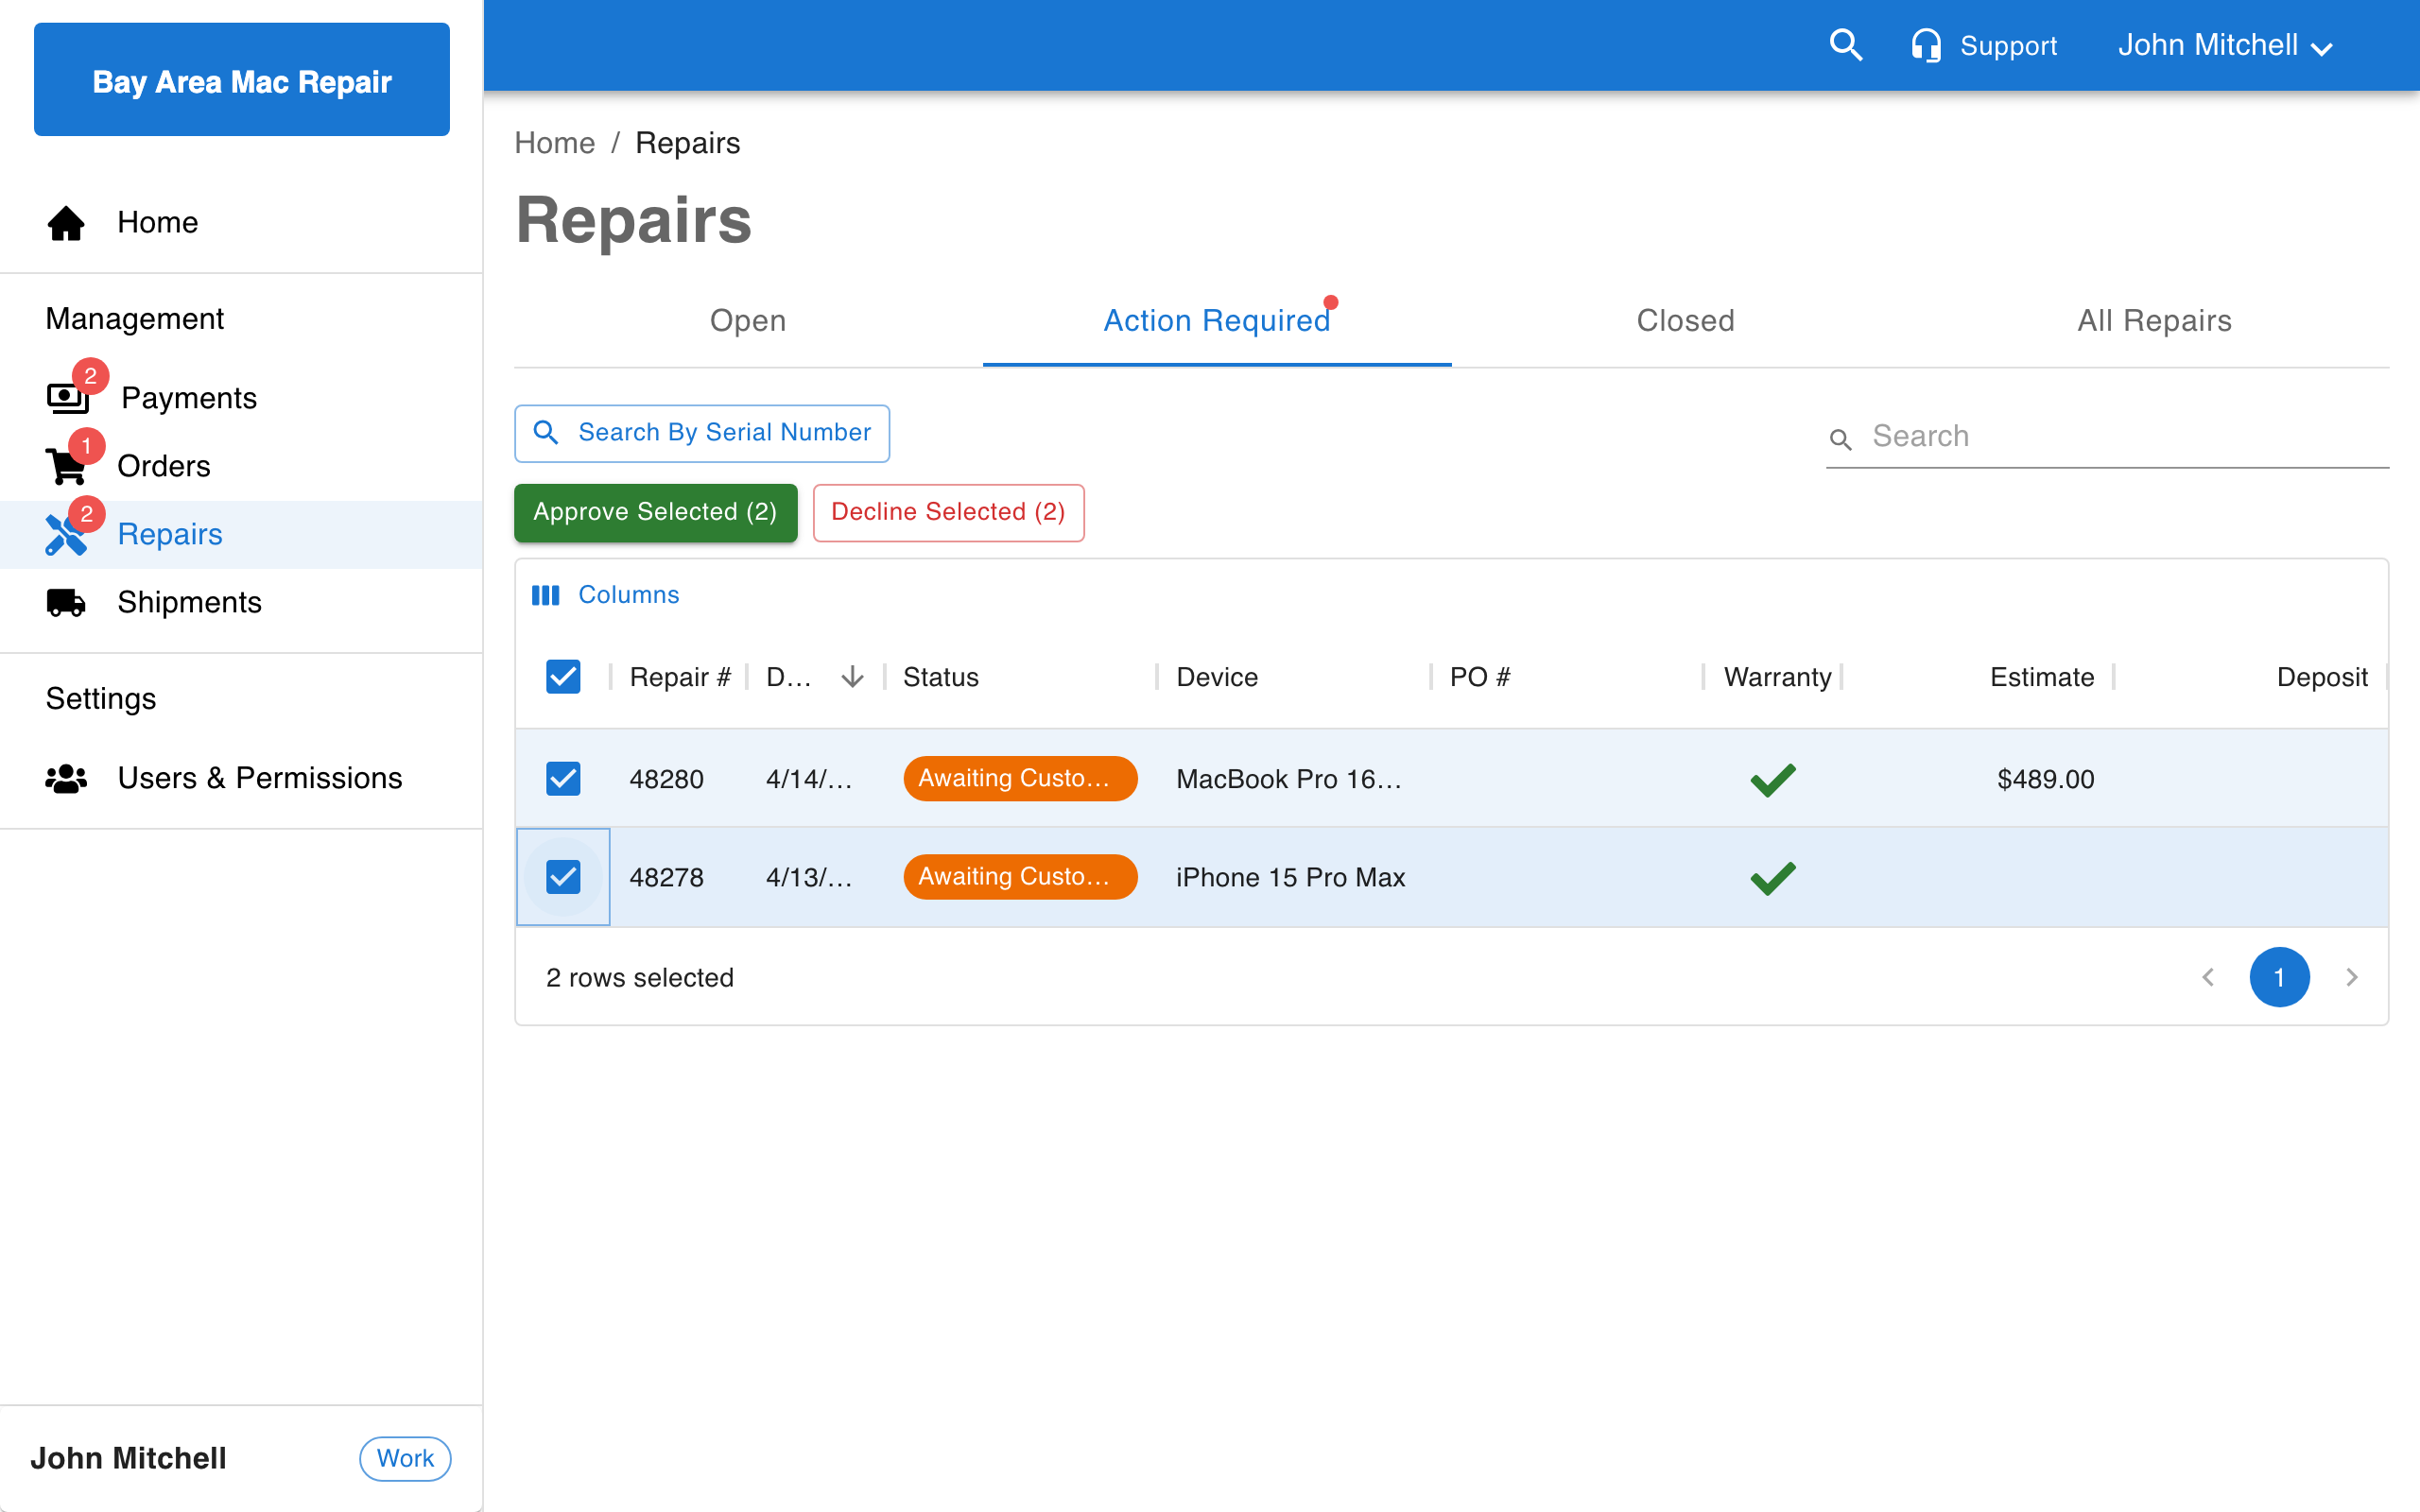
Approving Multiple Repairs
You can approve several repairs at once from the Action Required tab:
Select repairs
On the Repairs page, switch to the Action Required tab. Use the checkboxes to select the repairs you want to approve.
Click Approve Selected
Click the Approve Selected (N) button above the table, where N is the number of selected repairs.
Note:
If a few repairs in the batch fail, you will see a partial-success message such as "2 repair(s) could not be processed. Please refresh the page and try again. If the issue persists, contact us." The successful repairs are already approved — only the listed count failed and can be safely retried. Refresh the page before retrying so the portal shows the latest repair details.
Complete payment if prompted
If any approved repairs require payment, a dialog shows how many need payment and offers to navigate to the Payments page.
Declining Repairs
If you decide not to proceed with a repair, you can decline it. Declining notifies the assigned technician.
Declining a Single Repair
From the repair detail page, click Decline Repair. A confirmation dialog asks you to confirm your decision. Click Decline to proceed or Cancel to go back.
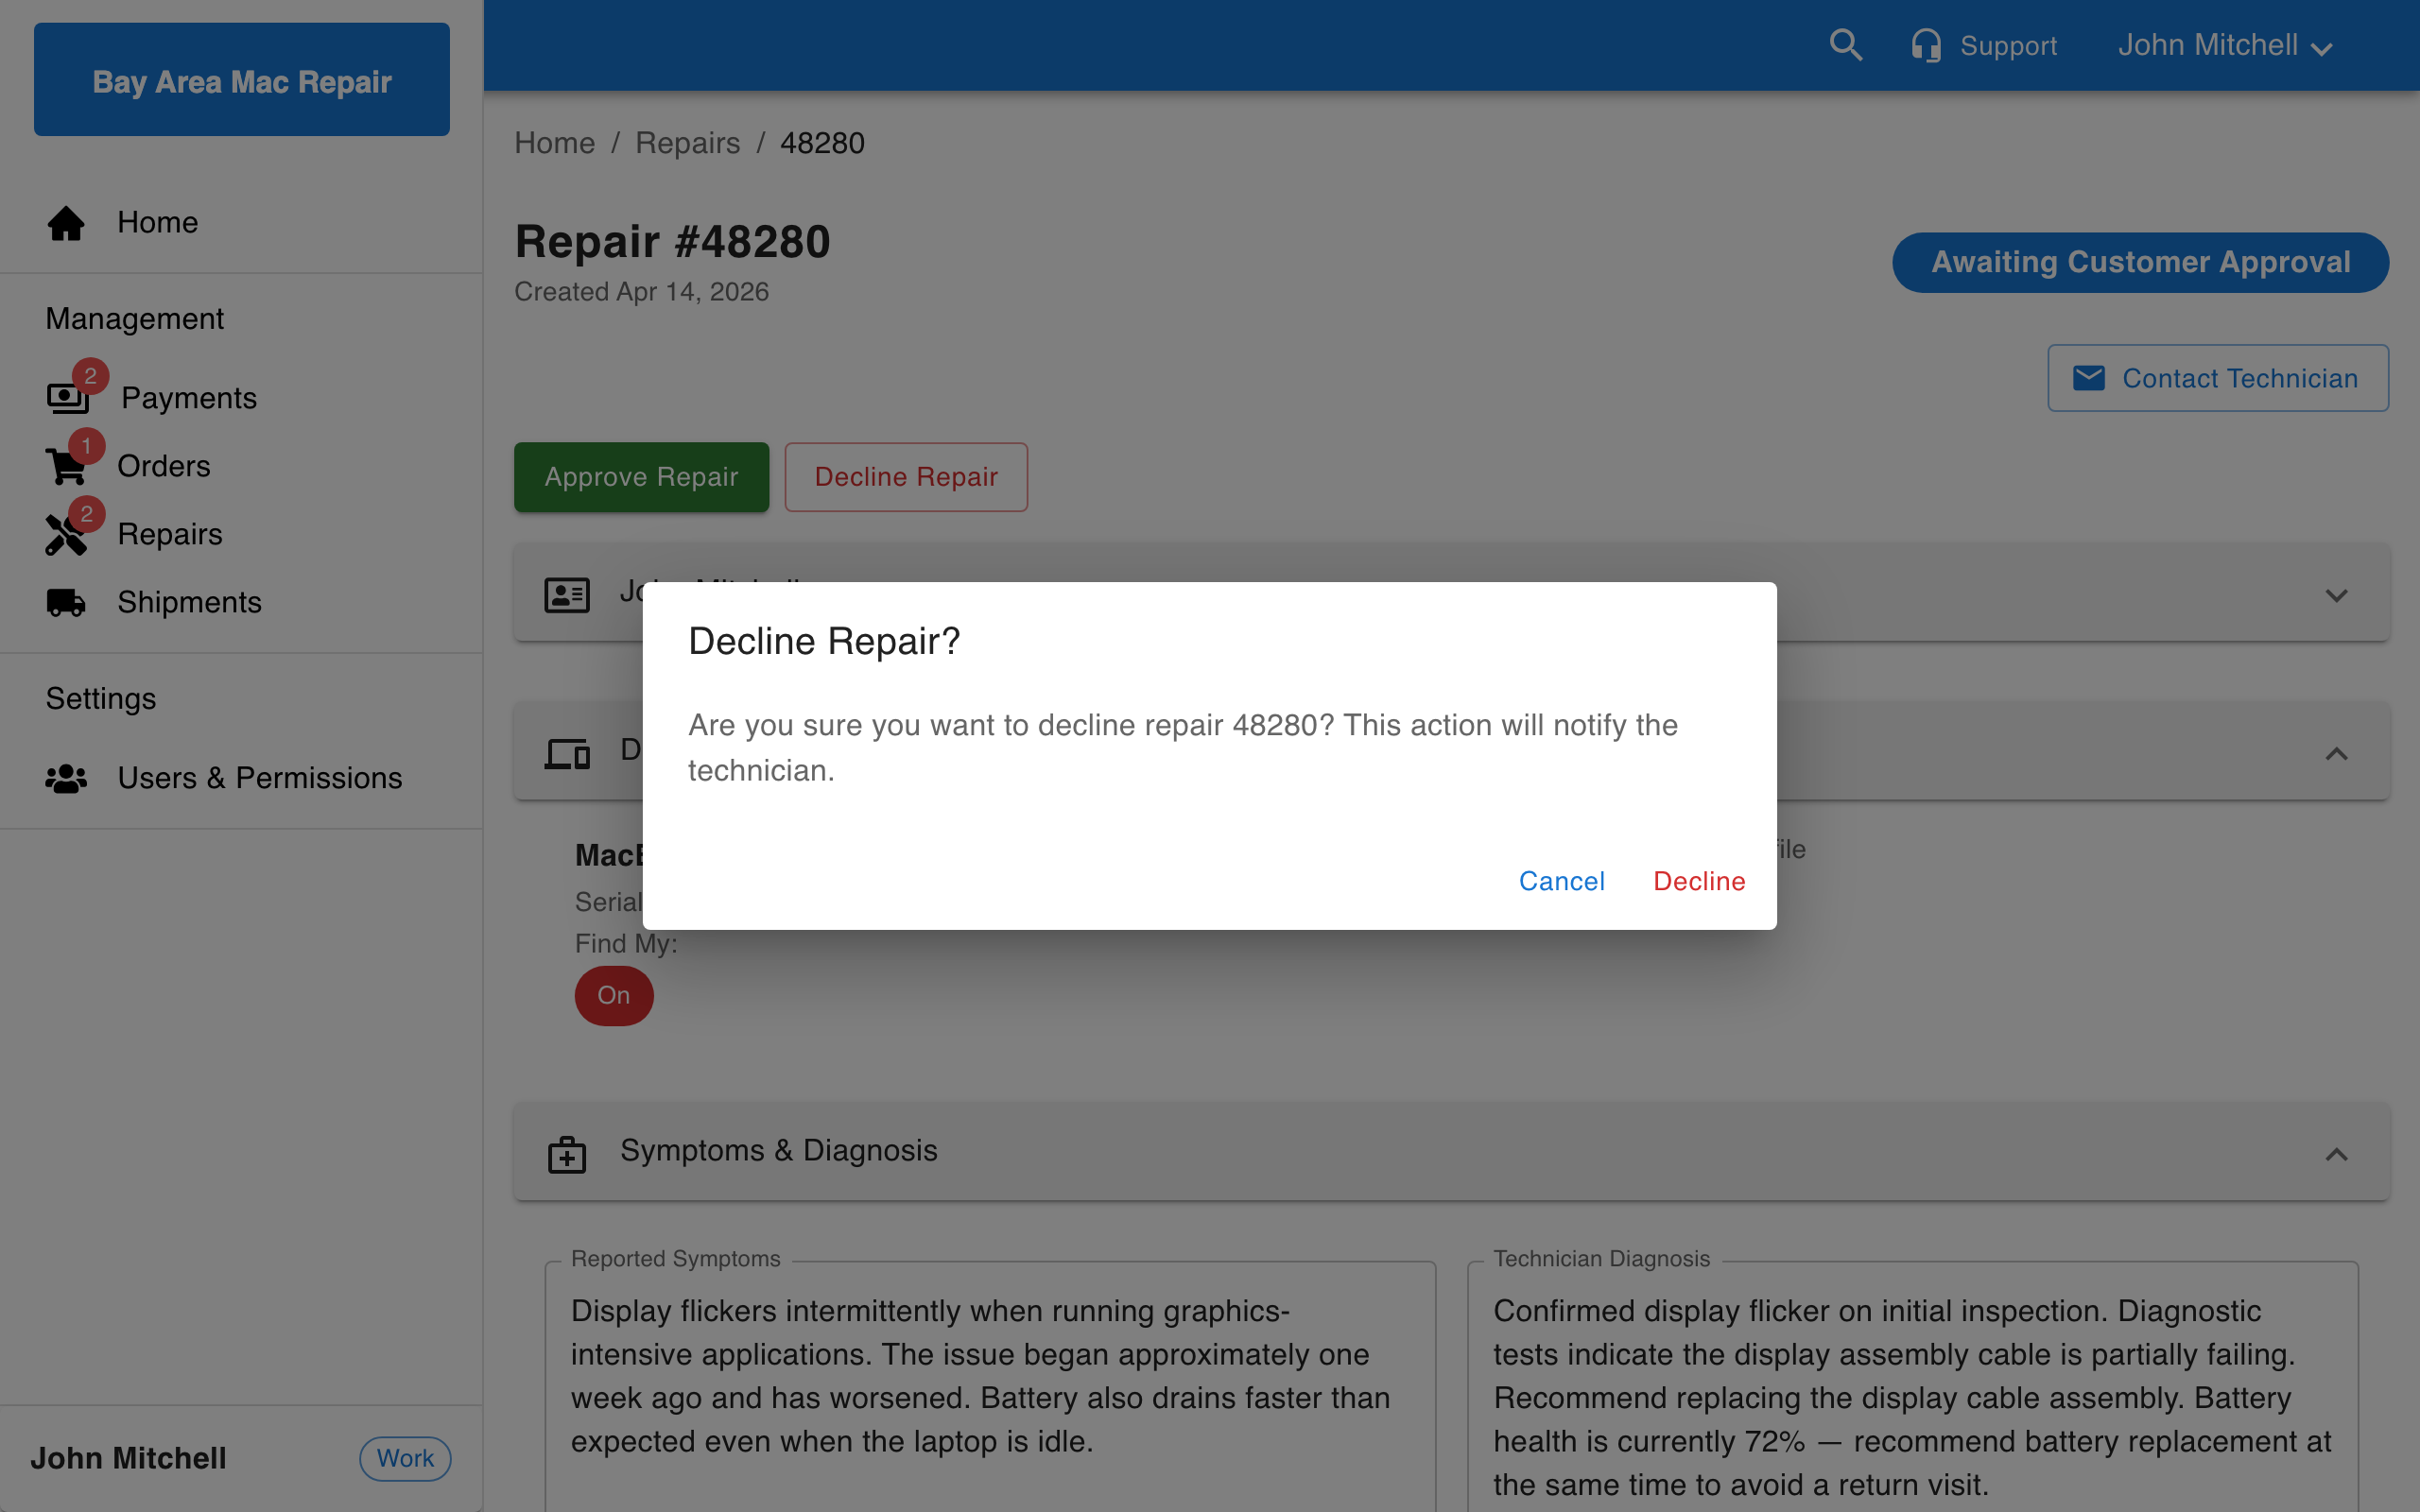
Note:
If an error toast appears (such as "Failed to decline repair. Please refresh the page and try again. If the issue persists, contact us."), the repair was not declined. Refresh and try again, or contact your service provider if the problem continues.
Declining Multiple Repairs
From the Action Required tab, select the repairs you want to decline, then click Decline Selected (N). A confirmation dialog appears before the action is processed.
Note:
Declining a repair immediately notifies the technician. Make sure you have reviewed the estimate before confirming.
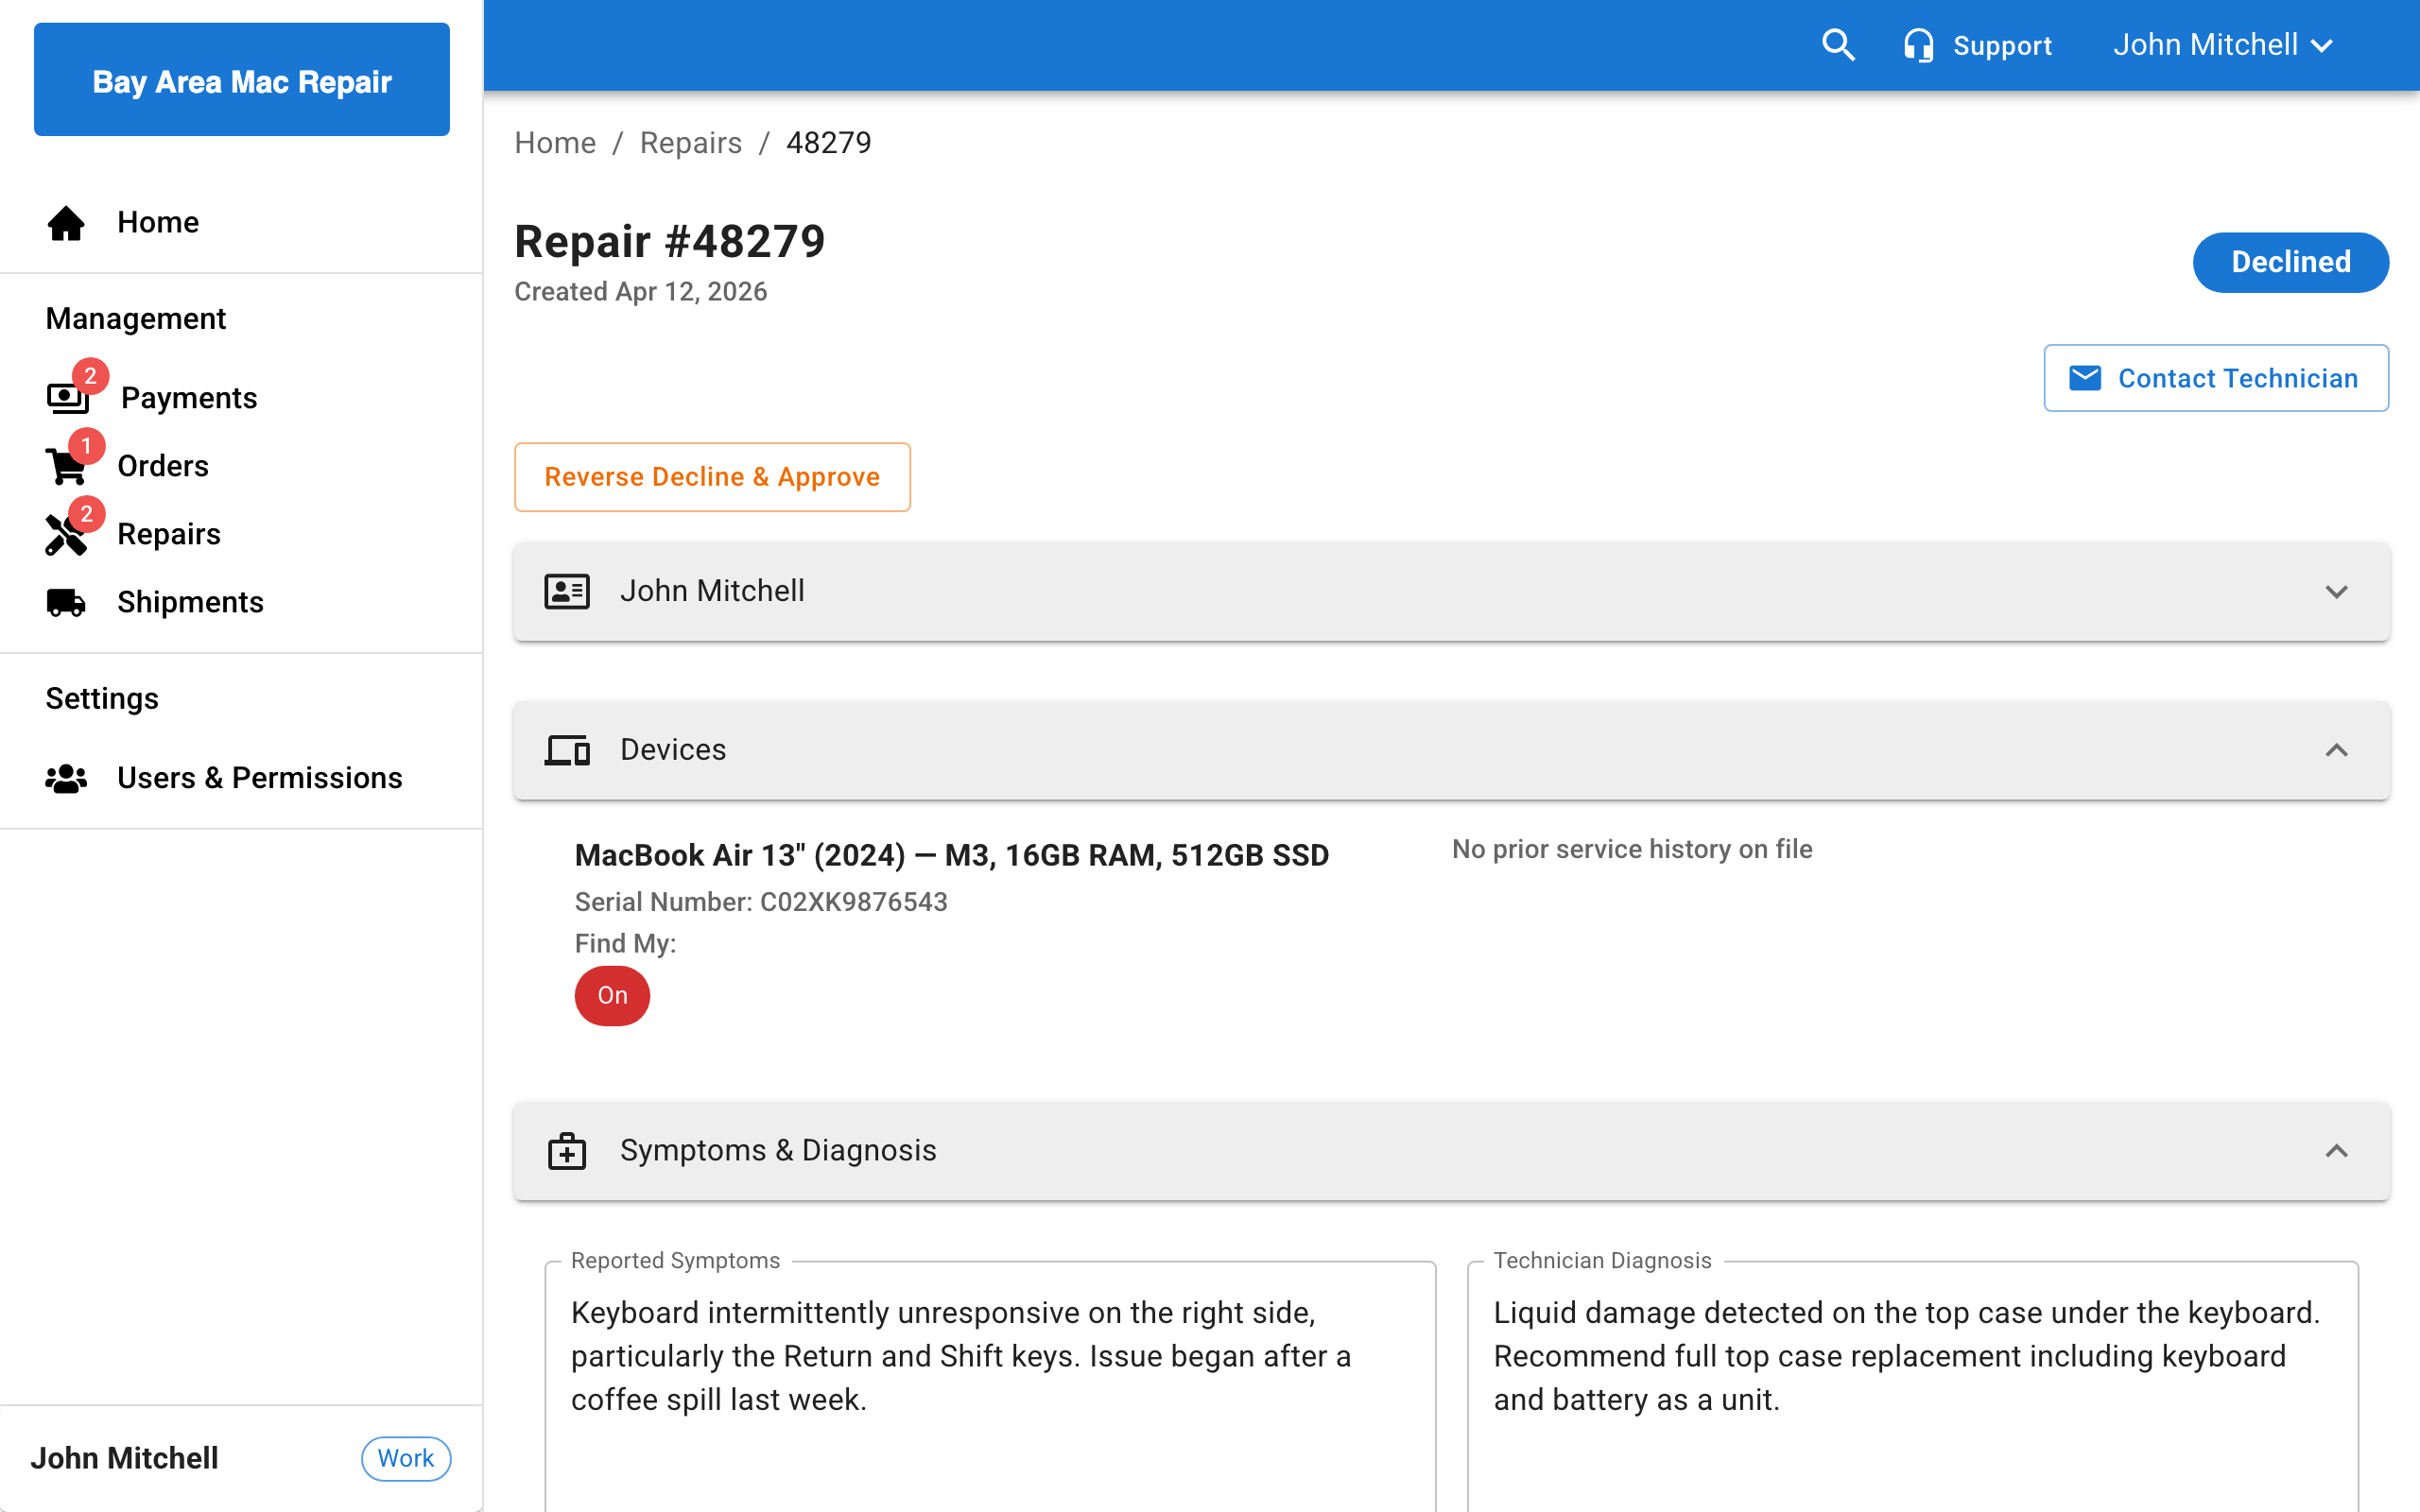
Reversing a Decline
If you change your mind after declining a repair:
- Open the declined repair from the repairs list.
- Click Reverse Decline & Approve.
- If payment is required, you will be prompted to complete payment.
Note:
Completed or canceled repairs cannot be approved or declined. Only active repairs support approval actions.
Post-Approval Payment
When your service provider requires payment before repairs proceed, the following happens after you approve:
- A payment prompt dialog appears with the option to go to the Payments page.
- On the Payments page, your approved repairs are automatically selected.
- The Payment Summary dialog opens so you can choose a payment method and complete checkout.
- Once payment is confirmed, the repair status updates and the technician is notified.
For details on payment methods and checkout, see Payments.
Troubleshooting Approval Errors
If the Customer Portal cannot reach your service provider's back-office system when you approve or decline a repair, the action is stopped and an error toast appears. The repair stays in its previous status — no partial or silent approval takes place — so you can refresh and retry without risk of double-processing.
Common error messages
| Message | What happened | What to do |
|---|---|---|
| Failed to approve repair. Please refresh the page and try again. If the issue persists, contact us. | The approve action could not complete. No status change was made. | Refresh the page and click Approve Repair again. If it keeps failing, contact your service provider. |
| Failed to decline repair. Please refresh the page and try again. If the issue persists, contact us. | The decline action could not complete. No status change was made. | Refresh the page and click Decline Repair again. |
| Failed to process repairs. Please refresh the page and try again. If the issue persists, contact us. | A bulk approve or decline did not complete for any of the selected repairs. | Refresh the page and retry the bulk action. |
| N repair(s) could not be processed. Please refresh the page and try again. If the issue persists, contact us. | A bulk action partially succeeded — some repairs were processed and N failed. | Only the listed count failed; the rest have already been approved or declined. Refresh and retry the failed ones. |
| An error occurred. Please refresh the page and try again. If the issue persists, contact us. | An unexpected error interrupted the action. | Refresh the page and try again. |
Note:
These messages mean the repair is safely left in its previous state. Always refresh before retrying so the portal shows you the latest details — a closed or canceled repair, for example, can never be accidentally re-approved during a temporary connection issue.
Admin Configuration
Note:
This section is for Weevio Cloud administrators configuring the approval workflow for their customers.
Approval workflow settings are configured in Weevio Cloud under Settings > Apps > Customer Portal.
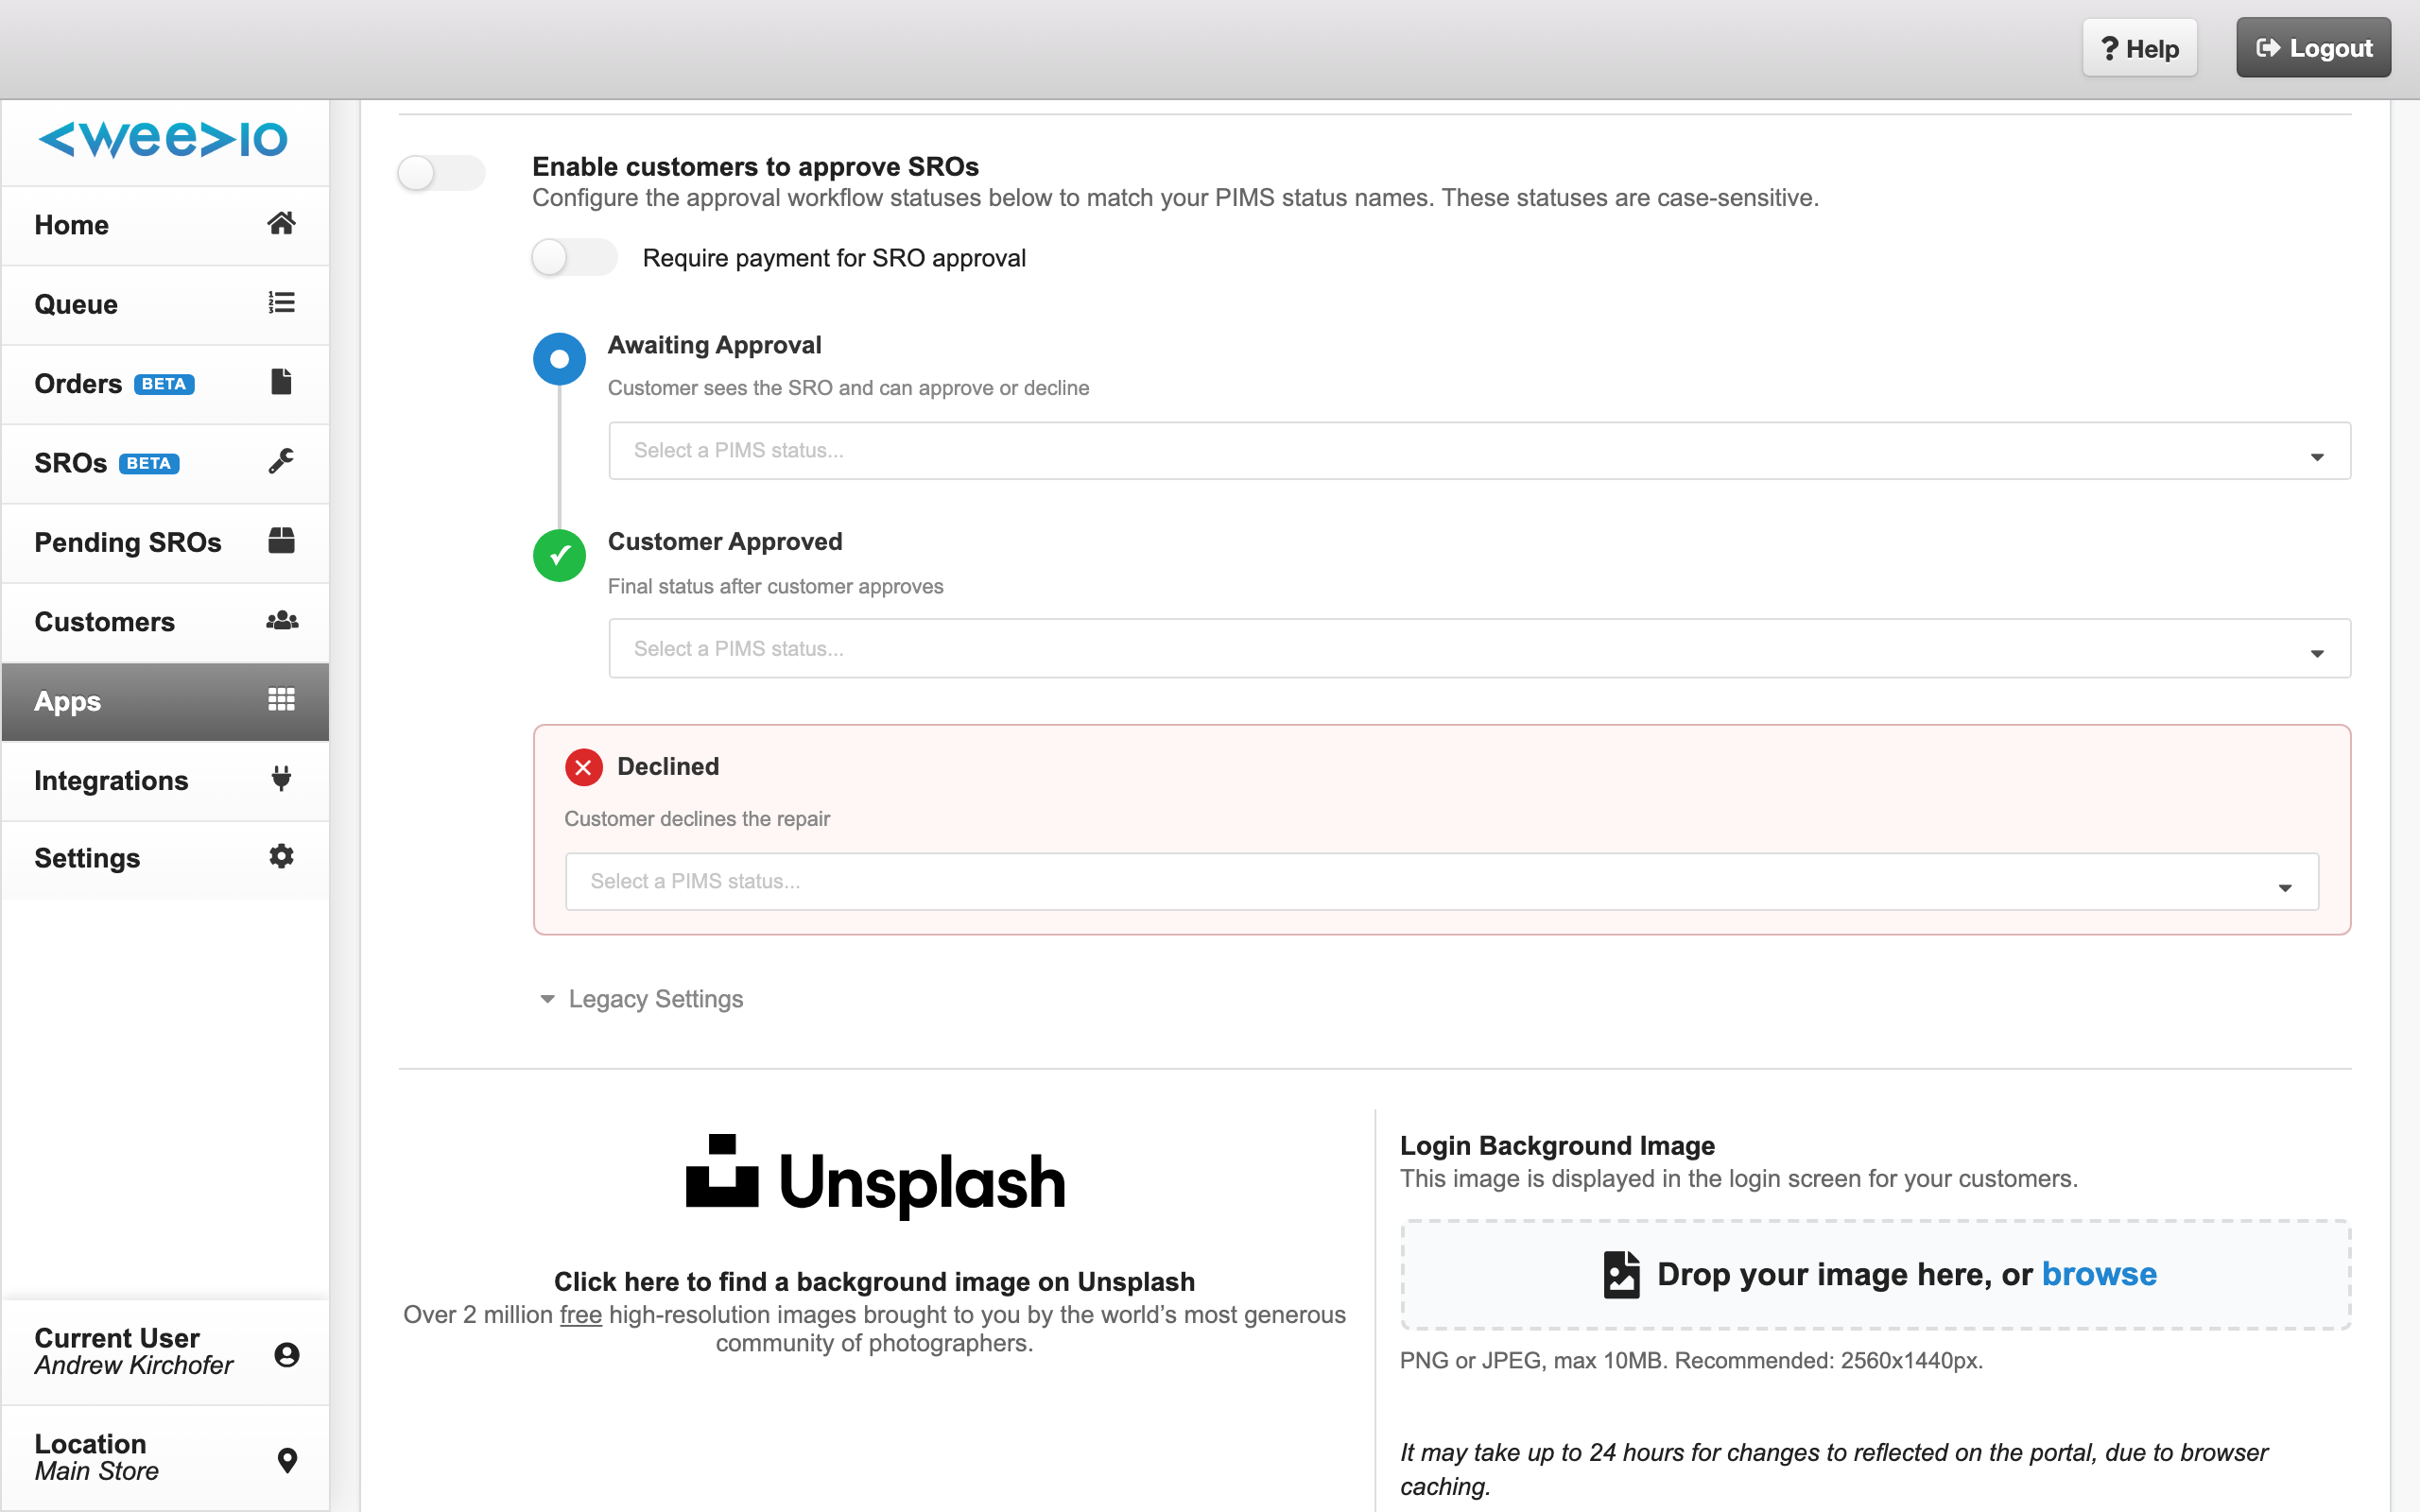
Enabling the Approval Workflow
Configure PIMS statuses
Before enabling the workflow, set the PIMS statuses for each stage. At minimum, configure:
- Awaiting Approval status
- Customer Approved status
- Declined status
Each field provides a searchable dropdown populated from your PIMS status records.
Enable the feature toggle
Toggle Enable customers to approve SROs to on. The toggle will not activate until the required statuses are configured.
Workflow Status Settings
The settings display as a visual timeline showing the SRO progression through the approval process:
| Setting | Description |
|---|---|
| Awaiting Approval | PIMS status when the SRO is waiting for the customer's decision. Triggers the repair to appear in the customer's Action Required tab. |
| Awaiting Payment | PIMS status after approval but before payment. Only visible when Require payment is enabled. |
| Customer Approved | Final PIMS status after the customer approves (and pays, if required). |
| Declined | PIMS status when the customer declines the repair. |
Note:
Status names are case-sensitive and must exactly match the status records configured in your PIMS system.
Require Payment Toggle
Enable Require payment for SRO approval to require non-terms customers to pay after approving before work proceeds. When enabled:
- The Awaiting Payment step appears in the workflow timeline
- Customers see a payment prompt after approving
- SROs stay in "Awaiting Payment" until checkout is completed
- Terms customers (Net 30, On Account, Invoice, etc.) skip this step automatically
Legacy Settings
If you previously used the comma-separated SRO status text field, those settings are preserved in a collapsible Legacy Settings section. New configurations should use the workflow status dropdowns above.
Need Help?
For assistance, please send a message to our Support page.